The volume of event logs generated per system is increasing daily, mostly due to sophistication in hardware and software, which requires greater monitoring for cases of abnormality and second, as a security measure that demands more event logs to understand external intervention in the system. Centralising this voluminous log data to a dedicated log server over the network is essential even for a medium scale organisation, in order to have an overall view of what is happening across the IT infrastructure. This article will help readers who are new to this subject, to configure a small and centralised remote-logging set-up.
Rsyslog is an open source software framework for log processing on GNU/ Linux and UNIX platforms. It is a multi-threaded, network-aware, modular, highly customisable system that is suitable for any currently conceivable logging scenario.
Let us consider some of the typical logging scenarios of Rsyslog.

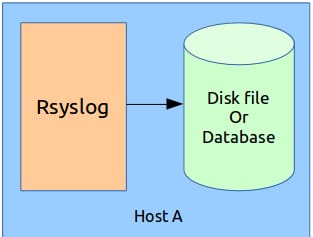
1. Single host configuration
This is the simplest configuration in which the Rsyslog server stores the log messages in the same machine, either in a disk file or database see Figure 1.
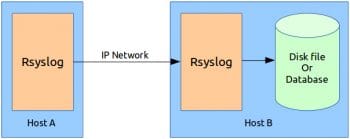
2. Dual host configuration
Here, two Rsyslog servers are physically separated over an IP network via WAN or LAN and the second Rsyslog server acts as a dedicated log server see Figure 2.

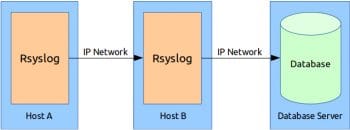
3. Dual host with a remote database server
The database server is also physically separated from the log server over an IP network see Figure 3.

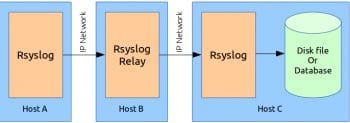
4. Triple host configuration with a Rsyslog relay server
The middle Rsyslog server relays the log messages coming from Host A to Host C, the log server. Other possible configurations are more or less some combination of these four basic forms see Figure 4.
Now lets configure our Rsyslog server in the dual host configuration discussed above. I have used the Ubuntu 14.04 LTS version for this set-up, though you can select any distribution of your choice. We have two hostsUbuntu1404lts1 (IP:10.0.6.100) and Ubuntu1404lts2 (IP:10.0.6.101), where the former forwards all its log messages to the latter via TCP/IP, which in turn stores all received log messages to a local MySQL database. Let’s install the required packages for our set-up. Rsyslog version 6 and above and any MySQL version will suffice. If any of these packages are already installed in your system, you can skip that step. To check, you can run the following command at the shell:
dpkg-query -s <package-name>
Install Rsyslog on both the hosts, Ubuntu1404lts1 and Ubuntu1404lts2, as follows:
sudo apt-get install rsyslog
Install rsyslog-mysql for MySQL support on Ubuntu1404lts2, using the following command:
sudo apt-get install rsyslog-mysql
Install mysql-server on Ubuntu1404lts2 by issuing the following command:
sudo apt-get install mysql-server
Now, lets create the required database structure in a MySQL server to store log messages, for which we need the database schema definition given in the createDB.sql file available in the Rsyslog source archive. I have taken the file from the Rsyslog version 7.4.10 source archive at http://www.rsyslog.com/files/download/rsyslog/rsyslog-7.4.10.tar.gz. The path to the file is ./rsyslog-7.4.10/plugins/ommysql/createDB.sql.
To create the database structure, run the following command in the Ubuntu1404lts2 host:
mysql -u root -p < createDB.sql
Or if you cant get the above SQL file, you can copy-paste the following SQL commands at the MySQL console to create the required database structure:
CREATE DATABASE Syslog;
USE Syslog;
CREATE TABLE SystemEvents
(
ID int unsigned not null auto_increment primary key,
CustomerID bigint,
ReceivedAt datetime NULL,
DeviceReportedTime datetime NULL,
Facility smallint NULL,
Priority smallint NULL,
FromHost varchar(60) NULL,
Message text,
NTSeverity int NULL,
Importance int NULL,
EventSource varchar(60),
EventUser varchar(60) NULL,
EventCategory int NULL,
EventID int NULL,
EventBinaryData text NULL,
MaxAvailable int NULL,
CurrUsage int NULL,
MinUsage int NULL,
MaxUsage int NULL,
InfoUnitID int NULL ,
SysLogTag varchar(60),
EventLogType varchar(60),
GenericFileName VarChar(60),
SystemID int NULL
);

CREATE TABLE SystemEventsProperties
(
ID int unsigned not null auto_increment primary key,
SystemEventID int NULL,
ParamName varchar(255) NULL,
ParamValue text NULL
);
To confirm that the database has been successfully created, check the list of databases for the new database, Syslog, using the following command:
show databases;
Create a new MySQL user and grant permission to use the newly created database, as shown below. In our set-up, the username is rsysloguser and the password is rsyslogpw.
CREATE USER rsysloguser@localhost IDENTIFIED BY rsyslogpw; GRANT ALL ON Syslog.* TO rsysloguser@localhost;

The last step is to configure Rsyslog in both the hosts. The configuration file is located at /etc/rsyslog.conf. To understand the structure of this file, lets have a look at the basic message processing work-flow of Rsyslog (see Figure 5). For each type of log source, we have a separate input module, e.g., imtcp for receiving log messages over TCP/IP, imklog for the kernel log, etc. Similarly, for each type of log destination, there is a separate output module, e.g., omfwd to forward the log to a remote host over the IP network, ommysql to send logs to a MySQL server, etc. To enable a particular type of input or output, we have to load the respective modules using module(load=<module>,
) before we create the input(type=<input-module>
) and action(type=<output-module>
) configuration objects to actually process logs to and from them. Some of the input and output types are natively supported by Rsyslog, so we need not load the respective modules before use, e.g., omfwd can be directly used in action(
) objects before loading them. Similarly, for some modules, loading is sufficient to get log messages from the source, input(
) and objects are not required, e.g., imklog.
Next, a set of rules needs to be specified to match log messages against a particular input type. Finally, on matching, a set of log messages will be redirected to output via action(
) objects. Now lets configure Rsyslog on the first host, Ubuntu1404lts1, as follows:
sudo gedit /etc/rsyslog.conf /etc/rsyslog.conf on Ubuntu1404lts1 #### MODULES #### # Load modules module(load=imuxsock) # For local system log, input() optional module(load=imklog) # For kernel log, input() not required #### RULES #### # Rule to send all local log messages to Ubuntu1404lts2 *.* action( type=omfwd # output module to be used Target=ubuntu1404lts2 # ip also can be specified Port=514 Protocol=tcp )
Host Ubuntu1404lts1 has to do the following:
1. Receive its own system and kernel log messages, and
2. Send them to Ubuntu1404lts2 over TCP/IP.
Lets move to the configuration on the second host, Ubuntu1404lts2, by issuing the following code:
/etc/rsyslog.conf on Ubuntu1404lts2
#### MODULES ####
# Load modules
module(load=imtcp) # For TCP input support
module(load=ommysql) # For MySQL output support
#### RULES ####
# Create a ruleset
ruleset(name=rsRemoteTCP) {
*.* action(
type=ommysql
server=localhost
serverport=4403
db=Syslog
uid=rsysloguser
pwd=rsyslogpw
)
}
# Bind the ruleset to tcp input
input(
type=imtcp
port=514
ruleset=rsRemoteTCP
)

This host has to:
1. Receive all the log messages from Ubuntu1404lts1, and
2. Send them to the local MySQL database that we have previously created.
Now restart the Rsyslog service on both the hosts as follows:
sudo service rsyslog restart
To test the set-up, lets write a small C program called test_logger.c on Ubuntu1404lts1 as shown below:
#include <syslog.h>
#include <stdlib.h>
#include <stdio.h>
int main(int argc, char* argv[])
{
unsigned int count, index;
count=( argc==2 )? atoi(argv[1]) : 10;
openlog(TestLogger,LOG_PID,LOG_LOCAL7);
for(index=0;index<count;index++)
{
printf(Test log generated [count=%d]\n,index);
syslog(LOG_INFO,Test log message %d,index);
sleep(1);
}
closelog();
return 0;
}
Compile the program as follows:
gcc test_logger.c -o test_logger
Run the executable on Ubuntu1404lts1 with the number of logs to be generated as the argument, by using the following command:
./test_logger 5
To check for log messages in the database, log into the MySQL server on Ubuntu1404lts2 and run the SQL query as follows:
mysql -u rsysloguser -p <<Enter password>> mysql>USE Syslog; mysql>SELECT ID,fromHost,Message ->FROM SystemEvents ->WHERE Message LIKE %Test log%; +------+----------------+---------------------+ | ID | fromHost | Message | +------+----------------+---------------------+ | 1015 | ubuntu1404lts1 | Test log message 0 | | 1016 | ubuntu1404lts1 | Test log message 1 | | 1017 | ubuntu1404lts1 | Test log message 2 | | 1018 | ubuntu1404lts1 | Test log message 3 | | 1019 | ubuntu1404lts1 | Test log message 4 | +------+----------------+---------------------+ 5 rows in set (0.00 sec) mysql>
So, we can see that all our test messages from Ubuntu1404lts1 are successfully logged in the database.
A lot more customisation can be done with Rsyslog configuration. You can create your own message format, filter the messages based on facility, priority, source or other criteria. Message transmission can be made secure using TLS (SSL). Apart from computers, now-a-days, network elements also come with Rsyslog support, using which you can receive log messages directly from network switches and routers in such a centralised logging set-up. So, interested readers should definitely refer to the official Rsyslog manual and explore all other features and possibilities.
References
[1] http://www.rsyslog.com
[2] http://www.tutorialspoint.com/unix/unix-system-logging.htm
[3] http://tecadmin.net/setup-centralized-logging-server-using-rsyslogd/
[4] http://www.techrepublic.com/blog/linux-and-open-source/set-up-rsyslog-to-store-syslog-messages-in-mysql/
[5] http://www.rsyslog.com/doc/v8-stable/tutorials/tls_cert_summary.html


