The problem with working on computers is that one experiences a certain type of physical strain because of constantly sitting in front of the keyboard, while the eyes suffer due to excess exposure to the monitors light. This is worse when using a laptop, especially at night when working in bed without the lights on. This article looks at the latter scenario and recommends the use of Redshift to protect your eyes. The position one sits in can be adjusted based on comfort, and coloured light from the monitor can be reduced by using computer glasses or following the common 20-20-20 rule, which states that you need to rest your eyes after every 20 minutes for a period of 20 seconds by looking at objects which are at least 20 metres away. If you do not take enough care, you will suffer from red eyes, blurred vision, headaches, etc. If this continues over a long period of time, you might even suffer from computer vision syndrome (CVS). The disadvantage of using computer glasses is that they are costly (the basic versions start from about ` 5000 (US$ 85) in India. There may be other problems associated with these glasses like not being comfortable, leaving marks on the face and negatively altering a persons appearance. I suggest that you use them, even if you are using Redshift, and maybe you can increase the time limit for constantly working on a screen to 30 minutes or an hour from the earlier twenty minutes.
How Redshift works
Jon Lund Steffensen (the creator of Redshift) says that he created his own tool, as f.lux didnt work well for him. He made it open source (GPLv3) and it is under constant development. You can contribute to its development at https://github.com/jonls/redshift. The working of Redshift is simpleit adjusts the temperature of the monitor based on the time and the surroundings. In the background, it makes use of the RandR (resize and rotate) communication protocol extension for X11 and Wayland (which is supposed to replace the X11) protocol for the display servers to adjust the colour. An alternative to RandR is the VidMode extension. Redshift can also be configured to change the colours individually and to reduce the brightness in a different manner. It actually doesnt reduce the light from the monitor but it applies a black filter to the screen, which creates a similar effect. Adjusting both the temperature and the brightness makes the monitor very eye friendly. Figures 1, 2 and 3 give three screenshots of opensourceforu.com with Redshift in various configurations.


Installing Redshift
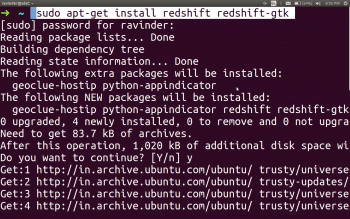
Ubuntu/Debian: Installing Redshift in Debian/Ubuntu can be done by issuing the following command in a terminal:
sudo apt-get install redshift redshift-gtk
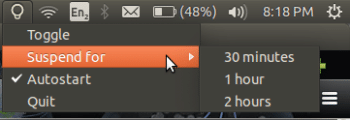
After installing the redshift-gtk you get the status icon in the tray with which you can control Redshift very easily. You can toggle between On, Off and Pause Redshift for certain periods if you are doing colour sensitive work such as editing pictures or videos.
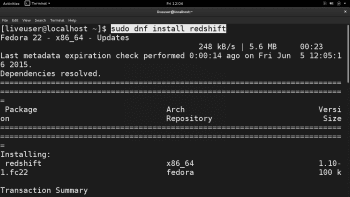
Fedora/Red Hat: In these systems, you can use the Yum package manager to install Redshift, as follows:
sudo yum install redshift redshift-gtk
Note: In the recent version of Fedora 22, Yum is replaced by dnf, which is better. So dnf should be used in place of yum in the above command.
SUSE based systems: If you are using a system based on Suse you can use zypper as below:
sudo zypper install redshift redshift-gtk
Arch based systems: The command for Arch linux will be:
sudo pacman -S redshift redshift-gtk
If you are using some other Linux distro in which the package manager doesnt have the package Redshift, you can install it from the source using the following commands:
wget -c https://github.com/jonls/redshift/releases/download/v1.10/redshift-1.10.tar.xz

tar xf redshift-1.10.tar.xz

cd redshift-1.10/

./configure --prefix=$HOME/redshift/root \
--with-systemduserunitdir=$HOME/.config/systemd/user

make

make install
Note: Earlier, version 1.8 redshift-gtk was known as gtk-redshift so you might need to change the name while installing. Also, there is redshift-qt for the KDE desktop.

Configuring Redshift
By default, Redshift configures itself based on the users location. The location is obtained using GeoClue which may or may not work out-of-the-box, in all cases. It can be configured manually. Uninstall the Redshift-gtk and not Redshift, and follow the steps below to use Redshift without the GUI.
Location: The location for Redshift can be set manually by using the -l(location) flag:
redshift -l 22.5:88.3
The above is the latitude and longitude of Kolkata, which works for most of India. Feel free to change the above value to that of the city which is nearest to you.
Temperature: The temperature of the screen can be set by using the -t(temperature) flag:
redshift -t 4500:3000
where 4500 is the daytime temperature and 3000 is the night temperature.
Brightness: The brightness of the screen can be set by using the -b (brightness) flag. And the value for it can be between 0.1 and 1.0.
redshift -b 0.8
Note: As I have mentioned above, brightness doesnt reduce the light from the screen but it applies a grey filter, which creates a similar effect. And you can combine the above commands according to your needs.

Configuration file: You can also use a configuration file instead of the above commands. Here is the configuration file example given by Jon Lund Steffensen in the Redshift website. You can create the new file in your favourite editor and put it at ~/.config/redshift.conf:
; Global settings for redshift [redshift] ; Set the day and night screen temperatures temp-day=5700 temp-night=3500 ; Enable/Disable a smooth transition between day and night ; 0 will cause a direct change from day to night screen temperature. ; 1 will gradually increase or decrease the screen temperature. transition=1 ; Set the screen brightness. Default is 1.0. ;brightness=0.9 ; It is also possible to use different settings for day and night ; since version 1.8. ;brightness-day=0.7 ;brightness-night=0.4 ; Set the screen gamma (for all colors, or each color channel ; individually) gamma=0.8 ;gamma=0.8:0.7:0.8 ; This can also be set individually for day and night since ; version 1.10. ;gamma-day=0.8:0.7:0.8 ;gamma-night=0.6 ; Set the location-provider: geoclue, geoclue2, manual ; type redshift -l list to see possible values. ; The location provider settings are in a different section. location-provider=manual ; Set the adjustment-method: randr, vidmode ; type redshift -m list to see all possible values. ; randr is the preferred method, vidmode is an older API. ; but works in some cases when randr does not. ; The adjustment method settings are in a different section. adjustment-method=randr ; Configuration of the location-provider: ; type redshift -l PROVIDER:help to see the settings. ; ex: redshift -l manual:help ; Keep in mind that longitudes west of Greenwich (e.g. the Americas) ; are negative numbers. [manual] lat=22.5 lon=88.3 ; Configuration of the adjustment-method ; type redshift -m METHOD:help to see the settings. ; ex: redshift -m randr:help ; In this example, randr is configured to adjust screen 1. ; Note that the numbering starts from 0, so this is actually the ; second screen. If this option is not specified, Redshift will try ; to adjust _all_ screens. [randr] screen=0
Note: I suggest that you do not use the screen option in the configuration file to adjust all screens, like external monitors too.

Making Redshift a start-up application: You can make Redshift start at boot using the status icon in Ubuntu. If you have any difficulty with the status icon, you can add Redshift to the start-up application, manually.
If you cant find the start-up application in your Linux distribution desktop environment, you can also add this file at ~/.config/autostart/redshift.desktop.
[Desktop Entry]
Type=Application
Exec=redshift -O 3000
Hidden=false
NoDisplay=false
X-GNOME-Autostart-enabled=true
Name[en_IN]=Redshift
Name=Redshift
Redshift vs f.lux
The most important reason to use Redshift rather than f.lux is the freedom that comes with it. It is licensed under GPLv3 and works very well with GNU/Linux (it can be used for Windows too). The only disadvantage is that it cant be installed on OSX. If you face any difficulties with Redshift, you can report them at https://github.com/jonls/redshift/issues/new.
References
[1] http://jonls.dk/redshift/
[2] https://github.com/jonls/redshift


