BigBlueButton is Voice over IP (VoIP) based Web conferencing software. This tool is helpful for remote learning, virtual classrooms, distance education, online learning, etc. Some of the features of BigBlueButton include:
- Recording and playing back the entire session
- Whiteboard for lectures (similar to a blackboard in a classroom)
- Desktop sharing
- Integrated VoIP for listening and speaking
- Presentations (any PDF or presentation file can be uploaded for teaching)
- Webcam that can be shared between users
- Private and group chat (in case the teacher wants to chat with a student, or the students and teachers want to chat within a group)
This tool is completely open source and the API is provided for deployment in a local server. There is also a developer version available for continuous development of the software.
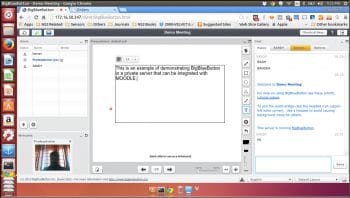
BigBlueButton displays three windows within a browser. The left side window shows the list of users that have joined during the session, the Web camera controls, as well as the audio and video controls. The middle window shows the whiteboard on which the teacher can write, scribble, type, draw, etc, and which can be broadcast to all the viewers. And the right side window is a chat window, in which all the users chat as a group or individuallywith the teacher or other users (see Figure 5 for more details).
Installing BigBlueButton in Ubuntu
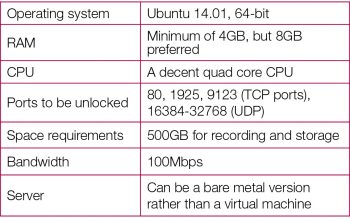
BigBlueButton recently released version 0.9.0 that can be installed mainly on an Ubuntu 14.04 OS, which is released with long term support (LTS). Table 1 gives the recommended prerequisites for installation in a server.
Installation of BigBlueButton in a server is a long process. It involves the downloading of around 500MB of software, and takes two to three hours to complete.
Before installing the software, the following things have to be checked:
- The locale should be en_US.UTF-8
- Check it using the following commands:
$ cat /etc/default/locale LANG=en_US.UTF-8 LANGUAGE=en_IN:en if not, then install the packages, $ sudo apt-get install language-pack-en $ sudo update-locale LANG=en_US.UTF-8
Also check the version of Ubuntu:
$ cat /etc/lsb_release DISTRIB_ID=Ubuntu DISTRIB_RELEASE=14.04 DISTRIB_CODENAME=trusty DISTRIB_DESCRIPTION=Ubuntu 14.04.2 LTS
Once the checks are over, here is how to go about the installation of BigBlueButton.
Server update
Check if trusty multiverse is there in the sources.list; if not, add the following:
$ grep multiverse /etc/apt/sources.list
The output should have the following:
deb http://in.archive.ubuntu.com/ubuntu/ trusty multiverse
If the above line is not there, you can add the following command:
$ echo deb http://us.archive.ubuntu.com/ubuntu/ trusty multiverse | sudo tee -a /etc/apt/sources.list
Now update the server before proceeding to the next step, with the following command:
$ sudo apt-get update
$ sudo apt-get dist-upgrade
Once the upgrading is over, restart the OS and lets move on to installing LibreOffice. Ubuntu comes with LibreOffice 4.2.7, and BigBlueButton uses LibreOffice 4.3 for document conversion, so the PPA for LibreOffice 4.3 version has to be added:
$ sudo apt-get install software-properties-common
$ sudo add-apt-repository ppa:libreoffice/libreoffice-4-3
Installing the key of BigBlueButton
The local machine needs to access the BigBlueButton server, so the key has to be installed. Here is the command for installing the key:
$ wget http://ubuntu.bigbluebutton.org/bigbluebutton.asc -O- | sudo apt-key add - $ echo deb http://ubuntu.bigbluebutton.org/trusty-090/ bigbluebutton-trusty main | sudo tee /etc/apt/sources.list.d/bigbluebutton.list $ sudo apt-get update
Installing ffmpeg
ffmpeg needs to be installed since it creates the playback components like audio, video, presentation, desktop sharing, etc. This tool needs other dependencies also, so a group of tools has to be installed. Some customisation is also needed in the OS. So the entire code is pasted in a shell script and the script runs the commands, one by one.
Simply copy-paste the following code into a ffmpeg_install.sh file:
sudo apt-get install build-essential git-core checkinstall yasm texi2html libvorbis-dev libx11-dev libvpx-dev libxfixes-dev zlib1g-dev pkg-config netcat libncurses5-dev
FFMPEG_VERSION=2.3.3
cd /usr/local/src
if [ ! -d /usr/local/src/ffmpeg-${FFMPEG_VERSION} ]; then
sudo wget http://ffmpeg.org/releases/ffmpeg-${FFMPEG_VERSION}.tar.bz2
sudo tar -xjf ffmpeg-${FFMPEG_VERSION}.tar.bz2
fi
cd ffmpeg-${FFMPEG_VERSION}
sudo ./configure --enable-version3 --enable-postproc --enable-libvorbis --enable-libvpx
sudo make
sudo checkinstall --pkgname=ffmpeg --pkgversion=5:${FFMPEG_VERSION} --backup=no --deldoc=yes --default
Now, run:
$ sh ffmpeg_install.sh
This process will take more than an hour to install ffmpeg, and it adds some modules into the kernel to support the audio, video, etc.
Installing BigBlueButton
Finally, install the BigBlueButton software using the following command:
$ sudo apt-get install bigbluebutton
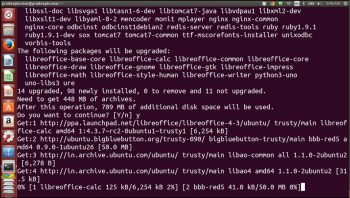
The above command will install the entire library of software with all the necessary dependencies, and this will download as much as 400MB of software from the server. Figure 1 shows the installation of BigBlueButton.
Installation of demo software
If you want to see a demonstration of how BigBlueButton is used, you can install the software using the following command:
$ sudo apt-get install bbb-demo
If you want to remove this demo software, then use the following command:
$ sudo apt-get purge bbb-demo
Other settings
To enable the WebRTC (audio) for the server, the following command can be used:
$ sudo bbb-conf --enablewebrtc
To make a clean restart of the BigBlueButton server, you can use the following commands:
$ sudo bbb-conf --clean
$ sudo bbb-conf --check
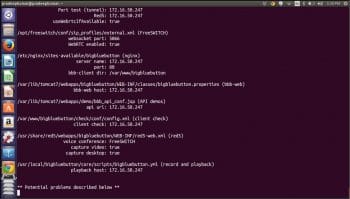
–clean will clear all the log files of BigBlueButton, and –check will search through and find any errors. See Figure 2 for the –check command. The IP address allocated to my server is 172.16.50.247 (its a local IP). To check the status of my server, you can look at Figure 3.
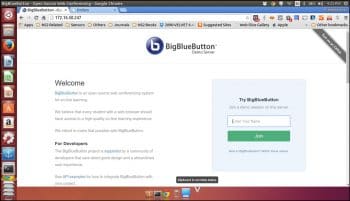
Once the demo server is opened, just distribute the IP addresses so that the users can be connected to the IP and can join the session. In the first session, the browser checks for devices like microphones, speakers and webcams. The users have the option of joining the session only as listeners or both as listeners and speakers. In case users dont want to allow the browser to access a particular device, they can block that device within the browser.
Integrating BigBlueButton with Moodle (a case study)
Moodle is an open source learning management system (LMS) that comes with various plugins for additional functionalities. BigBlueButton also has two plugins RecordingsBN and BigBlueButtonBN
BigBlueButtonBN: This plugin integrates Moodle and BigBlueButton, so that a teacher can create an activity within Moodle and the students can join the session. The teacher has total control of the session. The students can join the session only after the teacher joins the session. Also, the session can be recorded by the teacher and may be used later.
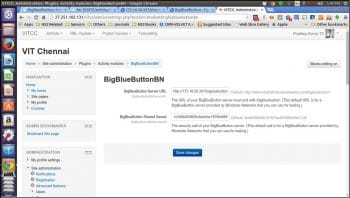
This plugin accepts two input URLs and a secret key (this setting will be set by the administrator of Moodle). The teachers and the students need not have any control over this setting. The secret can be obtained using the following commands:
$ sudo bbb-conf --secret
URL: http://172.16.50.247/bigbluebutton/
Secret: 1c5d8b004826c6edcbe19fxxxxxxxxxx
Both the above parameters have to be set as shown in Figure 4.
Figure 5 is a demonstration of a lecture on a whiteboard, wherein a teacher is typing some information and there are two other users in the session, listening in. The users are viewing the video of the teacher, to whom they can send messages through the window provided in the right hand column.
Using the open source tools Moodle and BigBlueButton, a huge amount of money can be saved by colleges and universities across the country. These institutions need to step forward and motivate students and faculty members to learn and use open source tools for their education.
Useful links
To download BigBlueButton: http://docs.bigbluebutton.org/install/install.html
To download Moodle: http://moodle.org


