With the growth and development of cloud computing technology there has been a corresponding rise in NoSQL databases. In order to understand NoSQL databases, we have to study the need for them. Before one heard about NoSQL, there were many types of databases and related technologies. Most of these were relational databases, and to work on these effectively, SQL or structured query languages were developed. But these databases, as well as SQL, posed complex problems, for which developers tried to find alternate solutions. Some major problems were rigid schema designs, joins, child-parent dependencies, and so on. Developers had to look for alternatives that would ease these common problems with relational databases and SQL. Hence, Not only SQL or NoSQL came into existence, which offered support for SQL-like query languages, besides other features. Some of its key features are:
- Dynamic schema design or non-schema
- No dependency (non-relational model)
- Flexibility
The following are the types of NoSQL databases (DBs) commonly found in todays market:
- Key-value databases
- Document databases
- Column family store databases
- Graph databases
In this tutorial, we will start looking into different databases, beginning with a document based DB called MongoDB, which is quite popular among developers worldwide.
MongoDB
This is a document based NoSQL DB. It has become quite popular in recent years and many big organisations are major supporters of it. It was initially launched in 2009, and is developed and distributed by the 10gen organisation. It is open source and is freely available for developers to explore and learn.
MongoDB set-up and installation
MongoDB comes in both 32-bit and 64-bit versions for different OS platforms. You can get the installation details from the MongoDB site.
Note: It is always preferable to install the 64-bit version for better performance.
Installation on Ubuntu
Installation on Ubuntu is very easy unlike the complexity with a Windows machine. If you want a simple installation, then follow the steps mentioned below.
Run the following commands from a terminal:
$ sudo apt-get update$ sudo apt-get install Mongoloid install y mongodb-org |
Start the mongod service by executing the commands shown below:
$ sudo service mongod start |
Open another terminal window and execute the following command:
$ mongo |
The above command opens the shell prompt, which will connect to MongoDB.
Your MongoDB installation is now complete and ready to be used.
Sometimes, the above method may not work for Debian Linux. Dont be disheartened; download the .gz file of MongoDB. For me, it is mongodb-linux-x86_64-debian71-3.0.1.gz. Extract it by using the following command:
# tar xvzf mongodb-linux-x86_64-debian71-3.0.1.gz |
After that, run the command shown below:
export PATH=$PATH:/mongodb/mongodb-linux-x86_64-debian71-3.0.1/bin |
The above command adds the MongoDB binary directory to the Linux path.
Run the following commands to run the service:
# cd /mongodb/mongodb-linux-x86_64-debian71-3.0.1/bin# ./mongod --dbpath=/data/mongodb3 |
A better way to do the above task is to put both commands in one file saved as mongo1.sh, then run the mongo1.sh shell script.
For the Mongo terminal, run the following commands:
# cd /mongodb/mongodb-linux-x86_64-debian71-3.0.1/bin# ./mongo |
You can save both commands in a file saved as mongo2.sh, and then run the mongo2.sh shell script.
You can install MongoDB in Windows too. Check the steps of the installation under the NoSQL tab of L4wisdom.com.
MongoDB with Python
Now lets study how Python and MongoDB interact. You can run MongoDB and Python programs on Linux. In order to install the pymongo module, you can take advantage of the PIP program. Use the following command:
# pip install pymongo |
After entering the command, the progress of the installation will be displayed.
Now lets explore some Python code for MongoDB.
Insert data with Python. MongoDB stores the data in the JSON format. I am presenting a JSON file named test.json for testing:
{Records: [{record: from socrates to sartre: the philosophic quest (paperback),ID: 39},{record: the magic of believing by bristol claude m.-english-embassy books-paperback (paperback),ID: 40},{record: haunted: hardy boys (paperback),ID: 42},{record: the intelligent investor (paperback),ID: 44},{record: understanding & worshiping sri chakra (paperback),ID: 45},{record: pmr: i too had a love story (paperback),ID: 55}]} |
In the above JSON file, the record field represents the actual record and the ID field represents the number (record number).
Now, lets insert the test.json file in MongoDB using Python:
import jsonimport pymongoconnection = pymongo.MongoClient(mongodb://localhost)db=connection.bookrecord1 = db.bookcollectionpage = open(test.json, r)parsed = json.loads(page.read())for item in parsed[Records]:record1.insert(item) |
Run the code using the following command:
# python insert.py |
Just be sure that test.json is present in the same directory.
Now, lets go over each and every line.
The first two lines are importing the json and pymongo module.
Code line connection = pymongo.MongoClient (mongodb://localhost) establishes a connection to the database. The next line is db=connection.book handle to the book database. Code line record1 = db.bookcollection; here, record1 contains a collection of records. In the next line, page = open (test.json, r) the variable page contains the test.json file. And in the following line, the variable parsed contains the file in json format. If you want to view the records from the MongoDB command line, use the commands as shown below.
The code line for the item in parsed[Records]: shows that we are interested in parsed[Records]. The last line inserts the records one by one in record1 collection.
If you want to view the records from the MongoDB command line, use the following command:
# use book# db.bookcollection.find() |
Find the data with Python
In the previous code snippet, we inserted the records in the record1 collection of books database. Now we are going to discuss the code to view the records.
Here is the minimum code named using_find.py to view the records:
import pymongoconnection = pymongo.MongoClient(mongodb://localhost)db=connection.bookrecord1 = db.bookcollectioncursor = record1.find()for doc in cursor:print doc |

I think you are acquainted with the first four lines. Code line cursor = record1.find() tells the cursor to contain all the records. If you print the cursor variable, it will give you addresses like <pymongo.cursor.Cursor object at 0x1aac810>
In order to print the cursor document, we have used the for loop.
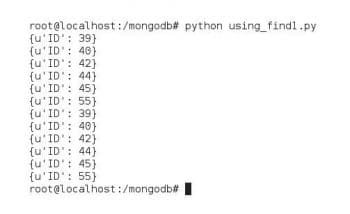
Run the program and you will get the output shown in Figure 1.
Lets assume that you want to display a particular field. Make some amendments to the above code. Replace the following line
cursor = record1.find() |
…with
cursor = mo.find({},{«ID»:True,«_id»:False}) |
and run the program again. The output will be like whats shown in Figure 2.
Here, ID is a particular field.

Now lets assume that you want to display a particular type, say, ID= 39. Make amendments to the above program and replace the following line
cursor = mo.find({},{ID:True, _id:False}) with cursor = record1.find({ID:39},{ID:True, _id:False}) |
and run the program again. The output will be like what is shown in Figure 3.

Remove records using Python
You can remove a particular record using the pymongo module. I am going to give the minimum required code del1.py to delete the record.
import pymongoconnection = pymongo.MongoClient(mongodb://localhost)db=connection.bookrecord1 = db.bookcollectionresult = record1.remove({ID:55})print num removed: , result |
Run the above program del1.py and the output will be as shown in Figure 4.

Update records using Python
Python can be used to update records as well as add new fields in a particular record.
In the first update program, lets update an old value. Let us discuss our next program named update1.py.
import pymongoconnection = pymongo.MongoClient(mongodb://localhost)db=connection.bookrecord1 = db.bookcollectionresult = record1.update({ID:45},{$set:{ID:100}})print result |


Run the above program update1.py and the output will be as shown in Figure 5.
Code line record1.update({ID:45},{$set:{ID:100}}) is responsible for updating the record ID=45 to ID= 100. You can check with the help of find programs.
Consider a situation in which you have to add one more field. Now, I am going to present the next code named update2.py.
import pymongoimport datetimeconnection = pymongo.MongoClient(mongodb://localhost)db=connection.bookrecord1 = db.bookcollectionresult = record1.update({ID:100},{$set:{website:l4wisdom.com}})print record1.find_one({ID:100}) |
The above code adds one more field with the value website:l4wisdom.com in the record, whose ID =100.
Run the program update2.py. The output will be as shown in Figure 6.


