
For the past few years, the word cloud has been making waves among techies. Previously, everyone faced the problem of limited space, a fixed location, software accessibility and resource constraints. Now, the cloud is the one-word answer to all these limitations. It is cloud computing that gives us the ability to use a network of remote servers hosted on the Internet to store, manage and process data, instead of a local server or a personal computer. It can be used by multiple users and it can be dynamically reallocated to other business operations, which helps in maximising the use of shared resources.
Almost everyonefrom individuals to top-notch tech companies like EMC, Amazon and Googleis now using the cloud. Even CERN, the famous European nuclear research laboratory, uses OpenStack to manage its IT infrastructure. With the widespread use of the cloud, many open source projects related to cloud computing have evolved, like OpenStack, ownCloud, etc.
Here are a few problems that people often face with the cloud:
(1) Installation: Server administration knowledge is needed
(2) Usage: New resources need to be created
(3) Data security: Concerns about privacy and integrity of data
To address all these problems in one go, an open source enthusiast developed Virtkick, a new cloud infrastructure management tool, and launched it on October 29, 2014. But first lets figure out how the cloud works, before exploring how useful Virtkick is. The cloud is a network of computers working together, but gives users the illusion that they are interacting with a single computer.
In the common mans language, the cloud is made up of three layers:
- The hardware layer (the actual servers)
- The virtualisation layer (which creates the illusion)
- The software layer with the user interface
Virtkick comes into play in the second layer and not only helps in virtualising the hardware but also serves as the panel for managing the different virtual machines created.
Virtkick has all the essential features wrapped in a beautiful user interface just like an app. Its tidy admin panel runs the server without tech expertise and gives users the plug-and-play feel. Even billing is made easy, as the billing mechanism is built into it and the invoices are generated automatically. Now, lets take a walk-through to know more about it.
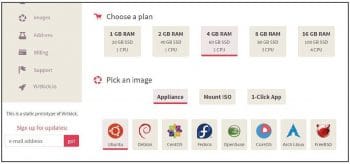
Virtkick has a single button for creating new machines. On clicking it, you get the option to choose from different plans, and each plan has its own configuration involving the RAM (ranging from 1GB to 16 GB), SSD (20GB to 100GB) and CPU (one to four in number).
To create a virtual machine, you need an operating system, for which Virtkick provides Ubuntu, Debian, Fedora and many more to choose from. Driver appliances for various Linux distributions will be added in the future. Another feature coming soon is one-click integration with Sandstorm.
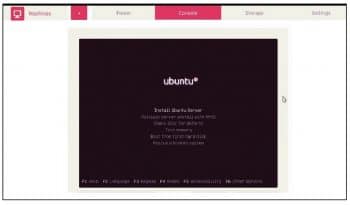
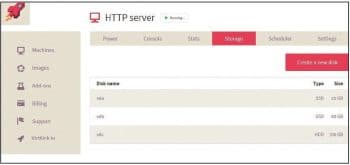
Now, to install a server, go to the console where the options will be shown as in Figure 2. If you wish to add a new disk, click the Storage tab and then create the new disk (see Figure 3). The scheduler helps in automatically scheduling the server. The Stats tab shows you CPU usage, I/O load and the network traffic on the server, and this helps in managing the server. All of this gives the feel of working on a personal computer with just a few installation clicks.
The non-techies guide to installing Virtkick
For the CentOS operating system, just enter yum install https://download.virtkick.io/latest.rpm in a terminal. Then go to http://yourserveri:3000 and skip to the next section, which deals with running the machine. For other environments, clone Virtkick from @https://github.com/virtkick/virtkick-starter#virtkick-take-cloud-back and then run it. Here are four easy steps to installing Virtkick in Ubuntu:
sudo apt-get install gitgit clone https://github.com/virtkick/virtkick-starter.gitcd virtkick-starter./virtkick-start dim |
After the installation, lets take a peek into how this tool works. The Virtkick team has decided to go for a SaaS solution instead of focusing on a self-hosted one. Now what does SaaS mean? You dont have to install Virtkick; you just have to log in to the website, connect with hypervisors via IP/SSH and deploy it for your client. The users can focus on their business and the team will look after all the issuesranging from the upgradation of Virtkick to the proper functioning of SaaS. The inbuilt billing system will help in generating one batch invoice per week, for the client. As far as the billing is concerned, the team has decided to work on a revenue sharing model, where you pay 15 per cent of what you earn through Virtkick.
Virtkick will help you compete with AWS and Digital Ocean, with its simplicity and great user experience. It looks like a mobile app, and works on tablets and phones. You can contact the team at team@virtkick.com. Within months of its launch, it has more than 1000 email subscriptions, around 800 GitHub downloads and 15,000 visitors. To add to the good news, Virtkick was one amongst the 10 cloud service providers to get selected for the Techstars Cloud 2015 for which 1200 companies applied. A hassle-free way to the cloud has arrived, and that is via Virtkick.


