Installation
The FSlint package is part of the official repositories of Ubuntu and Fedora. It can be installed using the apt and yum package managers, respectively. To install FSlint on Ubuntu, execute the commands shown below in a terminal:
[narendra]$ sudo apt-get update # Request updated packages
[narendra]$ sudo apt-get install fslint # Install FSlint package
[narendra]$ whereis fslint # Verify the installation
FSlint: /usr/share/FSlint /usr/share/man/man1/Fslint.1.gz
Thats it. We are done with the installation.
To install FSlint on other GNU/Linux distributions, go through the official website of the FSLint at http://www.pixelbeat.org/FSlint/ which describes installation steps.
Demystifying the GUI interface
Now that the installation is done, let us get our hands dirty with FSlint. For this demonstration, I am using the Ubuntu 14.04.1 MATE edition but FSlints usage and experience should be the same on other distributions.
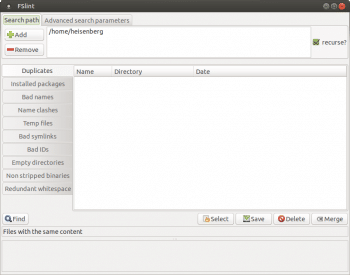
To launch FSlint from the GTK+ GUI, traverse to Applications->System Tools->FSlint. Command line junkies can launch it by executing the fslint-gui command from the terminal. After launching it, you will be shown the main window of FSlint (Figure 1).
FSlint has a few common interface items. Not every tool uses every interface option, so it is important to understand how these buttons and interfaces work. This will make it easier for you to understand their importance at various times. Lets take a look at detailed examples of each of these tools.
Search path tab: After launching FSlint, you will find the Search path tab. This provides Add and Remove buttons, which allow the user to add or remove one or more directory paths to be searched. By default, it searches from the directory that it has been launched from. If it is launched from the GUI, then it starts searching from the users HOME directory.
On the right hand side of the main windows there is a recurse? check box, which determines the depth of the search while searching duplicate files.
Advanced search parameters tab: FSlint allows advanced and powerful filtration with the aid of regular expressions and wild cards. This tab allows the user to exclude certain file types and directories. By default, it excludes a few directory paths and file types, but the user can easily manipulate these settings with the help of the Add and Remove buttons.
There is also an Extra find parameters text box, which is capable of performing a more refined search. This text box is used to pass parameters to the GNU/Linuxs find command. For instance, to search for the files that only belong to the user, Jerry, the user can add the following text: -user id -u Jerry.
Select button: By using this button, the user can select specific files from the results window. It also provides you the option to select multiple entries using wild cards. This button provides other options as well, but these are self-explanatory. Additionally, the user can bring up the same menu by right-clicking within the results window.
Save button: Besides the Select button, there is a Save button. After selecting files, the user can save the search results on the disk. Please note that this will save only the absolute path of the files and not the files themselves. This option is useful if you are planning to do more advanced tasks like providing this result to some automated script.
Delete button: As its name suggests, this button is used to delete selected items. I would advise you to perform this operation very carefully, because it deletes files permanently from the system. Before deleting, a confirmation window will appear each time unless the Ask me this in the future? check box is unchecked.
Merge button: This operation merges all the files within a group into one physical file using links. To do this, either a hard link or a symbolic link will be used depending on the location of the file. Let us suppose you have two duplicate files, namely, file1.txt and file2.txt; then the merge operation will delete one of the files and create a link (using the ln command) to the other file. If one or more duplicate files are present on the same file system, then the merge option will create a hard link; otherwise, it will create a symbolic link.
Find button: The Find button instructs FSlint to perform the selected actions. After completion, it displays the results in the window.
Now that we are familiar with FSlints GUI interface, let us get some insight into it.
Duplicate files
One of the very common forms of file system lint is duplicate files. We often copy music files, documents, images and videos at multiple locations on the file system while taking backups. As duplicates grow, they eat up available disk space. So let us figure out how to find and remove duplicate files with just a few clicks of the mouse.
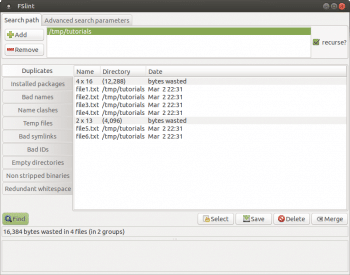
The Duplicates tab on the left hand side of the screen is the default tab selected at FSlint startup. Just choose the appropriate directory using the Add button and then click on the Find button. FSlint will show the summary of the duplicate files in the results window. Figure 2 shows the result of the operation.
All duplicate files are grouped together under a gray bar giving information such as the number of files in the group and the number of bytes wasted in duplicate files. The total number of bytes wasted in all the files and groups is shown below the Find button.
FSlint uses the following algorithm to find duplicate files:
1) First, it scans the file system and filters out the files of different sizes.
2) Then, files of the same size are checked to ensure that these are not hard links.
3) Subsequently, it calculates the checksum of the file using md5sum.
4) Finally, to guard against md5sum collisions, FSlint rechecks signatures of any remaining files using the sha1sum checksum.
Installed packages
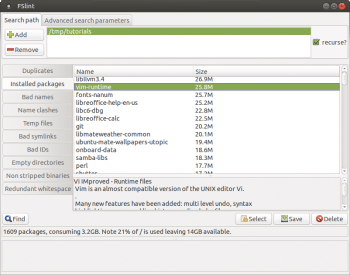
This tool lists the installed packages according to their sizes. It supports the Debian package manager (dpkg), the Red Hat package manager (RPM) and the Packman package manager. When a package is selected, a description of it is shown below the results window in a gray box. Figure 3 shows the results of the operation.
Bad names
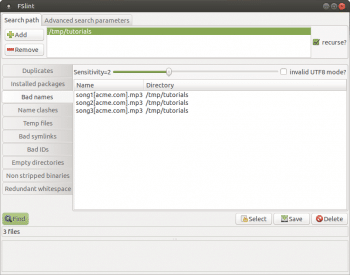
Another common form of file system lint is bad names. Even though they do not eat up disk space, they may be difficult to use or move. The Bad names tool searches all the files and inspects their naming conventions. You can set the sensitivity level by using the slider bar at the top of the selection window. Level 1 implies the least strict while Level 4 implies a strict POSIX check. Besides the slider, there is a check box, which allows you to select UTF-8 checking. The image in Figure 4 shows the results of the operation.
Name clashes
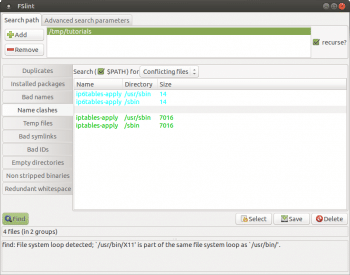
Another form of file system lint involves files that have identical or similar names. This usually does not cause any significant problems for the user other than slight inconvenience. But finding files with name clashes can be of great help when dealing with multiple versions of files (Figure 5).
Temp files
Temporary files eat up a lot of hard disk space. These are created while editing files, while running some programs, or when a program wishes to report and save a problem. Removing these temporary files can free up valuable space, and FSlint can find these files so that they can be purged.
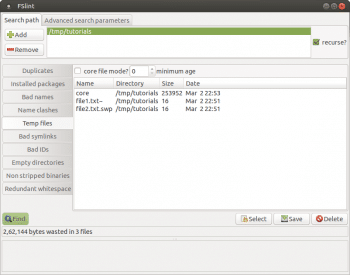
It is also possible to direct the program to find only files of a specified minimum agelike those modified in the last N’ number of days, for instance. When the minimum age is set to 0, FSlint reports all temporary files. FSlint provides a check box core file mode? which enables a more thorough search for the core files. Figure 6 shows the results of the operation.
Bad symlinks
Symbolic links are widely used in GNU/Linux. But broken symbolic links cause great frustration for the user. FSlint looks for symbolic links that have some kind of problem and immediately reports them. It specifically looks for the following problems.
1) Dangling: In this type, a broken symbolic link points to a file that no longer exists in the file system.
2) Suspect: In this type, symbolic links point to a file below their directory structure.
3) Relative: In this type, a symbolic link points to a path that is determined by the current location.
4) Absolute: In this type, a symbolic link points to a path that is determined by the full path.
Note: It seems that there is a bug in the GUI tool for this operation. Because, though the command line tool (/usr/share/fslint/fslint/findbl) reports broken links correctly, the GUI is unable to show correct results.
Bad IDs
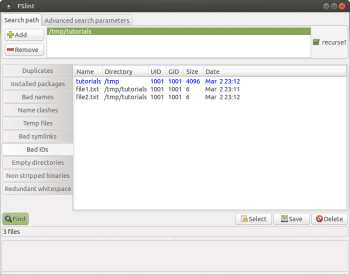
GNU/Linux assigns a positive integer number as user id’ to each user. When the user moves files between multiple computers, a file will occasionally end up with a user ID that the current system cannot resolve to that user. The most common forms of bad IDs are generated when we extract compressed files created by another user on another system. But FSlint finds and reports such problems. Figure 7 shows the results of the operation.
In this example, the FSlint utility reports a file with a bad ID because there is no user or group with ID 1001.
Empty directories
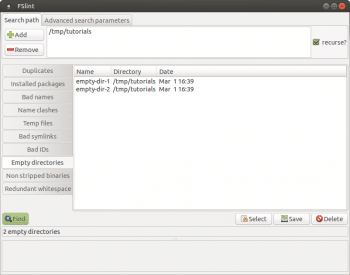
Empty directories clutter a file system, and make it difficult for the average user to find information quickly and efficiently. FSlint can find and clean these annoying empty directories (Figure-8 shows the result of the operation).
Non-stripped binaries
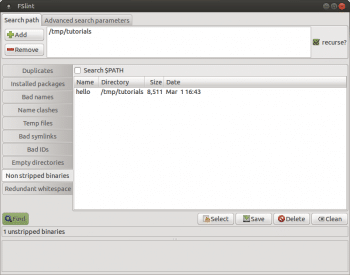
Non-stripped binaries contain extra debugging symbols and tend to be larger in size. These extra debugging symbols are needed while debugging binary files with debuggers like GDB. But often, this extra debugging information is not needed, and a considerable amount of drive space can be freed by stripping the binaries. FSlint finds such non-stripped binaries (Figure-9 shows the result of the operation).
In this example, the hello binary was purposefully compiled to contain debugging information.
With this tool, when the Search $PATH check box is enabled, FSlint searches the system path for non-stripped binaries. This tool provides a Clean button, which removes extra debugging symbols from the binary.
Redundant white spaces
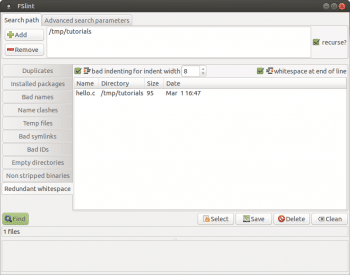
FSlint can check text files for a number of white space issues like unnecessary tabs and spaces. This feature is very useful for programmers and writers who need to be aware of the white space within their files. The average user may never need to use this feature, but knowing about this tool could be beneficial.
This tool also provides the check box for Bad indenting for indent width which checks text files to ensure that the indenting width is uniform. FSlint can also check for a white space at the end of a line. The Clean button will attempt to fix the white space issues in the selected files (Figure-10 shows the result of the operation).
To try this out, let us create a file with a trailing white space, which will look like what follows:
[narendra]$ cat -e hello.c
#include <stdio.h> $
$
int main(void) $
{ $
printf(Hello, World !!!\n); $
$
return 0; $
} $
Now, remove the trailing white space using FSlints clean option. Our modified file will now look like whats shown below:
[narendra]$ cat -e hello.c
#include <stdio.h>$
$
int main(void)$
{$
printf(Hello, World!!!\n);$
$
return 0;$
}$
In the above examples, the dollar ($) symbol implies the end of the line.
FSlint is an extremely useful tool that can be used regularly.
These simple yet powerful utilities make GNU/Linux more interesting. You can always learn more about FSlint by digging into it yourself.


