Cloud computing is the buzzword today. It has many different models, one of which is IaaS. In this article, the authors describes the delivery of IaaS using open source software OpenStack.
Nowadays, cloud computing has become mainstream both in the research as well as corporate communities. A number of cloud services providers offer computing resources in different domains as well as forms. Cloud computing refers to the delivery of computing resources as a service rather than as a product. In cloud services, the computing power, devices, resources, software and information are delivered to clients as utilities. Classically, such services are provided and transmitted by using network infrastructure or simply delivered over the Internet.
Infrastructure as-a-service (IaaS)
IaaS includes the delivery of computing infrastructure such as a virtual machine, disk image library, raw block storage, object storage, firewalls, load balancers, IP addresses, virtual local area networks and other features on-demand from a large pool of resources installed in data centres. Cloud providers bill for the IaaS services on a utility computing basis; the cost is based on the amount of resources allocated and consumed.
OpenStack: a free and open source cloud computing platform
OpenStack is a free and open source, cloud computing software platform that is widely used in the deployment of infrastructure-as-a-Service (IaaS) solutions. The core technology with OpenStack comprises a set of interrelated projects that control the overall layers of processing, storage and networking resources through a data centre that is managed by the users using a Web-based dashboard, command-line tools, or by using the RESTful API.
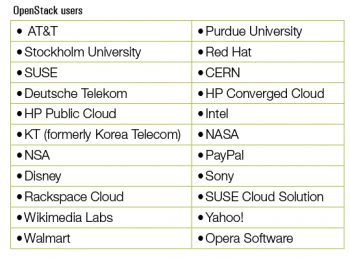
Currently, OpenStack is maintained by the OpenStack Foundation, which is a non-profit corporate organisation established in September 2012 to promote OpenStack software as well as its community. Many corporate giants have joined the project, including GoDaddy, Hewlett Packard, IBM, Intel, Mellanox, Mirantis, NEC, NetApp, Nexenta, Oracle, Red Hat, SUSE Linux, VMware, Arista Networks, AT&T, AMD, Avaya, Canonical, Cisco, Dell, EMC, Ericsson, Yahoo!, etc.
OpenStack computing components
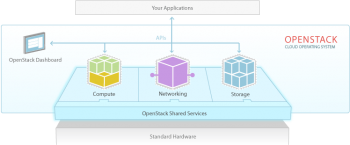
OpenStack has a modular architecture that controls large pools of compute, storage and networking resources.
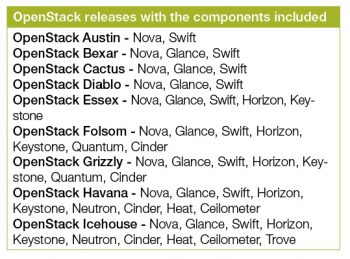
Compute (Nova): OpenStack Compute (Nova) is the fabric controller, a major component of Infrastructure as a Service (IaaS), and has been developed to manage and automate pools of computer resources. It works in association with a range of virtualisation technologies. It is written in Python and uses many external libraries such as Eventlet, Kombu and SQLAlchemy.
Object storage (Swift): It is a scalable redundant storage system, using which objects and files are placed on multiple disks throughout servers in the data centre, with the OpenStack software responsible for ensuring data replication and integrity across the cluster. OpenStack Swift replicates the content from other active nodes to new locations in the cluster in case of server or disk failure.
Block storage (Cinder): OpenStack block storage (Cinder) is used to incorporate continual block-level storage devices for usage with OpenStack compute instances. The block storage system of OpenStack is used to manage the creation, mounting and unmounting of the block devices to servers. Block storage is integrated for performance-aware scenarios including database storage, expandable file systems or providing a server with access to raw block level storage. Snapshot management in OpenStack provides the authoritative functions and modules for the back-up of data on block storage volumes. The snapshots can be restored and used again to create a new block storage volume.
Networking (Neutron): Formerly known as Quantum, Neutron is a specialised component of OpenStack for managing networks as well as network IP addresses. OpenStack networking makes sure that the network does not face bottlenecks or any complexity issues in cloud deployment. It provides the users continuous self-service capabilities in the networks infrastructure. The floating IP addresses allow traffic to be dynamically routed again to any resources in the IT infrastructure, and therefore the users can redirect traffic during maintenance or in case of any failure. Cloud users can create their own networks and control traffic along with the connection of servers and devices to one or more networks. With this component, OpenStack delivers the extension framework that can be implemented for managing additional network services including intrusion detection systems (IDS), load balancing, firewalls, virtual private networks (VPN) and many others.

Dashboard (Horizon): The OpenStack dashboard (Horizon) provides the GUI (Graphical User Interface) for the access, provision and automation of cloud-based resources. It embeds various third party products and services including advance monitoring, billing and various management tools.
Identity services (Keystone): Keystone provides a central directory of the users, which is mapped to the OpenStack services they are allowed to access. It refers and acts as the centralised authentication system across the cloud operating system and can be integrated with directory services like LDAP. Keystone supports various authentication types including classical username and password credentials, token-based systems and other log-in management systems.
Image services (Glance): OpenStack Image Service (Glance) integrates the registration, discovery and delivery services for disk and server images. These stored images can be used as templates. It can also be used to store and catalogue an unlimited number of backups. Glance can store disk and server images in different types and varieties of back-ends, including Object Storage.
Telemetry (Ceilometer): OpenStack telemetry services (Ceilometer) include a single point of contact for the billing systems. These provide all the counters needed to integrate customer billing across all current and future OpenStack components.
Orchestration (Heat): Heat organises a number of cloud applications using templates with the help of the OpenStack-native REST API and a CloudFormation-compatible Query API.
Database (Trove): Trove is used as database-as-a-service (DaaS), which integrates and provisions relational and non-relational database engines.
Elastic Map Reduce (Sahara): Sahara is the specialised service that enables data processing on OpenStack-managed resources, including the processing with Apache Hadoop.

Deployment of OpenStack using DevStack
DevStack is used to quickly create an OpenStack development environment. It is also used to demonstrate the starting and running of OpenStack services, and provide examples of using them from the command line. DevStack has evolved to support a large number of configuration options and alternative platforms and support services. It can be considered as the set of scripts which install all the essential OpenStack services in the computer without any additional software or configuration. To implement DevStack, first download all the essential packages, pull in the OpenStack code from various OpenStack projects, and set everything for the deployment.
To install OpenStack using DevStack, any Linux-based distribution with 2GB RAM can be used to start the implementation of IaaS.
Here are the steps that need to be followed for the installation.
1. Install Git
$ sudo apt-get install git |
2. Clone the DevStack repository and change the directory. The code will set up the cloud infrastructure.
$ git clone http://github.com/openstack-dev/devstack$ cd devstack//devstack$ lsaccrc exercises HACKING.rst rejoin-stack.sh testsAUTHORS exercise.sh lib run_tests.sh toolsclean.sh extras.d LICENSE samples unstack.shdriver_certs files localrc stackrceucarc functions openrc stack-screenrcexerciserc functions-common README.md stack.sh |
stack.sh, unstack.sh and rejoin-stack.sh are the most important files. stack.sh script is used to set up DevStack.unstack.sh is used to destroy the DevStack setup.
If you are on the earlier execution of ./stack.sh, the environment can be brought up by executing the rejoin_stack.sh script.
3. Execute the stack.sh script:
/devstack$ ./stack.sh |
Here, the MySQL database password is entered. Theres no need to worry about the installation of MySQL separately on this system. We have to specify a password and this script will install MySQL, and use this password there.
Finally, we will have the script ending as follows:
+ merge_config_group /home/r/devstack/local.conf post-extra+ local localfile=/home/r/devstack/local.conf+ shift+ local matchgroups=post-extra+ [[ -r /home/r/devstack/local.conf ]]+ return 0+ [[ -x /home/r/devstack/local.sh ]]+ service_check+ local service+ local failures+ SCREEN_NAME=stack+ SERVICE_DIR=/opt/stack/status+ [[ ! -d /opt/stack/status/stack ]]++ ls /opt/stack/status/stack/*.failure++ /bin/true+ failures=+ [ -n ]+ set +o xtrace |
- Horizon is now available at http://1.1.1.1/
- Keystone is serving at http://1.1.1.1:5000/v2.0/
- Examples on using the novaclient command line are in exercise.sh
- The default users are: admin and demo
- The password: nova
- This is your host IP: 1.1.1.1
After all these steps, the machine becomes the cloud service providing platform. Here, 1.1.1.1 is the IP of my first network interface.
We can type the host IP provided by the script into a browser, in order to access the dashboard Horizon. We can log in with the username admin or demo and the password admin.
You can view all the process logs inside the screen, by typing the following command:
$ screen -x |
Executing the following will kill all the services, but it should be noted that it will not delete any of the code.
To bring down all the services manually, type:
$ sudo killall screen |
localrc configurations
localrc is the file in which all the local configurations (local machine parameters) are maintained. After the first successful stack.sh run, you will see that a localrc file gets created with the configuration values you specified while running that script.
The following fields are specified in the localrc file:
DATABASE_PASSWORD
RABBIT_PASSWORD
SERVICE_TOKEN
SERVICE_PASSWORD
ADMIN_PASSWORD
If we specify the option OFFLINE=True in the localrc file inside DevStack directory, and if after specifying this, we run stack.sh, it will not check any parameter over the Internet. It will set up DevStack using all the packages and code residing in the local system. In the phase of code development, there is need to commit the local changes in the /opt/stack/nova repository before restack (re-running stack.sh) with the RECLONE=yes option. Otherwise, the changes will not be committed.
To use more than one interface, there is a need to specify which one to use for the external IP using this configuration:
HOST_IP=xxx.xxx.xxx.xxx |
Cinder on DevStack
Cinder is a block storage service for OpenStack that is designed to allow the use of a reference implementation (LVM) to present storage resources to end users that can be consumed by the OpenStack Compute Project (Nova). Cinder is used to virtualise the pools of block storage devices. It delivers end users with a self-service API to request and use the resources, without requiring any specific complex knowledge of the location and configuration of the storage where it is actually deployed.
All the Cinder operations can be performed via any of the following:
1. CLI (Cinders python-cinderclient command line module)
2. GUI (Using OpenStacks GUI project horizon)
3. Direct calling of Cinder APIs
Creation and deletion of volumes: To create a 1 GB Cinder volume with no name, run the following command:
$ cinder create 1 |
To see more information about the command, just type cinder help <command>
$ cinder help createusage: cinder create [--snapshot-id <snapshot-id>][--source-volid <source-volid>] [--image-id <image-id>][--display-name <display-name>][--display-description <display-description>][--volume-type <volume-type>][--availability-zone <availability-zone>][--metadata [<key=value> [<key=value> ...]]]<size>Add a new volume.Positional arguments:<size> Size of volume in GBOptional arguments:--snapshot-id <snapshot-id>Create volume from snapshot id (Optional,Default=None)--source-volid <source-volid>Create volume from volume id (Optional, Default=None)--image-id <image-id>Create volume from image id (Optional, Default=None)--display-name <display-name>Volume name (Optional, Default=None)--display-description <display-description>Volume description (Optional, Default=None)--volume-type <volume-type>Volume type (Optional, Default=None)--availability-zone <availability-zone>Availability zone for volume (Optional, Default=None)--metadata [<key=value> [<key=value> ...]]Metadata key=value pairs (Optional, Default=None) |
To create a Cinder volume of size 1GB with a name, using cinder create –display-name myvolume:
$ cinder create --display-name myvolume 1+------------------+----------------------------------------+| Property | Value |+------------------+-------------------------------------- -+| attachments | [] || availability_zone | nova || bootable | false || created_at | time | | display_description | None || display_name | myvolume | | id | id || metadata | {} || size | 1 || snapshot_id | None || source_volid | None || status | creating || volume_type | None |+-----------------------+----------------------------------+ |
To list all the Cinder volumes, using cinder list:
$ cinder list |
ID Status Display Name Size Volume type Bootable Attached Toid1 Available Myvolume 1 None Falseid2 Available None 1 None False |
To delete the first volume (the one without a name), use the cinder delete <volume_id> command. If we execute cinder list really quickly, the status of the volume going to deleting can be seen, and after some time, the volume will be deleted:
$ cinder delete id2$ cinder listID Status Display Name Size Volume type Bootable Attached Toid1 Available Myvolume 1 None Falseid2 Deleting None 1 None False |
Volume snapshots can be created as follows:
$ cinder snapshot-create id2+---------------------+---------------------------------+| Property | Value |+---------------------+-----------------------------------+| created_at | TimeStamp || display_description | None || display_name | None || id | snapshot2 || metadata | {} || size | 1 || status | creating || volume_id | id2 |+---------------------+----------------------------------+ |
All the snapshots can be listed as follows:
$ cinder snapshot-listID Volume ID Status Display Name SizeSnapshotid1 id2 Available None 1 |
You can also create a new volume of 1GB from the snapshot, as follows:
$ cinder create --snapshot-id snapshotid1 1+---------------------+--------------------------------------| Property | Value+---------------------+--------------------------------------| attachments | [] || availability_zone | nova || bootable | false || created_at | creationtime || display_description | None || display_name | None || id | v1 || metadata | {} || size | 1 || snapshot_id | snapshotid1 || source_volid | None || status | creating || volume_type | None |+---------------------+-------------------------------------+ |
There are lots of functions and features available with OpenStack related to cloud deployment. Depending upon the type of implementation, including load balancing, energy optimisation, security and others, the cloud computing framework OpenStack can be explored a lot


