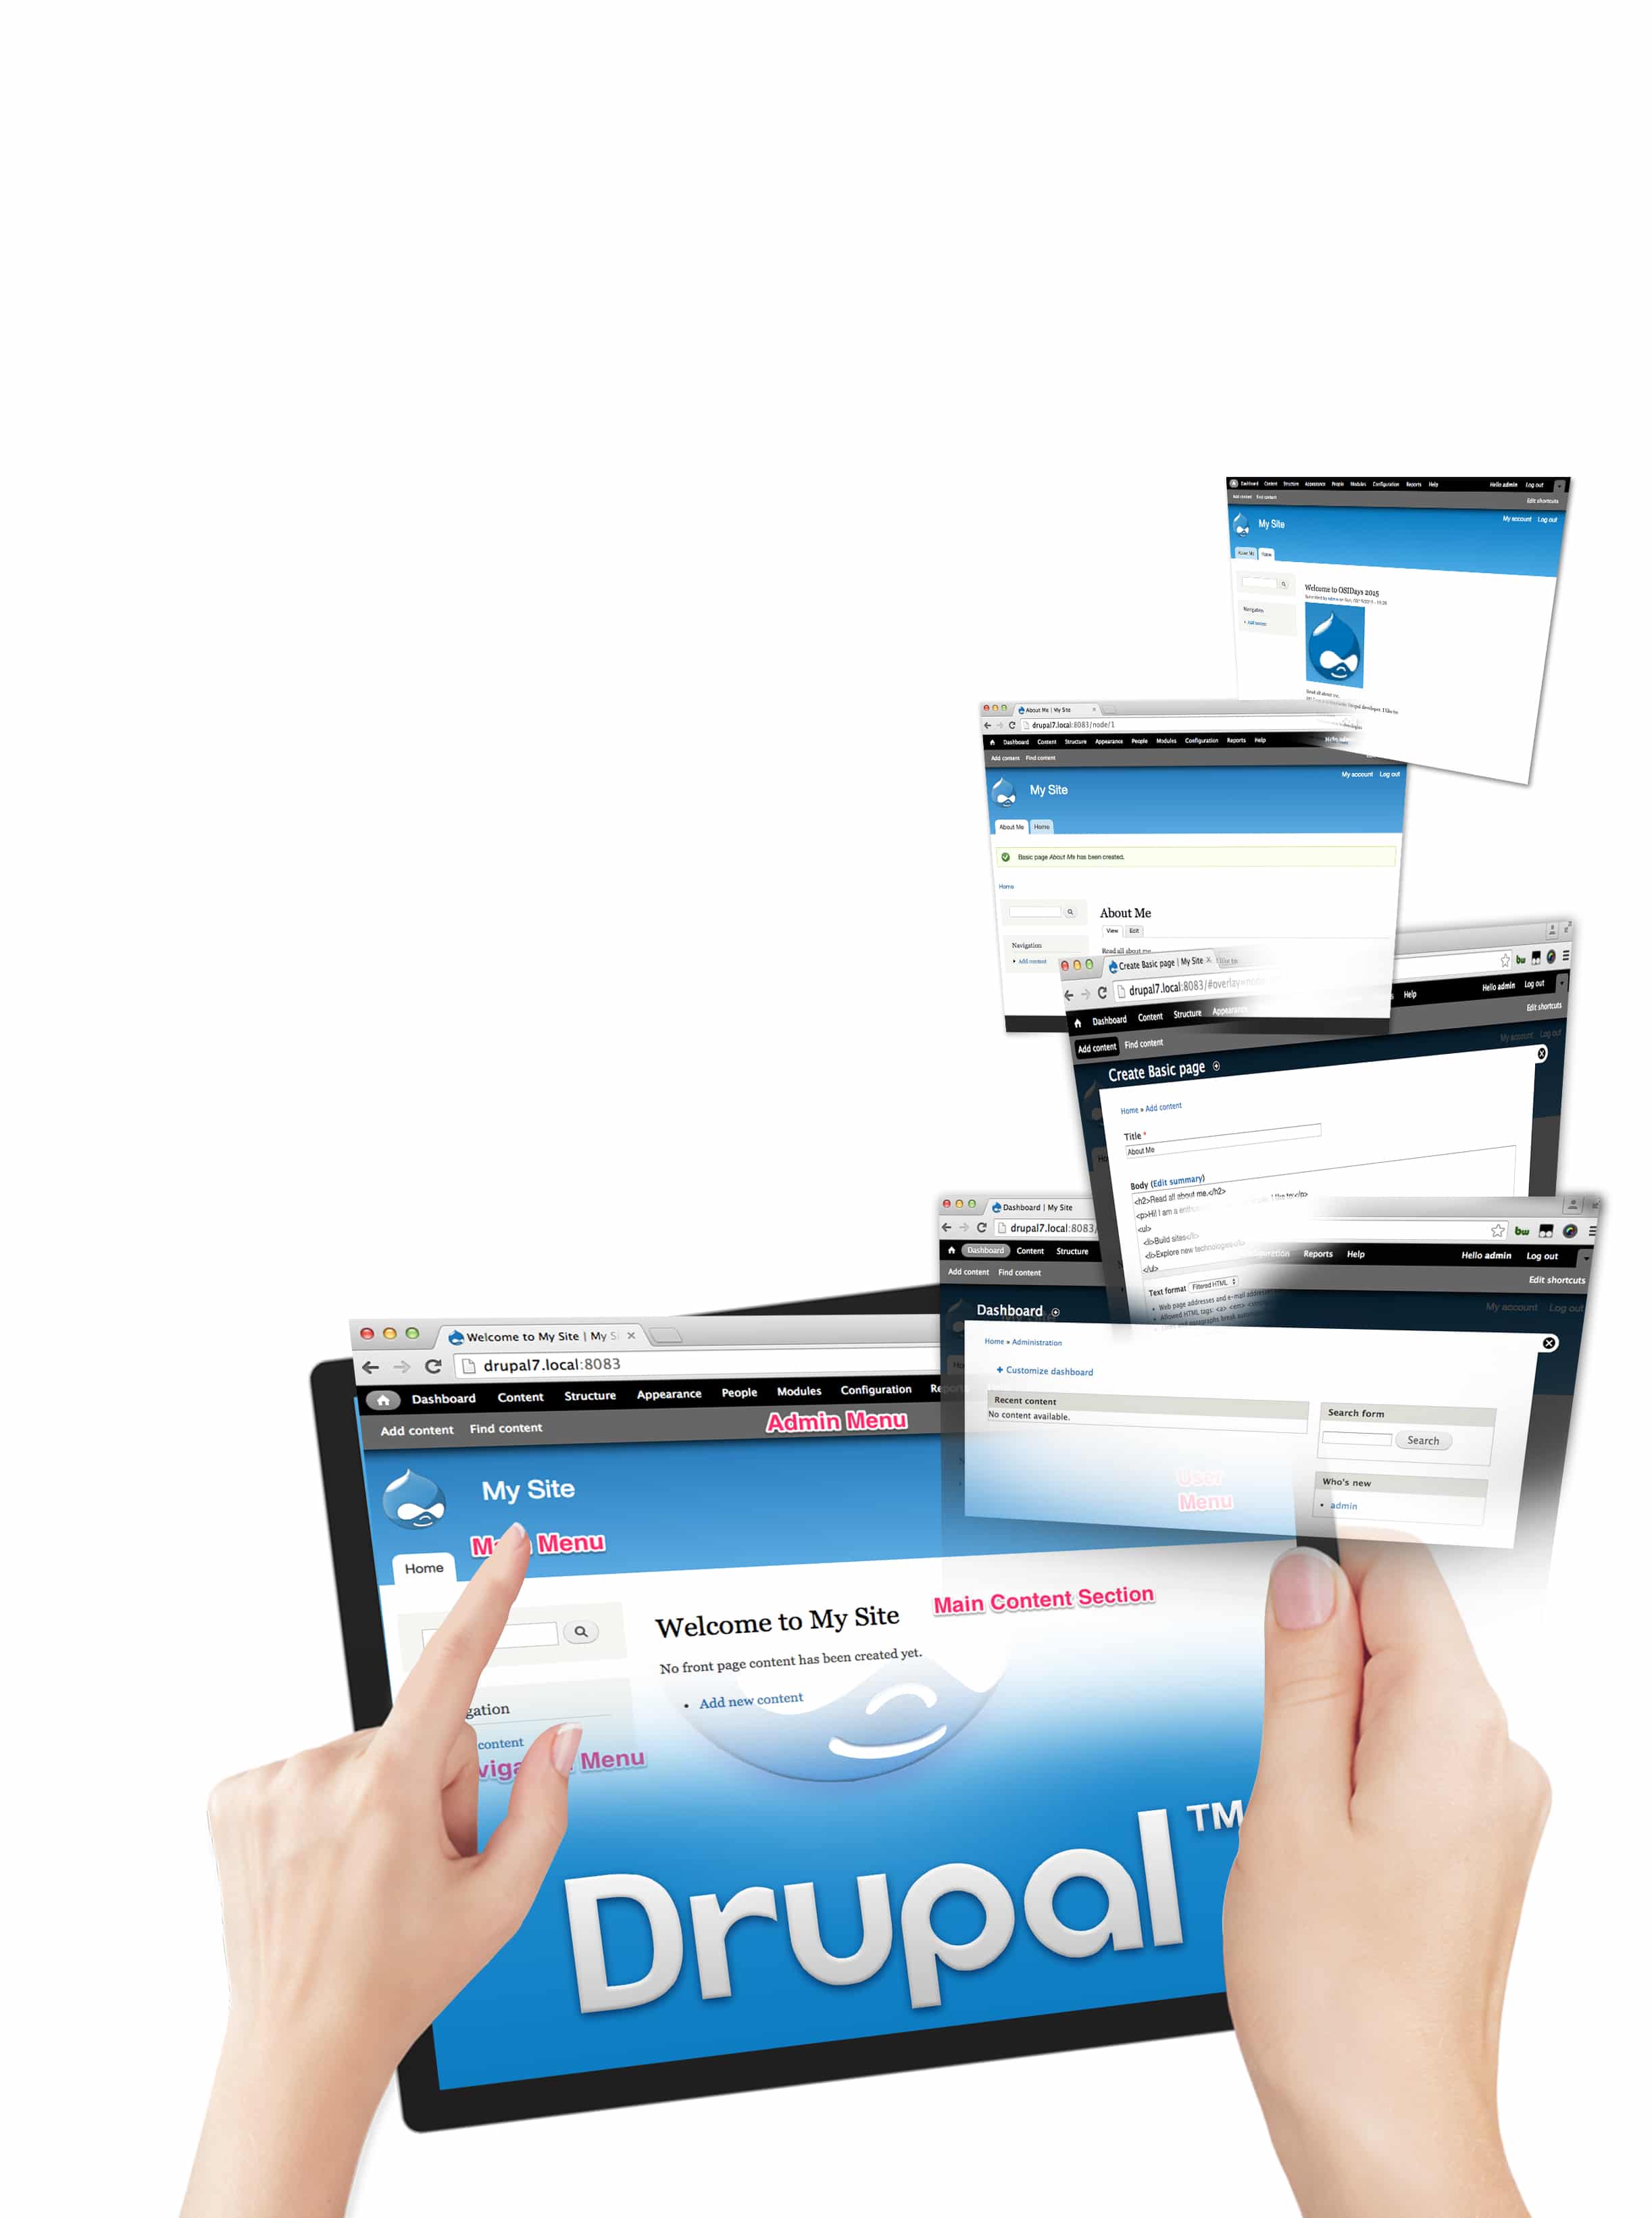
Drupal is an open source content management platform that powers millions of websites and applications. It is built, used and supported by an active and diverse community of people around the world (website: www.drupal.org).
Drupal is a PHP based Web content management system (CMS), which is distributed under the GNU-GPL license, making it free and open source software that is used to power millions of sites on the World Wide Web. Drupal was originally created by Dries Buytaert as a message board project, and was released as an open source project in 2001. It is now continuously fuelled by contributions from a huge community of around 39,000 users. It is used by organisations large and small, across various verticals like healthcare, retail, government, consumer, media and entertainment, life sciences and many more.
Some sample sites
One really famous Drupal site is whitehouse.gov. The Warner Music Group uses Drupal to power its artists websites, while fashion brand Lush uses Drupal for its e-retail store lushco.uk. The Weather Channel at NBC is also powered by Drupal
and the list is long.
To check out case studies, you can visit https://www.drupal.org/case-studies and http://www.drupalshowcase.com/
Start building your own website
So lets learn how to install and get started with a Drupal site, and add some basic content to it. A basic knowledge about using computers and how to install software on them is required. Experience in working on a LAMP, WAMP or MAMP stack is preferable.
Prerequisites
You will need a *AMP stack, which implies a computer, laptop or server with a stable operating system like Windows, Mac OS, UNIX or any Linux based OS like Ubuntu, Fedora, Red Hat, etc. Note that PHP is a requirement since Drupal has been written in it. PHP 5.4 or higher is recommended. Usually, the database used is MySQL. However, other databases like PostgreSQL, SQLite, MS SQL server or Oracle can be chosen. We need a Web server, which could be Apache, Nginx, or Microsoft IIS. Apache is usually chosen.
For a quick start, you can choose one of the preconfigured packages like WAMPServer, MAMP, XAMPP, or a LAMP-server package on a Linux based OS or Acquias Dev Desktop.
Download Drupal
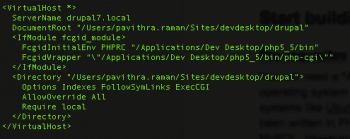
Go to https://www.drupal.org/project/drupal to download Drupal, which will be in the form of a .tar.gz or a .zip file. Extract it and place it into your Web server docroot. Create a virtual host that points to your docroot and assign a dev domain to the virtual host. Do not forget to update your IP tables to point this dev domain to your local host. Ensure that the .htaccess file and .gitignore files also get copied with the Drupal files.
Go into your MySQL administration and create a database for the Drupal site.
Creating settings.php and the files directory
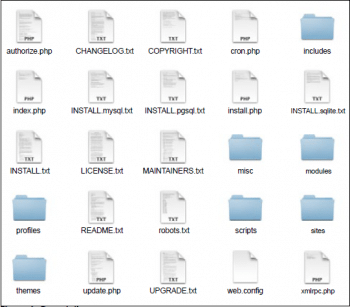
Within the sites/default/ directory, as seen in Figure 1, there will be a sample settings file default.settings.php which is what we will use to create our settings.php. Copy default.settings.php to the same location as settings.php and make sure that the file permissions are such that the Apache Web server can write into this file for now. Make sure that you have both the files in the directory, default.settings.php and the newly created settings.php.
Within this sites/default directory, create another directory named files. Make sure this directory can be written to by the Web server too. Any file uploaded to the Drupal site or any JavaScript or CSS aggregated files will be stored in here.
Running the installation script
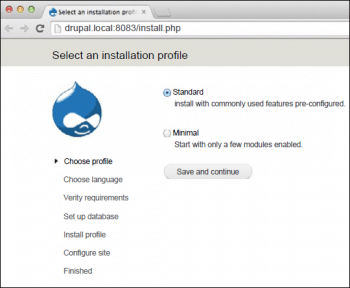
Now get on to your browser and visit this Base URL or the domain set on your virtual host as shown Figure 2, to begin installing Drupal. You should be seeing the page shown in Figure 3.
Select the Standard installation profile and click on Save & Continue. The next page should show you a list of languages available to install Drupal in. Since we have not added any support for additional languages, it will, for the time being, just show English. Click on Save & Continue to proceed.
It next checks for the prerequisites for the Web server, PHP version, PHP settings, permission to write into the settings.php file and the files directory. In case there is any issue with any of these aspects, an appropriate message will be displayed. Use corrective measures as suggested by the message and then retry the same step.
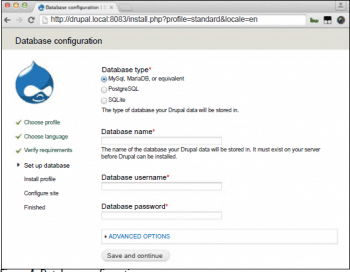
Database configuration
Remember the database you had created earlier? Now, fill in the details like the databases name, user name and password as shown in Figure 4. In case your database is on a non-standard port or on a different machine, update the database server details accordingly.
If all the previous steps went fine, you should now see a screen that displays all the Drupal modules and components being installed, the database being set up and necessary settings being saved.
Site information
Now this is where you add your sites name, slogan and create an administrative user number 1. Dont forget to set the country, time zone and to make sure you enable Check for updates automatically.
Congratulations! Your site is up. Lets go visit it.
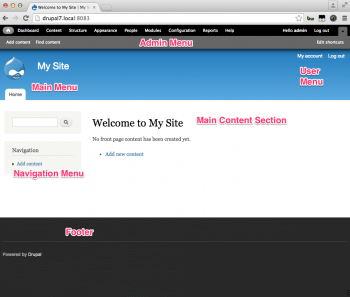
Front page
Figure 5 shows the front or home page of your site. It shows your sites name at the top, with the user menu on the right side, a navigation menu, some blocks on the left hand side and an admin menu on top.
Admin dashboard
The administration section will be visible to you as you are currently logged into the site as an administrator. Notice a black coloured menu on top that presents a list of links for all administrative tasks. Click on the one that says Dashboard.
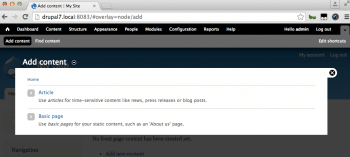
Lets create the About Me page
Now let us quickly create an About Me page. From the top admin menu, click on Add Content. This gives you a list of choices like those shown in Figure 6.
Click on Basic Page. This will now open up a form for you to add content to. Add the page title as About Me and in the Body field, add any HTML that you desire to be part of your content — something like whats shown below:
<h2>Read all about me.</h2><p>Hi! I am an enthusiastic Drupal developer. I like to:</p><ul><li>Build sites</li><li>Explore new technologies</li></ul> |
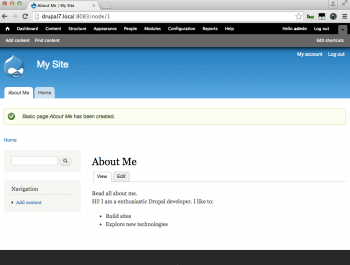
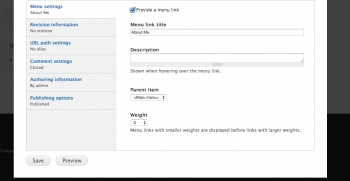
Now, let’s add a menu link, from where this page will be accessible. Scroll down the form and check the checkbox in the Menu settings section that says Provide a menu link. This will prompt you to add the Menu link title, indicating which menu you want it on. Add details as shown in Figure 8 and save them.
Now, when you save the form, the page content gets saved and is displayed to you. You can also see a menu link on top that reads About me and the links to this page that you have created.
Congratulations! You have created your first ever Drupal page.
Let us now create a few articles in the same way. To create a new article, go to the same Add content link and choose the content type as Article. In the form, you will notice that we now have an extra field to upload an image and one to categorise your article using tags. Go ahead and add a few articles with images along with this tag information.
Now take a look at the front page; it shows a list of all the articles that you added just now.
A few Drupal basics
We will now discuss the internal structure of Drupal and a few key concepts.
Content and content types
Everything in Drupal revolves around content, which could be a static Web page, an article, a blog post, product information, a slide in a slide show, etc. Each of these make up a content type. We can alter the data structure of each content type so that it has all the relevant information captured in the best way.
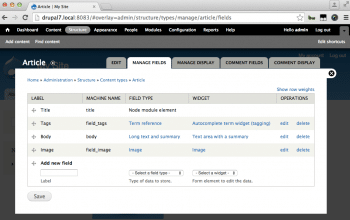
To create your own content type, from the admin menu on top, click on Structure and from the list shown, click on Content types. This will now show you a list of the content types that are present in the system.
You can add a new content type, edit the fields that are a part of it, and even decide which fields are to be shown and which hidden (Figure 9).
Taxonomy
Another important aspect of arranging content on a CMS is categorising features. Using Drupals inbuilt taxonomy system, one can easily create vocabularies and associate them with the various contents on the system. These could be a pre-entered list of terms or a free tagging system. Content can then be easily categorised, sorted and filtered using the terms associated with it. You can see them as a list of taxonomies and terms. To view them, click on Structure from the admin menu and then on Taxonomy. This will show a list of the taxonomies in the system and then you can click to add or view more terms.
To add it to the contents, just make a Taxonomy Term field as a part of the Content type, to capture which category is associated with the content added.
Users
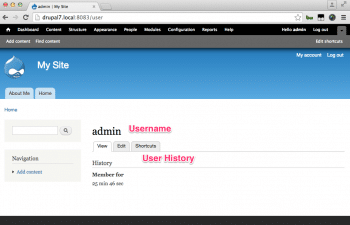
No digital system is complete without its users. Drupals inbuilt user module provides a very good solution for users to be registered on the system and role based permissions to be assigned to them. You can extend the information about a user by adding more fields into the users profile information. From the top user menu, click on the My account link to view your user profile (Figure 10).
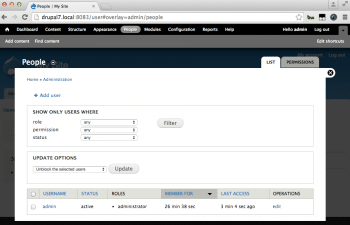
To check the list of users registered on the system, click on the People link from the admin menu (Figure 11).
To add more roles or assign special permissions to each role, click on the Permissions tab in the People page that you opened right now.
Menu and path system
In Drupal, every path lands at a unique page that runs a set of functions to create the content and structure for that page. This could be individual content, a list of contents, a list of users, the Home page with aggregated content from the rest of the site, a form and more. In order to make the URLs user friendly, URL aliases are used and mapped to these paths generated by the Drupal system.
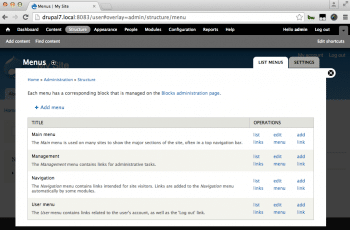
Next, you can create a list of the paths to build a menu and display it as the main menu or a user menu, secondary side navigation menu and more. Go to Structure from the admin menu, and click on Menus to view the list of menus and a list of links added to each menu (Figure 12).
Modules
The module system of Drupal is at the heart of its extensibility. The plain Drupal installation has some core features and a hook based system that helps other added modules to extend its features. These additional features are packaged into modules that can be added and enabled as per requirements. Some examples could be: a Commerce module to enable commerce capabilities, a Five Star rating, CKEditor, Devel for debugging and more. There are close to 30,000 modules that have been published on www.drupal.org, which can be added to your Drupal site to enhance its features.
Go on and try one. Lets try the Webform module at https://www.drupal.org/project/webform.
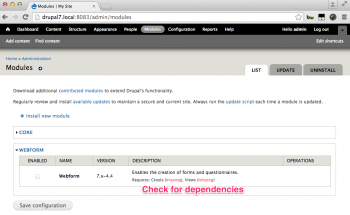
Go to the URL and download the .tar.gz or .zip file. Unzip it and extract the contents into the sites/all/modules/contrib folder within the docroot of your Drupal site. Now, from the top admin menu, click on the Modules page link. This should show you a list of modules with this new module that can be selected to be enabled and installed.
As seen in Figure 13, the system checks if there are any dependencies for installing this module. You can see that it requires two other modules, ctools and views, to be installed too. So quickly download them from https://www.drupal.org/project/ctools and https://www.drupal.org/project/views, respectively and extract them into the sites/all/modules/contrib directory. Now revisit the Modules page and see that the Webform module can be installed and automatically enables the prerequisite modules too.
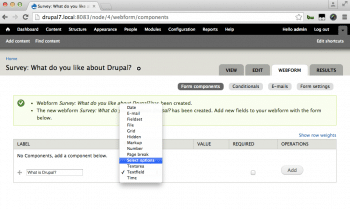
The aim of this module is to provide you with a way to add more forms to your site using an easy form builder facility. It would have created a content type Webform for you on the Content types listing page. You can now go ahead and create a form in the same way as creating a page. Go to Add content and see that Webform is listed as a type there. Click on it, and you will be asked for a title for the form and any menu, path or permissions that you would like to associate with the form. Once you add this information and save it, you will be led to the form builder page, where you can add text fields, select boxes, text area, date and other types of form components. Next, you can program what actions should be taken after submitting the form, like sending a confirmation message, email to the administrator, etc (Figure 14).
Themes
Drupals UI architecture beautifully separates out logic, data and presentation. The features that govern the data architecture and logic are separated into the modules and the presentation layer is governed by the Theme layer. Drupal comes with a default theme, Bartik, which is enabled when you install it. Now, to change the appearance, install another theme, or create your own theme and install it. The Drupal community has contributed over 2000 themes for you to start with. Some of them are base themes that put in a framework for you to build a branded theme and some give you a complete coloured theme. You can find them at https://www.drupal.org/project/project_theme.
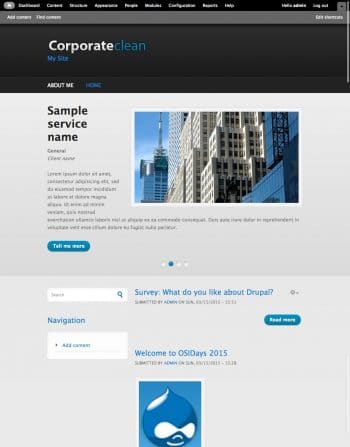
Lets try one at https://www.drupal.org/project/corporateclean. Download the .tar.gz or .zip file, extract it and place it in the sites/all/themes directory. Now navigate to the Appearance page from the admin menu on top. It shows you a list of themes available and the one you just added.
Enable it and set it as the default in the Corporate Clean theme, and then navigate to the front page and see the magic (Figure 15).
A good start to building your site on Drupal
You are probably well into getting your site built on Drupal. For a quick try out, you can start building and hosting your site on Acquias cloud servers, which provide developers with a free version to kickstart their Drupal development. Go to http://www.acquia.com/free to register for your free dev cloud. The Drupal community site hosts an awesome documentation section that provides details about working in the Drupal ecosystem. Do feel free to register on www.drupal.org and visit its forum section to interact with the Drupal community, post your questions and participate in local events. Drupal has been adopted by major systems integrators and IT companies to create great digital experiences for their customers. The Drupal community in India regularly organises events like the Drupal Camps in Delhi and Mumbai held earlier this year, Global training days that happen every quarter, and many monthly meet-us for training, code sprints or contribution drives. Come, join for the technology and stay on for the community.
References
[1] Documentation: https://www.drupal.org/documentation
[2] Case studies: https://www.drupal.org/case-studies, http://www.drupalshowcase.com/
[3] Drupal modules: https://www.drupal.org/project/modules
[4] Drupal themes: https://www.drupal.org/project/themes
[5] Hosting your site on Acquia Cloud: https://www.acquia.com/free, https://docs.acquia.com/cloud/free
[6] Using Acquia Dev Desktop: https://docs.acquia.com/dev-desktop2
[7] Acquia library: https://www.acquia.com/resources


