Rust is a systems programming language that is designed for writing systems software compiled with the self-hosted compiler known as rustc, with the low level virtual machine (LLVM) as its backend. The compiler is written in the Rust programming language and is developed by the Mozilla community. It ensures memory safety by setting the invariant in such a way that the creation of dangling pointers is not possible. It is also type safe, that is, it prevents type errors. Rust is a multi-paradigm language that supports procedural, functional and object-oriented styles as well as concurrent computations. It is designed in such a way that it can be used to create large client and server programs that run over the Internet.
Memory safety
In software development, memory safety is considered to be an important factor as it prevents software errors that can cause security vulnerabilities through RAM accesses. Data race and dangling pointers are some of the memory errors that are common to most of the languages. Dangling pointers do not occur in Rust because of the special types of pointers used in it, called smart pointers. Memory allocated to smart pointers is freed only when they go out of scope, hence avoiding the formation of dangling pointers, which point to a de-allocated memory.
The data in Rust is immutable, by default, and can be made mutable by adding the keyword mut. Rust does not allow the sharing of mutable data between threads; hence, it eliminates race conditions for in-memory data. Instead of sharing, data is copied or owned pointers are moved between tasks. In addition to this, Rust ensures that data is initialised before it is read from anywhere in the program and also does bound checking.

Installation in Linux and Mac
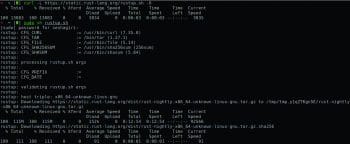
You can use the rustup script to install Rust in Linux and Mac, as follows:
$ curl -L https://static.rust-lang.org/rustup.sh -O$ sudo sh rustup.sh |
To build from source, you need the following prerequisite packages:
- G++ 4.7 or Clang++ 3.x
- Python 2.6 or later (but not 3.x)
- Perl 5.0 or later
- GNU make 3.81 or later
- Curl
- Git
- To build from tar, type:
$ curl -O https://static.rust-lang.org/dist/rust-nightly.tar.gz$ tar -xzf rust-nightly.tar.gz$ cd rust-nightly |
To build from the repository, type:
$ git clone https://github.com/rust-lang/rust.git$ cd rust |
After the Rust source code is available, configure it and build using the following commands:
$ ./configure$ sudo make install |
When the make install is complete, several programs will be placed in /usr/local/bin like rustc, the Rust compiler and rustdoc, which is the API documentation tool.


Installation in Windows
The precompiled binary installers for Windows are available at the Rust website, from where it can be downloaded. After doing so, run the .exe file, which completes the installation of Rust.
You can check whether the installation is complete by typing the following command:
$ rustc --version |
Note: Rust currently needs about 1.5GB of RAM to build without swapping; if it uses swap during the build process, it will take a very long time to build.
Compiling and running the program
Create a file hello_world.rs and include the following lines:
fn main() {println!(Hello, world!);} |
The Rust program can be compiled using the following command:
$rustc hello_world.rs |
When the program is compiled successfully, Rust will generate a binary executable automatically, with the name hello_world which can be run as usual, as shown below:
$ ./hello_world |
Cargo
Cargo is a tool to manage Rust projects, which has the following functionalities:
- Builds the code
- Downloads the required dependencies for your code
- Builds the dependencies
To cargo-ify the project, two steps are to be followed:
- Make a configuration file, Cargo.toml
- Put all the source files in the src folder
Given below are the contents of the Cargo.toml file:
[package] // gives the information of the package to Cargo metadataname = hello_worldversion = 0.0.1authors = [ Your name <you@somedomain.com> ][[bin]] // tells that a binary is to be build not libraryname = hello_world // name of the file which is to be compiled |
The project can be built and run as follows:
$ cargo build$ ./target/hello_world |
When the Cargo build is run, you will notice that a file, cargo.lock, is created. This file is used by Cargo to keep track of dependencies in the project.
Rust versus C
Even though both the programming languages support manual memory management, they work differently. In C, the memory is allocated and freed by using special functions like malloc() and free(). The malloc function allocates memory and returns a void pointer pointing to the allocated space. After the memory is freed, the variable pointing to that memory is called a dangling pointer. Using dangling pointers causes security vulnerabilities and the C compiler does not provide any method of avoiding them.
In contrast to C, the Rust language does not support dangling pointers. The allocation and initialisation of the memory is done at the same time using the allocation operator ~ , which returns a smart pointer. The compiler will automatically free the memory when the pointer goes out of scope. The programmer need not do it manually and hence avoids dangling pointers from being created.
Expressions
Rust is an expression based language. We can also say that the fundamental difference between the Rust syntax and languages like C is that some things that are statements in C are expressions in Rust. The command if is an expression whereas let is a statement in Rust.
In C, if we want to assign a value to a variable based on some condition, it is done in the following way:
int var;if (value < 3) {var = 2;}else if (value > 5) {var = 6;}else {var =4;} |
The same thing can be done in Rust, as follows:
let var =if value < 3 {2}else if value > 5 {6}else {4}; |
Here, the if condition is an expression; it returns some value, depending on the condition that holds. It is less error-prone and is more comfortable. But Rust also supports the common syntax and hence the coder can use either of the two ways.
Rust documentation
Rustdoc is a build in the API-documentation tool in Rust, which generates HTML documentation from doc comments. In order to generate documentation, it is necessary to include some documentation related lines inside the code.

Creating the documentation
When something has to be documented, we can use doc comments. The following is a sample set of lines that describes the documentation functionality written in myworld.rs file:
// This is not a doc comment#![crate_id = myworld]#![crate_type = lib]//! This is my world for documentation. This is shown on the crate index page. The//! e ! sign indicates that the comment apply to the parent of the comment, not to//! what follows./// These doc comments will be shown in the Widgets documentation.pub struct Widgets{purpose: String,///These are not readableunderstandable: bool}/// These will be shown in the recalibrate part.pub fn recalibrate(){//! This is also a doc comment. This will show three dots to show continuation./* ... */} |
The HTML documentation for the above file can be generated by running the following command:
$ rustdoc myworld.rs |
When the command is run, a doc directory is created, by default, which will have a myworld directory containing HTML files. The src folder will have the file that contains the lines that we have written for generating the documentation. The Web pages generated by rustdoc are in the same logical hierarchy that is followed when writing a library. All the items like struct and functions will have a unique colour and when clicked on, you will be directed to their respective documentation.

Testing the documentation
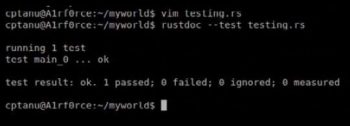
In addition to support for documentation, Rustdoc also verifies the code examples that are included in the documentation. For that we just need to include the –test option while running the rustdoc command.
rustdoc --test filename.rs |
Rustdoc also provides few extra features that simplify some tedious documentation examples. If a line is prefixed with #, then that line will not show up in the HTML documentation but it will be used when testing the code block.
References
[1] http://doc.rust-lang.org/book/README.html
[2] http://www.rust-lang.org/
[3] http://web.mit.edu/rust-lang_v0.11/doc/tutorial.html
[4] https://github.com/rust-lang/rust


