MongoDB is a big name among NoSQL databases. One of its most significant features is that you can scale out your deployments quite easily, i.e., additional nodes can easily be added to the deployment to distribute data between them so that all data neednt be stored in one node. This concept is known as sharding, which when combined with replication, offers great protection against failover. So lets take a closer look at sharding and how it can be implemented.
I assume that you have MongoDB installed on your system. Well, just in case I am wrong, you can get it from http://www.mongodb.org/downloads. Download the zip file as per your operating system and extract the files once the download is completed. For this article, I am using MongoDB on a 32-bit Windows 7 system. Under the extracted directory, you will see a number of binary files. Among them, mongod is the server daemon and mongo is the client process.
Lets start the process by creating a lot of data directories that will be used to store data files. Now switch to the MongoDB directory that you extracted earlier. I have put that directory on my desktop (Desktop\mongodb-win32-i386-2.6.0\bin). So Ill open a command prompt and type:
cd Desktop\mongodb-win32-i386-2.6.0\bin. |
Lets create the required directories, as follows:
mkdir .\data\shard_1 .\data\shard_2mkdir .\data\shard_1\rs0 .\data\shard_1\rs1 .\data\shard_1\rs2mkdir .\data\shard_2\rs0 .\data\shard_2\rs1 .\data\shard_2\rs2 |
Here weve created directories for two shards, with each having a replica set consisting of three nodes. Lets move on to creating the replica sets. Open another command prompt and type the following code:
mongod --port 38020 --dbpath .\data\shard_1\rs0 --replSet rs_1 --shardsvr |
This creates the first node of the first replica set rs_1, which will be using port 38020 and .\data\shard_1\rs0 as data directory. The –shardsvr option indicates that sharding will be implemented for this node. Since well be deploying all the nodes in a single system, lets just change the port number for additional nodes. Our first node is now ready and its time to create the two others.
Open two more command prompts, switch to the MongoDB root directory and type the following commands in each, respectively:
mongod --port 38021 --dbpath .\data\shard_1\rs1 --replSet rs_1 --shardsvr mongod --port 38022 --dbpath .\data\shard_1\rs2 --replSet rs_1 --shardsvr |
Three nodes for the first replica set are ready, but right now they are acting as standalone nodes. We have to configure them to behave as replica sets. Nodes in a replica set maintain the same data and are used for data redundancy. If a node goes down, the deployment will still perform normally. Open a command and switch to the MongoDB root directory, and type:
mongo --port 38020. |
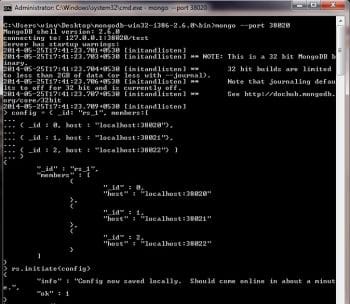
This will start the client process and connect to the server daemon running on Port 38020 that we started earlier. Here, set the configuration as shown below:
config = { _id: rs_1, members:[{ _id : 0, host : localhost:38020},{ _id : 1, host : localhost:38021},{ _id : 2, host : localhost:38022} ]} |
Initiate the configuration with the rs.initiate (config) command. You can verify the status of the replica set with the rs.status() command.
Repeat the same process to create another replica set with the following server information:
mongod --port 48020 --dbpath .\data\shard_2\rs0 --replSet rs_2 --shardsvrmongod --port 48021 --dbpath .\data\shard_2\rs1 --replSet rs_2 --shardsvrmongod --port 48022 --dbpath .\data\shard_2\rs2 --replSet rs_2 --shardsvr |
The configuration information is as follows:
config = { _id: rs_2, members:[{ _id : 0, host : localhost:48020},{ _id : 1, host : localhost:48021},{ _id : 2, host : localhost:48022} ]} |
Initiate the configuration by using the same rs.initiate (config) command. We now have two replica sets, rs_1 and rs_2, up and running; so, the first phase is complete.
Lets now configure our config servers, which are mongod instances used to store the metadata related to the sharded cluster we are going to configure. Config servers need to be available for a functional sharded cluster. In our production systems, we use three config servers, but for development and testing purposes, usually one does the job. Here, well configure three config servers as per the standard practice. So, first, lets create directories for our three config servers:
mkdir .\data\config_1mkdir .\data\config_1\1 .\data\config_1\2 .\data\config_1\3Next open 3 more command prompts and type mongod --port 59020 --dbpath .\data\config_1\1 --configsvrmongod --port 59021 --dbpath .\data\config_1\2 --configsvrmongod --port 59022 --dbpath .\data\config_1\3 --configsvr |
This will start the three config servers well be using for this deployment. The final phase involves configuring the Mongo router or mongos, which is responsible for query processing as well as data access in a sharded environment, and is another binary in the Mongo root directory. Open a command prompt and switch to the MongoDB root directory. Type the following command:
mongos --configdb localhost:59020,localhost:59021,localhost:59022 |
This starts the mongos router on the default Port 27017 and informs it about the config servers. Then its time to add shards and complete the final few steps before our sharding environment is up and running. Open another command prompt and again switch to the MongoDB root directory.
Type mongo, which will connect to the mongos router on the default Port 27017, and type the following commands:
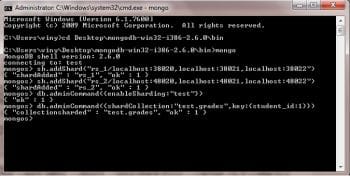
sh.addShard(rs_1/localhost:38020,localhost:38021,localhost:38022)sh.addShard(rs_2/localhost:48020,localhost:48021,localhost:48022) |
These two commands will add the two shards that were configured earlier. Enable sharding for the test database using the following command:
db.adminCommand({enableSharding:test}) |
Finally, enable sharding on the grades collection under the test database by using the code shown below:
db.adminCommand({shardCollection:test.grades,key:{student_id:1}}) |
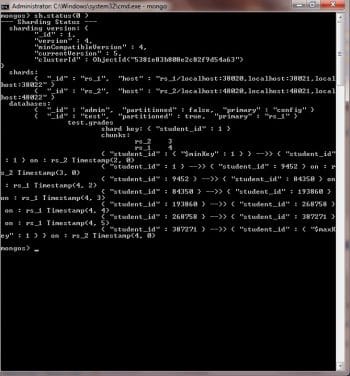
In this instance, student_id is our shard key, which is used to distribute data among shards. Do note that this collection does not exist right now. To use sharding, we need an index on the shard key. Here, the collection does not exist and the index will be created automatically. But if you have data in your collection, then youll have to create an index on your shard key. You can verify your sharding status by using the sh.status() command.
We now have our sharded environment up and running, and its time to see how it works by inserting data in the grades collection. So type the following simple javascript code snippet to insert data:
for (var I = 1; I <= 500000; i++) db.grades.insert( { student_id : I,Name:Student+I } ) |
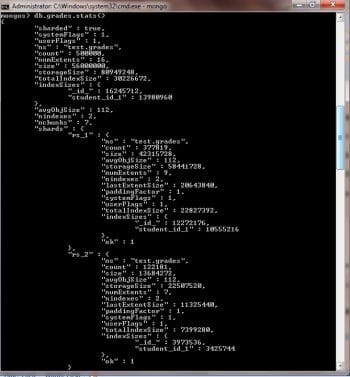
Now if you type db.grades.stats(), youll find that some of these records are stored in the rs_1 shard and others are stored in the rs_2 shard.
You can see that out of 500,000 records inserted, 377,819 are stored in shard rs_1 while the remaining 122181 go to shard rs_2. If you fire the sh.status() command, you can figure out how data is distributed between these two shards.
In Figure 4, you can see that student IDs ranging from 1 – 9452 and 387,271 – 500,000 (represented by $maxKey) are stored on rs_2 while the remaining data is on rs_1.This data distribution is transparent to the end user; data storage and retrieval is handled by the mongos router.
Try to configure and explore the overall process a few more times so that you can feel more confident in implementing sharding in MongoDB.


