Apart from introducing you to OpenSSL, this article explores the scale of its usage and, hence, the need to customise it based on real world requirements. It then goes into the details of the engine and BIO interfaces, and how external hardware or software can be hooked into these interfaces to override the default software implementation and make OpenSSL more relevant in the real world.
This article is meant for casual readers interested in knowing about OpenSSL as well as open source hobbyists who would like to go under the hood to look at OpenSSL source code to see how they can make it work the way they want it to. It may also be helpful to serious developers trying to explore ways to improve their SSL traffic performance.
What is SSL/TLS and why is it important?
Secure Sockets Layer and its new avatar, Transport Layer Security, are cryptographic algorithms that are used to establish a secure channel of communication between two end points. Three versions of SSL1.0, 2.0 and 3.0were published up to the late 90s, the last being the biggest overhaul of the protocol. Subsequently, TLS 1.0 was defined in RFC 2246 as a small upgrade over SSL v3.0. As there is very little difference between the two, the terms SSL and TLS are usually used interchangeably.
As the names suggest, SSL or TLS are mechanisms to secure connections and sit on top of the transport layer. They involve arriving at a shared session key using the initial handshake protocol. The initial handshake messages are primarily based on CPU-intensive public key cryptographic algorithms. Once the session is established, data is sent encrypted with a shared session key using much faster symmetric key algorithms, which are decrypted on the other end.
SSL/TLS is one of the most pervasive cryptographic protocols used in the market today. Most popular application layer protocols like HTTP, SMTP and FTP use it for a secure lower layer. Most commonly used applications like online banking, Gmail, Facebook, Twitter, etc, use HTTPS and hence TLS/SSL as a secure channel to communicate personal and confidential information. These servers handle millions of TLS/SSL sessions concurrently.
As per Sandvines Global Internet Phenomenon Report 2H 2012 (see References), by 2018, SSL traffic is expected to increase 16-fold over its 2012 levels, putting much more pressure on these servers to handle concurrent sessions. Figure 1 demonstrates the trend in SSL traffic growth.
Where does OpenSSL fit in?
OpenSSL is a commercial grade open source toolkit, under an Apache-style licence, which according to Wikipedia is implicitly used by two-thirds of all Web users, as of 2014! It is used in everything from quick personal scripts to some of the largest commercial email and Web services.
It provides implementation for Secure Sockets Layer (SSL) v2 and v3, and Transport Layer Security (TLS) v1 protocols, as well as a default software implementation for general-purpose cryptographic algorithms.
OpenSSL is now widely accepted and is applied in various ways in the real world. It is used as a command line utility and as a library that is linked to userland applications. It is used in Perl scripts, and there are open source projects that develop wrappers around the OpenSSL library (like pyOpenSSL, which provides a Python wrapper around the OpenSSL library). But, more importantly, it is used in commercial servers handling millions of SSL/TLS sessions.
Customising OpenSSL
For TLS communication, OpenSSL first establishes a TCP socket communication with the other end over the specified IP address and port number. Then it exchanges handshake messages over this connection to establish a TLS session. It then uses this secure connection to communicate data, as TLS records, with the other end.
OpenSSL provides a library called Libcrypto, which is the default software implementation. This is used for cryptographic operations for TLS and is also exposed in the interface as utility crypto APIs.

The software implementation of Libcrypto would ideally be good enough for many general purpose SSL/TLS clients/servers like browsers, etc, and all general-purpose Libcrypto utility users. However, this may not be enough for many real world applications processing large amounts of traffic. OpenSSL developers understand this real world need and have found a way forward through customisation.
Dedicated hardware helps
Cryptographic operations are typically iterative and involve intense processing. Asymmetric key algorithms like RSA, especially, are used during the initial handshake while establishing a SSL/TLS connection. When processing a large number of TLS connections, for example, on a HTTPS server handling millions of connections, the encryption/decryption being performed in the software on general-purpose processors can be very heavy. This slows down processing on the server, even affecting its core functionality. Dedicated hardware accelerators called Hardware Security Modules (HSMs) are commercially available in various forms, like PCI cards that can be hooked on to be used for faster encryption/decryption. Some modules help in accelerating only certain asymmetric key algorithms like RSA, thus speeding up the initial handshake. Some can help in speeding symmetric key block cipher algorithms like AES, thus speeding up encrypted data throughput. Some can help in both. Based on the requirement, implementers can pick and choose the right hardware acceleration.
Processing speed apart, hardware cryptographic modules are more secure than software implementations. Some standards like FIPS-140 and FIPS 140-2, defined by a US government body called the National Institute of Standards and Technology (http://nist.gov), define certain security levels to be maintained by a crypto module. Higher levels of security, like resistance to key disclosure, can be provided only by a hardware module. Based on these standards, certain businesses like banks mandate a higher-level security requirement. This would require external hardware for cryptographic operations.
Using HSMs with OpenSSL
As discussed earlier, OpenSSL is a commercial grade toolkit. It has a very robust, well-written TLS protocol implementation. To take best advantage of this, OpenSSL provides an engine interface to hook an HSM for hardware acceleration for crypto operations but still use OpenSSL for the TLS protocol. The caller code for OpenSSLs interface will remain the same, with or without hardware acceleration, as the EVP/SSL interface is not impacted.
Also, though the engine interface is targeting primarily HSMs, it need not be hardware only. An external software implementation can also be hooked into OpenSSL using the engine interface, based on the implementation needs.
Overriding the default communication
channel in OpenSSL
Contrary to the assumption in the default implementation, a TCP connection may not always be the medium to communicate TLS records. Sometimes, even if the default software crypto implementation of OpenSSL is good enough, a direct connection over TCP may not be possible. For example, in embedded systems, the communication stack may not be directly available. However, a TLS session would have to be established. The TLS records may be exchanged with higher layers over RPC or event notifications, and the higher layers will be involved in establishing a TCP/ application layer connection with the server side. This would mean overriding the communication behaviour of OpenSSL. For such an activity, OpenSSL provides an interface called the BIO interface.
The architecture of OpenSSL
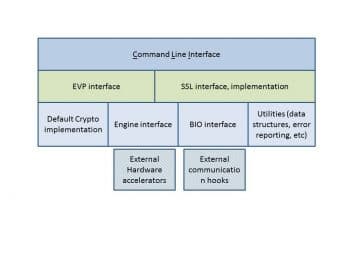
As mentioned earlier, OpenSSL can be used as a command line utility or can be used as a library linked into the users application. Hence, the layering is as described in Figure 2. Below the command line interface are the EVP layer and the SSL interface layer. These are typically the interfaces for the caller code to use the cryptographic functions of OpenSSL. Below that is the actual SSL/TLS default implementation and interfaces to hook in external overrides.
Figure 2 illustrates the layering and architecture of OpenSSL.

Going under the hood
In this section, we go into the open source code and see how OpenSSL is implemented by default. To follow this section, please download the OpenSSL sources tarball from http://www.openssl.org/source/ and extract it. At the time of writing this article, OpenSSL 1.0.1g is the latest version. So, all illustrations will be based on this version. Remember that since OpenSSL is an evolving toolkit, the file names, variable names, etc, might have changed if you download a different version. So, it is best to download the same version to avoid confusion. For convenience, we will refer to the directory into which OpenSSL has been extracted as $(ROOT).
Using the engine interface
The engine interface is declared in the header in $(ROOT)/include/openssl/engine.h. There is support for specific hardware in $(ROOT)/crypto/engine/ directory. Each engine is designated an engine ID string, and OpenSSL ships with implementations for some software and interfaces for a few hardware engines, by default. A call to function ENGINE_by_id will return the corresponding engine object. For example, cswift is used for CryptoSwift acceleration hardware, while ubsec is for Broadcom uBSec acceleration hardware. The default engine ID is openssl, which uses the built-in default software implementation. Once the engine object is got, we need to call ENGINE_set_default to use the specified engine. It provides several functions to set external implementations for specific algorithms.
To hook-in an external RSA implementation, write the following code:
int ENGINE_set_RSA(ENGINE *e, const RSA_METHOD *rsa_meth);To hook-in an external DSA implementation:int ENGINE_set_DSA(ENGINE *e, const DSA_METHOD *dsa_meth);Likewise, other algorithms:int ENGINE_set_ECDH(ENGINE *e, const ECDH_METHOD *ecdh_meth);int ENGINE_set_ECDSA(ENGINE *e, const ECDSA_METHOD *ecdsa_meth);int ENGINE_set_DH(ENGINE *e, const DH_METHOD *dh_meth);int ENGINE_set_RAND(ENGINE *e, const RAND_METHOD *rand_meth);int ENGINE_set_STORE(ENGINE *e, const STORE_METHOD *store_meth); |
Any one or more of the cryptographic functions can be
overriden. For the other algorithms that are not set, the default implementation will be used.
If you take a look at $(ROOT)/crypto/engine/eng_openssl.c you can see how the default engine is loaded in OpenSSL code. The code snippet below is taken from
$(ROOT)/crypto/engine/eng_openssl.c.
/* The constants used when creating the ENGINE */static const char *engine_openssl_id = openssl;static const char *engine_openssl_name = Software engine support;/* This internal function is used by ENGINE_openssl() and possibly by the* dynamic ENGINE support too */static int bind_helper(ENGINE *e){if(!ENGINE_set_id(e, engine_openssl_id)|| !ENGINE_set_name(e, engine_openssl_name)#ifndef TEST_ENG_OPENSSL_NO_ALGORITHMS#ifndef OPENSSL_NO_RSA|| !ENGINE_set_RSA(e, RSA_get_default_method())#endif#ifndef OPENSSL_NO_DSA|| !ENGINE_set_DSA(e, DSA_get_default_method())#endif#ifndef OPENSSL_NO_ECDH|| !ENGINE_set_ECDH(e, ECDH_OpenSSL())#endif#ifndef OPENSSL_NO_ECDSA|| !ENGINE_set_ECDSA(e, ECDSA_OpenSSL())#endif#ifndef OPENSSL_NO_DH|| !ENGINE_set_DH(e, DH_get_default_method())#endif|| !ENGINE_set_RAND(e, RAND_SSLeay())#ifdef TEST_ENG_OPENSSL_RC4|| !ENGINE_set_ciphers(e, openssl_ciphers)#endif#ifdef TEST_ENG_OPENSSL_SHA|| !ENGINE_set_digests(e, openssl_digests)#endif#endif#ifdef TEST_ENG_OPENSSL_PKEY|| !ENGINE_set_load_privkey_function(e, openssl_load_privkey)#endif)return 0;/* If we add errors to this ENGINE, ensure the error handling is setup here *//* openssl_load_error_strings(); */return 1;}static ENGINE *engine_openssl(void){ENGINE *ret = ENGINE_new();if(!ret)return NULL;if(!bind_helper(ret)){ENGINE_free(ret);return NULL;}return ret;}void ENGINE_load_openssl(void){ENGINE *toadd = engine_openssl();if(!toadd) return;ENGINE_add(toadd);/* If the add worked, it gets a structural reference. So either way,* we release our just-created reference. */ENGINE_free(toadd);ERR_clear_error();} |
The good thing about the engine interface is that an engine need not be the only software and hardware implementation supported by OpenSSL by default, but can be ones own implementation. So, let us assume we have a software token implementation, which implements the RSA algorithm. Let us write a sample code that will register our implementation with the OpenSSL engine interface. Lets call our engine mytest.
if ( 0 == (ENGINE_set_id(eng, mytest) &&ENGINE_set_name(eng, MyTest OpenSSL Engine) &&ENGINE_set_load_privkey_function(eng, l_LoadMyTestPrivateKey) &&ENGINE_set_ciphers(eng, l_CiphersCb) &&ENGINE_set_default_ciphers(eng) &&ENGINE_set_digests(eng, l_DigestsCb) &&ENGINE_set_default_digests(eng) &&ENGINE_set_RSA(eng, l_EngineRsaMethod())) ) {LOG_AND_EXIT(There was an error registering mytest engine )}if ( 0 == ENGINE_add(eng) ) {LOG_AND_EXIT(There was an error adding mytest engine );}if ( 0 == ENGINE_init(eng) ) {LOG_AND_EXIT(There was an error initing mytest engine )} |
Customising the SSL/TLS communication channel
The BIO interface is an I/O abstraction layer that allows different kinds of I/O mechanisms to be implemented to customise communication as per real world needs. This is basically needed for implementers who look at the TLS implementation as a black box but want to customise the communication only as per their needs. The BIO interface can be found at $(ROOT)/include/openssl/bio.h
There are two types of BIOsa source-sink BIO and a filter BIO. The basic communication mechanismsfor example, communication over a socket or file (yes, TLS records can be written to and read from a file descriptor; remember, this could be a device file too)can be overridden with a source-sink BIO. As the name suggests, this acts as the source of data on the sending end and the sink on the receiving end. For filtering, buffering and translation activities, you can use a filter BIO. As you can see, you can pick and choose one source sink BIO, many filter BIOs and stack up BIOs, one on top of the other, like building blocks.
A BIO is overridden by registering a structure called BIO_METHOD, which contains hooks for different I/O operations. Please find the snippet from $(ROOT)/include/openssl/bio.h to see the BIO methods provided by OpenSSL:
BIO_METHOD *BIO_s_mem(void);BIO *BIO_new_mem_buf(void *buf, int len);BIO_METHOD *BIO_s_socket(void);BIO_METHOD *BIO_s_connect(void);BIO_METHOD *BIO_s_accept(void);BIO_METHOD *BIO_s_fd(void);#ifndef OPENSSL_SYS_OS2BIO_METHOD *BIO_s_log(void);#endifBIO_METHOD *BIO_s_bio(void);BIO_METHOD *BIO_s_null(void);BIO_METHOD *BIO_f_null(void);BIO_METHOD *BIO_f_buffer(void);#ifdef OPENSSL_SYS_VMSBIO_METHOD *BIO_f_linebuffer(void);#endifBIO_METHOD *BIO_f_nbio_test(void);#ifndef OPENSSL_NO_DGRAMBIO_METHOD *BIO_s_datagram(void);#ifndef OPENSSL_NO_SCTPBIO_METHOD *BIO_s_datagram_sctp(void); |
You may have noticed that the naming convention for the source sink BIO is BIO_s_* and for a filter BIO, it is BIO_f_*. These APIs return BIO_METHOD structures containing hooks, which implement the behaviour for each of these BIOs. These BIO methods are implemented by OpenSSL itself and are used for its default communication as well. So, the core functionality of a BIO is in its BIO_METHOD.
Now, lets look at how OpenSSL implements these BIOs. We will look at how a basic socket connection is implemented in OpenSSL and then at how we can override the default.
If you take a look at $(ROOT)/crypto/bio/bss_conn.c, you can see the BIO_METHOD structure that contains hooks for different operations on a socket connection. The code snippet is as follows:
static BIO_METHOD methods_connectp={BIO_TYPE_CONNECT,socket connect,conn_write,conn_read,conn_puts,NULL, /* connect_gets, */conn_ctrl,conn_new,conn_free,conn_callback_ctrl,}; |
In this code, BIO_TYPE_CONNECT specifies that it is a connection BIO. The function conn_write implements the functionality of writing to a socket, while conn_read implements reading from a socket. conn_ctrl implements control plane operations, like the current state of the machines in the whole TLS process (the implementations of these functions are also present in the same file).
As explained earlier, this is the default implementation of OpenSSL. To override this, we need to implement our own hooks. Given below is a code snippet that implements our user defined BIO method and registers it with OpenSSLs BIO interface:
static BIO_METHOD methods_connect= {BIO_TYPE_CONNECT,Connect overrides,l_bio_WriteCallback, /* This is a locally implemented callback for write operations */l_bio_ReadCallback, /* This is a locally implemented callback for read operations */l_bio_PutsCallback, /* Likewise for puts */NULL,l_bio_CtrlCallback, /* This is called to override/log commands being called */l_bio_NewCallback,l_bio_FreeCallback};/* Initialize OpenSSL library */static voidl_InitOpenSSL(){ERR_load_crypto_strings();ERR_load_SSL_strings();OpenSSL_add_all_algorithms();SSL_library_init();SSL_load_error_strings();}int main(){BIO *out=NULL, *ret=NULL, *con=NULL, *ssl_bio=NULL;SSL_CTX *ctx = NULL;//SSL *ssl = NULL;int len = 0;FILE *fd = NULL;char tmpbuf[1024];/* Initialize */l_InitOpenSSL();RET(ctx = SSL_CTX_new(TLSv1_client_method()));/* For client authentication */if( 1 == l_SetPrivateKeyAndCert(ctx) ) {printf(" key init failed \n");}/* =============================== */RET(con=BIO_new(&methods_connect));RET(ssl_bio=BIO_new_ssl(ctx,1));RET(ret=BIO_push(ssl_bio,con));BIO_get_ssl(ssl_bio, &ssl);if (!ssl) {fprintf(stderr, Cant locate SSL pointer\n);goto EXIT;}SSL_set_mode(ssl, SSL_MODE_AUTO_RETRY);RET(fd = fopen(OUT_FILE, w));RET(out = BIO_new_fp(fd, BIO_NOCLOSE));if (BIO_do_connect(ssl_bio) <= 0) {fprintf(stderr, Error connecting to server\n);printf(state = %s \n,SSL_state_string_long(ssl));ERR_print_errors_fp(stderr);goto EXIT;}BIO_puts(ssl_bio, GET <some specific file> HTTP/1.1\nHost: <IP address>:443\n\n);for (;;) {len = BIO_read(ssl_bio, tmpbuf, 1024);if (len <= 0) {break;}BIO_write(out, tmpbuf, len);}SSL_shutdown(ssl);printf(state read = %s \n,SSL_state_string_long(ssl));EXIT:BIO_free_all(ssl_bio);BIO_free(out);fclose(fd);return 0;} |
Finally, customise only if you have to
Everything has a flip side to it. For example, hardware acceleration is a good thing, but it comes with its own drawbacks like initial costs, the cost of upgrading, defect fixing, etc. There may be easier alternatives already supported in OpenSSL. One such example is the AES-NI support.
In order to achieve faster speeds, the x86 instruction set was extended to include the Advanced Encryption Standard New Instruction (AES-NI) set of instructions that are supported on some Intel and AMD processors as detailed in http://en.wikipedia.org/wiki/AES_instruction_set.
From version 1.0.1 onwards, OpenSSL supports the use of the AES-NI instruction set in order to speed up AES operations.
References
[1] Accelerating OpenSSL using Intel QuickAssist technology:
http://www.intel.co.uk/content/dam/www/public/us/en/documents/solution-briefs/accelerating-openssl-brief.pdf
[2] Global Internet Phenomena Report: www.electronics.dit.ie/staff/dclarke/Other Files/Sandvine_Global_Internet_Phenomena_Report_2H_2012.pdf
[3] Wikipedia on OpenSSL: http://en.wikipedia.org/wiki/OpenSSL


