Android is gaining market share and opening up new horizons for those who want to develop Android apps. Android app development doesnt require any investments because all the tools needed for it are free. It has been quite a while since Android app development began and most of us are aware of how things work. Just install Java, then install Eclipse, download the ADT (Android Development Toolkit) bundle, do a bit of configuration and you are all set to develop Android apps. Google provides us with a new IDE called Android Studio, which is based on IntellJ IDEA. It is different from Eclipse in many ways. The most basic difference is that you dont have to do any configuration like you would have to for Eclipse.
Android Studio comes bundled with the Android ADT, and all you need to do is to point it to where Java is installed on your system. In this article, I will cover a few major differences between Android Studio and the Eclipse+ADT plugin methods. Android Studio is currently available as an easy access preview’ or developer preview, so several features will not be available and there are chances that you may encounter bugs.
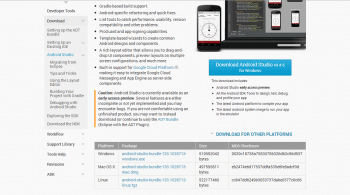
First, lets install Android Studio. Im assuming yours is a Windows OS with pre-installed JDK as the developer machines configuration. One thing to check is that the JDK version is later than version 6. Next, go to the link: http://developer.android.com/sdk/installing/studio.html. Here, youll see the button for downloading Android Studio. The Web page automatically recognises your OS and provides you with the compatible version. If you need to download for some other OS, just click on Download for other Platforms (refer to Figure 1).
Once downloaded, you can follow the set-up wizard. There might be a few challenges. For example, at times, for Windows systems, the launcher script isnt able to find Java. So you need to set an environment variable called JAVA_HOME and point it to your JDK folder. If you are on Windows 8, you can follow these steps to set an environment variable: click on Computer -> Properties -> Advanced System Settings -> Advanced Tab (on the System Properties Dialogue) -> Environment Variables. Then, under System Variables, click on New.
Another problem might be the PATH variable. In the same manner as above, reach the Environment Variable dialogue box, and there, instead of creating a new variable, find the existing PATH variable and edit it. To the existing value, just add a semicolon at the end (if its not already there) and add the path to the bin folder of the JDK. Also, please note that if you are working with a 64-bit machine, the path to JDK should be something like: C:\Program Files\Java\jdk1.7.0_21 and not C:\Program Files (x86)\Java\jdk1.7.0. If you dont have it in the former location, it means that a 64-bit version of Java isnt installed on your system; so install that first.
Now that the set-up is complete, we can go ahead and directly launch the Android Studio. There is no need to download the ADT plugin and configure it. When you launch it, you can see the Welcome screen (refer to Figure 2),

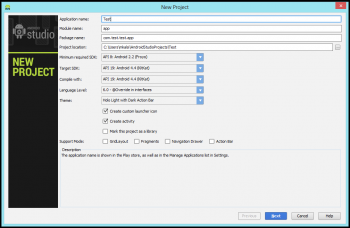
which is very powerful and deep. You can directly check out the Version Control Systems from the Welcome screen itself. The Version Control Systems supported are GitHub, CVS, Git, Mercurial and Subversion. Then, from the Configure menu within the Welcome screen, you can configure the SDK manager, plugins, import/export settings, project default settings and the overall settings for the IDEall this without even launching the IDE. You can also access the Docs and the How-Tos from the Welcome screen. Next, the New Project screen is almost similar to what it looked like in Eclipse, but now theres no need to select Android Application or anything else. You are directly at the spot from where you can start off a new Android Project (refer to Figure 3).
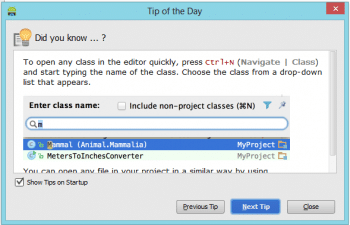
Among other interesting things about Android Studio is the Tip of the day section (refer to Figure 4), which makes you familiar with the IDE.
Now, lets focus on some specific features that come with Android Studio (and quoting directly from the Android Developers Web page):
- Gradle-based build support.
- Android-specific refactoring and quick fixes.
- Lint tools to catch performance, usability, version compatibility and other problems.
- ProGuard and app-signing capabilities.
- Template-based wizards to create common Android designs and components.
- A rich layout editor that allows you to drag-and-drop UI components, preview layouts on multiple screen configurations, and much more.
- Built-in support for Google Cloud Platform, making it easy to integrate Google Cloud Messaging and App Engine as server-side components.
One of the major changes with respect to Eclipse is the use of Gradle. Previously, Android used Ant for build, but with Android Studio, this task has been taken over by Gradle. In last years Google I/O, sources at Google had talked about the new Android build system - Gradle. To quote from the Gradle website: Google selected Gradle as the foundation of the Android SDK build system because it provides flexibility along with the ability to define common standards for Android builds. With Gradle, Android developers can use a simple, declarative DSL to configure Gradle builds supporting a wide variety of Android devices and App stores. With a simple, declarative DSL, Gradle developers have access to a single, authoritative build that powers both the Android Studio IDE and builds from the command-line. Owing to Gradle, people will also notice a change in the project structure as compared to the project structure in Eclipse. Everything now resides inside the SRC folder. But from a developers perspective, it is essentially all still the same.
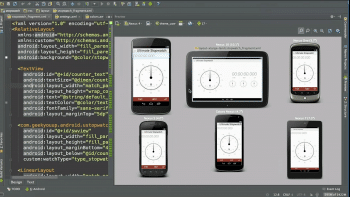
The other major, and rather useful, change is the ability to preview the layout on different screen sizes (refer to Figure 5, as shown during the Google I/O last year).
While retaining the drag-and-drop designer function, the text mode has the preview pane to the right which allows for previewing the layout on various screen sizes. There is also an option for making a landscape variation design for the same app without having to do anything much on the code level.
This is just the tip of the iceberg, and the features discussed above are amongst the major changes in terms of build and layout designing. I would encourage zealous developers who want to try out this IDE to visit the Android developers page and check out the Android Studio section. It is definitely a different way to approach Android app development, with the focus shifting towards development rather than configuration and management.




The most effective & attractive part in this article I found is Figure 4… I guess visitors attract more towards your article after reading this.
conference management app