In this article, the author guides the reader on how to create new apps using Python in conjunction with Django. The Eclipse IDE is used to demonstrate how a simple body mass indicator (BMI) app can be built.
Building an application on any platform is much easier than setting up the platform to do so. Developers have spent most of their time gathering the pre-requisites and setting up the platform to build an application. This article is aimed at beginners. It aims to help you to set up the Django framework in Windows for Python developers.
What is Django?
Django is an open source Web application framework written in Python, which follows the MVC (Model View Controller) architecture. In simple terms, a view is everything that is known to the user, seen by the user and interacted with by the user, like a GUI.
For most applications based on data, we need to store that data somewhere. So a model is nothing more than a logical data structure, like database tables and schemas. Whenever we have many branches, we need something to control all of them. So here, the controller sends a command to the view and the model to perform operations.
Setting up the platform
To develop any application, most developers prefer to use an IDE. Here, I am using Eclipse, which you can download from http://www.eclipse.org/downloads/.
Next, you need to install Python, whose latest version is 3.4.2. But since this version is not yet supported for all third party modules, its better to use a stable version of Python, like 2.7.x. You can download it from https://www.python.org/downloads/.
Python alone is not enough to build apps; we require an environment which provides all the dependencies required to build the app. So PyDev is the Python development environment that you can download from http://pydev.org/download.html.
The last and very important thing to take care of is Django. You can download it from https://www.djangoproject.com/download/. Download the zip/RAR file.
The steps
1. Install the Eclipse IDE.
2. Install Python. Download the appropriate version of the Python package depending on your OS, like the 32-bit or 64-bit version for Windows. Install the EXE file in your drive, say C:\>
3. Configure PyDev in Eclipse (with the Internet connected). Go to Eclipse -> Help -> Install new software -> Add new. Use www.pydev.org/updates as URL and pydev as name.
Click Next, then follow the instructions and you are done with setting up PyDev.
4. Now configure PyDev in Eclipse (without the Internet). Download the .zip file of PyDev for Windows and extract it in your drive. Extract the zip file under the Eclipse/dropin folder for older versions of Eclipse. Extract the zip file under Eclipse/plugin folder for newer versions of Eclipse. Restart Eclipse.
5. Configure Python in Eclipse. Go to Eclipse -> Windows -> Preferences -> Pydev -> Interpreter -> Python -> Add new and provide the path of the python.exe from the directory where you have installed Python.
6. Configure Django with Python in Eclipse. Download the .tar file for Windows, and extract it in your drive. Move to the Python directory and execute the following command:
C:\<python dir>\ python.exe C:\<django dir>\setup.py install |
This will automatically configure Django in Eclipse too.
How to build an app using Django and Python
Lets build a simple application that will calculate the BMI (body mass index), for which you just need to provide your height and weight as input. In this example, the name of the application is BMI_Calculator.
First, create a new application using Eclipse. Go to Eclipse -> New project->PyDev Django.
Right click on the root folder -> Django -> Create new application. You will be able to see a few sub-folders inside the root folder.
Below is the code for View.py:
# Create your views here.from django.http import HttpResponsefrom django import formsfrom django.shortcuts import renderfrom django.core.context_processors import requestdef form_print(request):return render(request, firstform.html, {})def form_get(request):height=request.POST.get(height,)weight=request.POST.get(weight,)weight=float(weight)height=float(height)BMI = weight/(height*height)weight=str(weight)height=str(height)BMI=str(BMI)return HttpResponse(Your Height = + height + meter + Your Weight = + weight + KG + Your BMI = + BMI )Url.pyfrom django.conf.urls import patterns, include, urlfrom BMI_Calculator.views import hello, form_print, form_geturlpatterns = patterns(,url(r^form_print/$, form_print),url(r^form_get/$, form_get),)Setting.pyMake changes in TEMPLATE_DIRS and INSTALLED_APPSPACKAGE_ROOT = os.path.abspath(os.path.dirname(__file__))TEMPLATE_DIRS = (os.path.join(PACKAGE_ROOT, templates))INSTALLED_APPS = (BMI_Calculator,) |
Keep Firstform.html file in the template folder (you can create one inside the root folder).
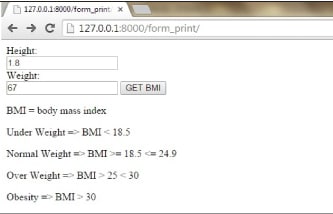
<html><body><form action=/form_get/ method=POST>{% csrf_token %}Height:<br><input type=text name=height value=Height in Meter><br>Weight:<br><input type=text name=weight value=Enter your weight in KG><input type=submit value=GET BMI></form><p>BMI = body mass index</p><p>Under Weight => BMI < 18.5</p><p>Normal Weight => BMI >= 18.5 <= 24.9</p><p>Over Weight => BMI > 25 < 30</p><p>Obesity => BMI > 30</p></body></html> |

You can refer to Figure 1 to see the output of the above code.
References
[1] https://docs.python.org/2.7/
[2] http://www.djangobook.com/en/2.0/index.html


