Security is a paramount concern today with identity theft becoming an everyday occurrence. Linux security is built around privileges given to users and groups. This article introduces the reader to the basics of user and group management in Linux
Linux is basically a kernel on which various distributions of operating systems have been developed, namely Red Hat, Fedora, Ubuntu, SUSE, etc. Since its inception, Linux has become the most dominant technology used to manage servers worldwide. In recent years, its popularity has extended to normal users also, rather than just being the administrators preferred choice. No doubt, one of the compelling attractions of Linux is that it is open source but another reason for choosing Linux for middle to high-end machines is that Linux is safe and secure.
A common myth is that Linux is built up on only plain text files, and that it is 100 per cent virus-free. However, this is not the truth. Hackers and crackers have always tried to inject threats into the Linux environment, and initially, they were successful to a certain extent. The reason for Linuxs security is that all its processes run strictly under the privileges allocated to various users by the systems administrator. Privileges, if implemented fairly well, make an unbreakable security layer around the Linux engine and prevent it from being attacked. In Linux, users and group members access a file systems contents (files and directories) based on the privileges assigned to them in the form of permissions. This is further enhanced by Access Control Lists, Sticky Bits and Security Enhanced Linux (SELinux).
Users and groups
A user is a person who is authorised to use the Linux interface under privileges issued by the systems administrator. Every person gets a username and password as credentials, which are to be passed during the login process for receiving an interactive shell. When we add a new user, several details are automatically configured by Linux. However, these can be customised as we will see later. There are five kinds of users:
- System user -works for system applications and has a non-interactive shell. These users need not log in; rather, they become active as their corresponding system services start.
- Super user – is the one who has full control over the Linux file system and is empowered with unlimited permissions. Root is the default super user.
- Owner user - is the one who is the creator or owner of the content and uses the allotted permissions.
- Group user – is one member of a group, all the members of which get the same permissions for some particular content.
- Other user - is the one who is not an owner of content. Write and Execute permissions are not given to this user, unless really required.
A group is a collection of users to whom common permissions are allocated for any content. There is only one user owner for any content but, when we need to allow multiple users to access or modify the content by working as shared owners of that content, group ownership comes into the picture.
There are two types of groups:
- Primary group is the default group of a user, which is mandatory and grants group ownership. It is mapped in /etc/passwd file with the corresponding user.
- The secondary group allows multiple users to become members in order to provide them content-accessing permissions. Members of this group do not get ownership of content.
Tips: 1. Adding and managing users seems to be very simple in graphical mode, but for administrators it is recommended to use commands on the terminal.
2. One user can have only one primary group, which is called his private group. However, users can enjoy secondary membership of multiple groups. This means that a user can be a member of multiple groups but only through secondary group membership.
Creating users and groups with default configurations
Let us add two new users named u1 and u2 with default configurations and issue a password to u1 only.
#useradd <username>
#passwd <username>

For Example:
#useradd u1
#passwd u1
#useradd u2
By default, a new group is created with the same name as the username and a /bin/bash shell is assigned. Also, the user gets a directory with this name inside /home and receives some predefined files from the /etc/skel directory for starting work.
A new group can be added as follows:
#groupadd <groupname>

For example:
#groupadd mygroup
Information and configuration parameters of users and groups
Information about existing users is present in /etc/passwd and has the following format:
<username>:<auth_check>:<userid>:<groupid>:<Comments>:<Homedirectory>:<Shell>
The various fields separated by : in this file are:
- username is a unique name issued to the person who is to use the Linux interface.
- The auth_check field only denotes whether this user has a password or not. The actual password is stored in /etc/shadow file.
- The userid is a unique number issued to identify a user. 1 – 499 are reserved for system applications and 499 onwards are issued to new users managed by the administrator. With default configurations, this ID is issued in an incremental manner.
- The groupid is a unique number issued to identify a group of users. 1- 499 are reserved for system applications and 499 onwards are issued to new groups managed by the administrator. With default configurations, this ID is issued in an incremental manner through the /etc/group file.
- The Comments field is optional and contains information about the user.
- The Home directory is the default path where users can manage their documents and keep them safe from other users.
- Shell is an environment provided as an interface to the user. Shell decides which tools, utilities and facilities are to be provided. Examples are ksh, bash, nologin, etc.

Password related information of the user is automatically managed in the /etc/shadow file. Here, passwords are saved in encrypted form.
Tips: Log in as the root user (the superuser with unlimited privileges) to access and manage these files.
Let us have a look at the /etc/passwd file by using the tail command.
You can see that system user tcpdump has IDs less than 500 while u1 and u2 have IDs that are greater than 500.
Let us have a look at the /etc/shadow file by using the tail command.
Here, u1 has an encrypted password while tcpdump and u2 have null passwords.
Tip: /etc/passwd- and /etc/shadow- are the backup files of /etc/passwd and /etc/shadow, respectively.
You can switch between user sessions by using the su command as #su – <username>
For example:
#su u1
Home directories of users exist under /home. The same can be checked by listing the contents of /home directory using command #ls /home. Directories of u1 and u2 will be displayed.
Information about existing groups is present in the /etc/group file and has the following format:
<groupname>:< auth_check >:<groupid>:<secondarymemberslist>

Let us have a look at the /etc/group file (Figure 2).
Here, no group is allotted as secondary to any user but soon we will see how to allocate secondary groups.
Group passwords are stored in the /etc/gshadow file.
Now the question is: where do the rules of default configurations reside? This is important for customisation.
The following files answer this question:
1. /etc/login.defs: Provides control over password aging, minimum-maximum allowable user IDs/group IDs, home directory creation and other settings.
2. /etc/default/useradd: Provides control over the home directory path, shell to be provided, kit-providing directory and other settings.
3. /etc/skel: This is the default directory acting as a start-up kit, which provides some pre-created files for new users.
Customising default configurations for a new user
It is always good to tweak the default configurations for several reasons. It provides better security since the default settings are known to almost every admin. It also creates a customised environment that suits your requirements. It even helps you to exhibit your advanced administration skills.
Let us customise the following default settings for any new user:
- Change the default home directory path.
- Change the permitted maximum user/group ID range.
- Change the location of the default start-up kit source.
To do this, edit login.defs and make the changes as shown:
# vim /etc/login.defs
Now, edit the useradd file:
# vim /etc/default/useradd
Next, create the /ghar and /etc/startkit directories with some files in startkit.
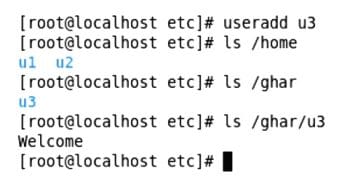
So, we have created a file named Welcome, which will be available in the home directory of all new users. Now, add a new user u3 and check its home directory under /ghar instead of /home.
We can see that u3 received the file named Welcome in the home directory automatically. Now, when we try to add more users, the effect of Min and Max user/group ids will not allow us to accomplish user/group creation. We cannot create more users since the maximum range of the UID has been reached, which can be verified in /etc/passwd.
Other alterations are also visible in /etc/passwd as per customisations.
Dynamically customising default configurations for a new user
We can also make changes in configurations for individual users during new user creation. The following are the options for useradd and usermod commands:
-u -> uid -d -> home directory -g -> primary group
-s -> shell -G -> Secondary Group
Let us add a new user called myuser with the user ID as 2014, the home directory as /myhome, the primary group as u1, secondary group as u2 and shell as ksh. Any of these options can be omitted, as required.
# useradd -u 2014 -d /myhome -g u1 -G u2 -s /sbin/ksh myuser
Tip: Manual UID and GID do not adhere to minimum and maximum ID rules.
Let us verify the user information in /etc/passwd.
Also, look at the /etc/group file to see the effect of secondary group membership of myuser with u2.
Tip: After customising the primary group through the command, a new group with the name of the user is not created.
Similarly, a group can also be configured with a specific ID during creation:
# groupadd -g 2222 testgroup
By default, every group should have a unique group ID, but a non-unique group ID can be forcibly shared among different group names using o as follows:
# groupadd o -g 2222 newgroup
We can verify the result of above commands in /etc/group.

Altering existing users and groups
The usermod and groupmod commands (with options that are the same used in creation) are used to alter the information, while userdel and groupdel commands are used to delete existing users and groups, respectively.
To change the user ID and secondary group of myuser, type:
# usermod -u 3333 -G newgroup myuser
Now, verify /etc/passwd and /etc/group files.
To change the name of newgroup to ngroup, type:
# groupmod -n ngroup newgroup
To modify gid of ngroup from 2222 to 4444, type:
# groupmod-g 4444 ngroup
To delete an existing group testgroup, type:
# groupdel testgroup
To delete an existing user u2, type:
# userdel u2
To delete an existing user u2 along with its home directory, type:
# userdel -r u2


