A typical Web mail application, which would be sufficient for the needs of an individual, is woefully inadequate when it comes to system generated emails. The obvious solution to this issue is to set up your own mail server. Here’s a detailed guide on how to go about it.
Email notifications have become a common feature, especially in SaaS applications. To send out email notifications, you can use Sendmail, which is usually available on any UNIX/Linux-based server. This should suffice if the volume of mail is small. For slightly larger volumes, any of the public mail services like Google and Yahoo can be used to push out emails. In this case, however, the mail ID of the sender will be similar to yourname@gmail.com. If you are conscious about building your brand and would like to send out emails from your domain, you can purchase a mail service from any of the hosting providers like GoDaddy. The advantage in this case is that the sender mail ID will be one that has your domain name: yourname@yourdomain.in
Why set up your own mail server?
The number of system generated mails from your programmes, like sign-up confirmations, password changes, etc, can hardly be predicted. A large volume of unsolicited mail from an IP to any of the public email services like Google and Yahoo is likely to get your IP blacklisted.
On the other hand, if you use a purchased email service from hosting providers, there is a limit to the volume of emails that can be sent out using their servers. I discovered that I was able to send out about 80 mails with GoDaddy, though the FAQ on its site mentioned that about 300 emails could be pushed out at a time. To send out larger volumes, I had to purchase a different plan.
If you are running a marketing or email campaign, its recommended that you use any of the public bulk mail services like Mail Chimp (http://www.mailchimp.com) or Mail Gun (http://www.mailgun.com). These services ensure that you maintain a good reputation for your domain.
However, for transactional notifications like when you want to notify a diner that her table booking has been confirmed, the volume of emails depends on the popularity of the site. High volumes require very deep pockets if you are signing up for a third party mailing service. In such a situation, creating a fully functional SMTP, POP or IMAP server is a necessity.
Terminology
Before we start setting up a mail server, let’s take a quick look at the basic terminology that will be used, so that there’s no ambiguity later on. MTA: A Mail Transfer Agent or Message Transfer Agent is the piece of software that transfers messages from one computer to another using SMTP (Simple Mail Transfer Protocol). It implements both the sending and receiving components. MDA: A Mail Delivery Agent or Message Delivery Agent is a piece of software that is responsible for the delivery of the messages or mail to a recipient’s mailbox.
What is to be installed?
To have fully operational email capabilities, well need to install the following: Postfix: A MTA and the most popular alternative to Sendmail that was released by Wietse Venema in December 1998 Dovecot: A mail server suite that includes a MDA, an IMAP and POP3 server. It was released in 2002 by Timo Sirainen. SpamAssassin: An email spam filtering software originally written by Justin Mason, and which is part of the Apache Foundation. SquirrelMail: A Web mail interface originally written by Nathan and Luke Ehresman.
Setting up the Virtual Private Server (VPS)
We’ll need a VPS and the smaller the better. A 20 GB HDD and 512 MB of memory should suffice. Digital Ocean, Rackspace and Tata Insta Compute have such offerings, though there must be other providers with similar options. Spin an instance with the bare minimum configuration using CentOS 6.x. If you prefer Ubuntu, you can spin an Ubuntu instance, but the rest of the article assumes that you have CentOS installed on your VPS.
Most Linux distributions have Sendmail running by default. Check if Sendmail is running on your VPS and remove it. Well install Postfix to do its job.
psaux | grepsendmail
yum remove sendmail
Set up the fully configured domain name as the host name by executing the following command:
Alternatively, openthe network fileusing an editor like Nano or Vi, and typeinthe host name, i.e., replace sastratechnologies.inwith your domain name.
nano /etc/sysconfig/network
HOSTNAME=sastratechnologies.in
Next, openthe hosts fileusing Nano or Vi, and add a host entry foryour domain. In the example below, replace the IP address and the domain with your IP address and domain:
nano /etc/hostsfile
146.185.133.41 sastratechnologies.in
Change the timezone of your VPS by executing this command:
Next, setup your iptables to allow incoming and outgoing connections on ports 25, 110, 143, 465, 587,993 and 995. You can put these commands ina fileand execute them:
iptables -F
iptables -A INPUT -p tcp --tcp-flags ALL NONE -j DROP
ip tables -A INPUT -p tcp! --syn -m state --state NEW -j DROP
ip tables -A INPUT -p tcp --tcp-flags ALL ALL -j DROP
iptables -I INPUT -m state --state ESTABLISHED,RELATED -j ACCEPT
iptables -P OUTPUT ACCEPT
iptables -P INPUT DROP
iptables -L -n
iptables-save | sudotee/etc/sysconfig/iptables
service iptables restart
We have completed setting up the VPS. We should now installthe postfix MTA. Execute this commandfrom the terminal:
yum -y installpostfix
You should see some messages on the screenwhileit is getting installed.
<strong>Installing SMTP authentication and creating certificates</strong>
Having installed Postfix, let's now installthe SMTP AUTH packages, whichprovide a SSL channel foryour SMTP server. Install the packages by executing the following commandfrom the terminal:
You are about to be asked to enter information that will be incorporated
into your certificate request.
What you are about to enter is what is called a Distinguished Name or a DN.
There are quite a few fields but you can leave some blank
For some fields there will be a default value,
If you enter '.', the field will be left blank.
-----
Country Name (2 letter code) [XX]:IN
State or Province Name (full name) []:Tamilnadu
Locality Name (eg, city) [Default City]:Chennai
Organization Name (eg, company) [Default Company Ltd]:Sastra Technologies Pvt. Ltd.,
Organizational Unit Name (eg, section) []:Netraja
Common Name (eg, your name or your server's hostname) []:sastratechnologies.net
Email Address []:info@sastratechnologies.in
<strong>Update the DNS Zone entries</strong>
After generating the SSL keys, setup the DNS Zone entries so that you designate the VPS forsending and receiving mail.
Set up the MX entries forpop, imap and smtp to point to your IP address. Create an mx record that points to a CNAME record which, inturn, points to an A record that points to the mail server IP.
Most registrars will have a Web interface that allows you to dothis. The interface may differ slightly but the DNS records are specified ina standard format.
<strong>Setting up Postfix</strong>
Open the Postfix main.cf configuration fileand makethe following changes:
Now add these lines at the bottom of the file. Use your host and domain names. The IP addresses indicate the IPs that are allowed to connect to Postfix. At the very least, these addresses should contain 127.0.0.0/8, whichindicates localhosts. The other addresses mentioned are that of our server's IPs; you should substitute these with the addresses of your servers ifyou want the mail host to serve morethan one application forsending out emails.
Ensure that you retain the two blank spaces before the '-o' when you save the file. Postfix is a bit finicky when it reads this fileand will report vague errors ifthis space convention is not adhered to. Now lets restart Postfix and sasl auth services:
service postfix start
service saslauthd start
chkconfig --level 235 postfix on
chkconfig --level 235 saslauthd on
<strong>Check SMTP connectivity</strong>
Let us now check ifPostfix is running by Telnet. From your terminal, run the following command:
telnet localhost 25
...thentype:
ehlo localhost
Your transcript will looksomething like what follows:
The going is good and though the server is ready to receive mails, we are yet to create users. So let's doso now.
<strong>Install and configure SpamAssassin</strong>
SpamAssassin is an email spam filter that uses DNS-based fuzzy logic, Baynesian filtering and several other methods forspam detection. To installit, run the following commandinyour terminal:
yum installspamassassin
Open the SpamAssassin configuration fileas follows:
nano /etc/mail/spamassassin/local.cf
You should see the following entries inthe file:
required_hits 5
report_safe 0
rewrite_header Subject [SPAM]
The <em>required_hits</em> determines the intensity of the filter. The lower the score, the higher the filter aggression. For a start-up organisation, you could setit at 5. Higher values will letmoreincoming mails to pass through.
The <em>report_safe</em> parameter determines whether the incoming mail is delivered to the intended recipient after being flagged as spam or trashed. If you want all spam to be trashed mercilessly, use a value of 1. Otherwise, use 0, inwhichcasemails that are appended with a spam notice inthe subject line are still sent to the recipients inbox.
The rewrite header specifies the text that is appended to the subject line of any mail that is flagged as spam. In our case, we'll have [SPAM] appended to our subject line. You could also use ****S P A M**** ifyou wish to draw the recipients attention.
Let's add another parameter required_score, whichsets the score forall emails allowed through to your domain. A score of 0 will classify the email as legitimate, whilea score of 5 will classify an email as definite SPAM. Lets setit to 3, whichwill letus trapa few unsolicited mails but will also flag a few falsepositives.
required_score 5
SpamAssassin relies on two UNIX daemon processes to work correctly-<em>spamd</em> and <em>spamc</em>. <em>Spamd</em> waits fornew email to arriveonce it receives an incoming connection it spawns the spamc daemon to readthe email from the respective socket. Spamc reads the email and once it encounters an EOF, it will pass the message to spamd. Spamd will thenrewrite the message based on your spam rules, e.g., it may rewrite the header with [SPAM] inthe beginning and pass it back to spamc. The spamc daemon process thenends and Dovecot processes the incoming message.
Because of the nature of these daemon processes, we'll need to create a separate group and user forspamd to integrate with Postfix:
Let's create users who'll have the accounts to receive mail but will not be able to log into the server. Since my user ID already exists, letme create that of my colleagues:
useradd-m amarnath.m -s /sbin/nologin
useradd-m balaji.k -s /sbin/nologin
useradd-m balamurugan.k -s /sbin/nologin
useradd-m premnath.b -s /sbin/nologin
Feel free! Add as many usersas you want! You don't have to pay foreach mail ID that you create. Set their passwords using the following commands:
passwdamarnath.m
passwdbalaji.k
passwdbalamurugan.k
passwdpremnath.b
Test one of the users' configurations in Thunderbird. You should be able to successfully set up an account. Your mail server is now ready. But like any organisation, roving programmers need a Web interface. So let's installSquirrel Mail.
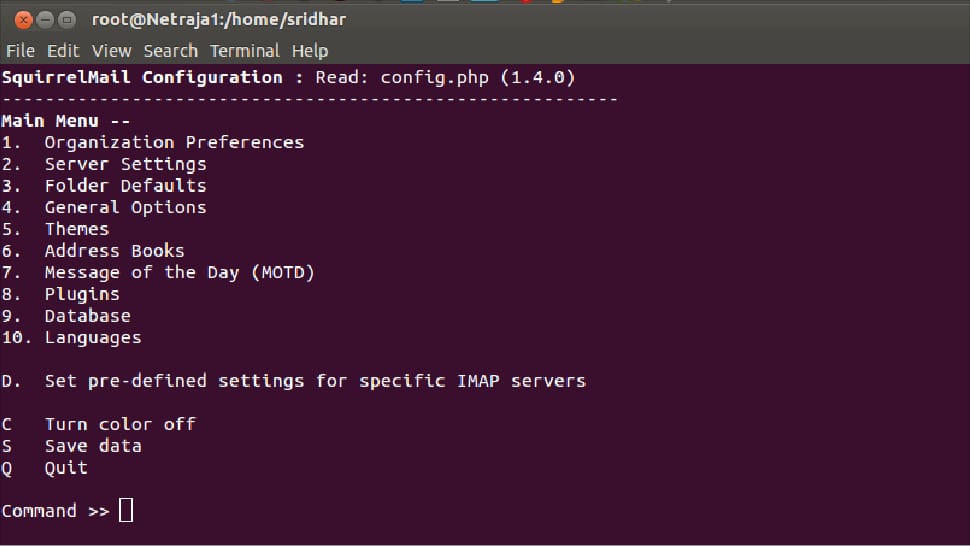
<strong>Install and configure Squirrel Mail</strong>
Squirrel Mail is a fabulous Web mail client but has a very modest user interface. Its available from the EPEL repository (Extra Packages forEnterprise Linux). So enablethe EPEL repository using <em>rpm</em>:
Figure 1 Configuration of squirrel mailFigure 2 Squirrel mail
Start the Apache service and enable it on boot:
service httpd start
chkconfig --level 235 httpd on
Fire up a browser and type<em>http://serverip/webmail</em> inthe URL bar (remember to replace the server IP with your servers IP address); you will see the login screen. Log inusing the user credentials you created earlier.
Congratulations! You are now ready to roll out your mail server across your organisation.
We have successfully installed a mail server forour SaaS application. With external email service providers, the throughput is about 80 emails per send attempt. Rolling out your own email server enables you to scale to a whopping 40,000 mails on a 512 MB RAM VPS. However, there were a few issues that we encountered. Since cloud server IP addresses are dynamically assigned, some email providers don't accept emails that originate from cloud servers. But there are ways to tell these servers that your mails are genuine, whichis the subject of another article.
I’m able to send and receive mails successfully. Thanks to you.
I wanted to ask is there a way to parse the mail and forward the mail to another ID automatically if the mail contains any abusive content. Any help would be appreciated.


Real nice one. Brings memories of when I started my career as a Free Software Enthusiast with mainly mail servers :) Thanks for sharing.
Glad you liked it.
Just install zimbra!
Nice
I’m able to send and receive mails successfully. Thanks to you.
I wanted to ask is there a way to parse the mail and forward the mail to another ID automatically if the mail contains any abusive content. Any help would be appreciated.