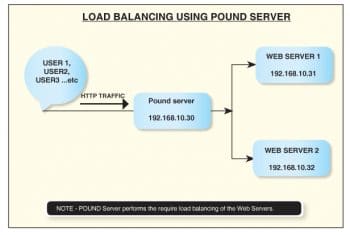
This article explains how to perform software-based load balancing using the Pound package. The Pound server, Web Server1 and Web Server2 are installed on Red Hat Enterprise Linux Server 6.1 (32 bit).
The end user [User1, User2, User3, etc] sends HTTP traffic to the Pound server, which in turn performs the load balancing and sends it to the required backend Web servers.
The default load balancing algorithm used is Round Robin.
Architecture
Shown in Figure 1 is the self-explanatory architectural diagram of the Pound server gateway and the backend Web servers.
Pre-requisites
The following pre-requisites apply to the three serversthe Pound server and both backend Web servers.
1. All servers uses RHEL6.1 as OS. The hostnames and IP addresses used are:
Pound server PoundGateway.linuxrocks.org 192.168.10.30Web server 1 ApacheWebServer1.linuxrocks.org 192.168.10.31Web server 2 ApacheWebServer2.linuxrocks.org 192.168.10.32 |
2. All servers /etc/hosts configuration files should contain all the servers details. They should look like the example shown below:
#cat /etc/hosts127.0.0.1 localhost localhost.localdomain localhost4 localhost4.localdomain4::1 localhost localhost.localdomain localhost6 localhost6.localdomain6192.168.10.30 PoundGateway PoundGateway.linuxrocks.org192.168.10.31 ApacheWebServer1 ApacheWebServer1.inuxrocks.org192.168.10.32 ApacheWebServer2 ApacheWebServer2.linuxrocks.org |
3. Set the IP address [Command ifconfig; System -> Preferences -> Network Connection]
4. Turn off the firewall [System -> Administration -> Firewall]
5. SElinux should be disabled [Command getenforce; Configuration File /etc/sysconfig/selinux]

Installation and configuration of Web servers
The default Apache Web Service will be installed on both the backend servers. Since the installation and configuration of Apache Web Service is exactly the same for both the servers, for purposes of documentation, lets record all the steps in ApacheWebServer1. The same steps are to be performed in ApacheWebServer2.
So lets proceed.
Mount the RHEL6.1 DVD and browse the Packages directory.
Install Apache Web Service:
[root@apachewebsever1 Packages]# rpm -ivh --aid --force httpd-2.2.15-9.el6.i686.rpmwarning: httpd-2.2.15-9.el6.i686.rpm: Header V3 RSA/SHA256 Signature, key ID fd431d51: NOKEYPreparing... ########################################### [100%]1:httpd ########################################### [100%][root@apachewebsever1 Packages]# |
Start the service:
[root@apachewebsever1 ~]# service httpd startStarting httpd: [ OK ][root@apachewebsever1 ~]# |
Start the service at boot time:
[root@apachewebsever1 ~]# chkconfig httpd on[root@apachewebsever1 ~]#[root@apachewebsever1 ~]# chkconfig --list httpdhttpd 0:off 1:off 2:on 3:on 4:on 5:on 6:off[root@apachewebsever1 ~]# |

The directory location of Apache HTTP Service is /etc/httpd/. Figure 2 gives the default test page for Apache Web Server on Red Hat Enterprise Linux.
Now, lets create a Web page index.html at /var/www/html. Restart Apache Web Service to bring the changes into effect.
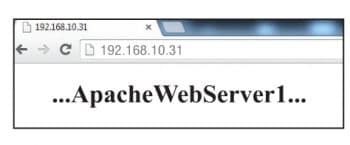
The index.html Web page will be displayed (Figure 3).
Repeat the above steps for Web Server2 ApacheWebServer2.linuxrocks.org, except for the following:
- Set the IP address to 192.168.10.32
- The contents of the custom Web page index.html should be ApacheWebServer2 as shown in Figure 4.


Installation and configuration of Pound
gateway server
First, ensure YUM is up and running:
[root@poundgateway ~]# ps -ef | grep yumroot 2050 1998 0 13:30 pts/1 00:00:00 grep yum[root@poundgateway ~]#[root@poundgateway ~]# yum clean allLoaded plugins: product-id, refresh-packagekit, subscription-managerUpdating Red Hat repositories.Cleaning repos:Cleaning up Everything[root@poundgateway ~]#[root@poundgateway ~]# yum update allLoaded plugins: product-id, refresh-packagekit, subscription-managerUpdating Red Hat repositories.Setting up Update ProcessNo Match for argument: allNo package all available.No Packages marked for Update[root@poundgateway ~]# |
Then, check the default directory of YUM:
[root@poundgateway ~]# cd /etc/yum.repos.d/[root@poundgateway yum.repos.d]#[root@poundgateway yum.repos.d]# lltotal 8-rw-r--r-- 1 root root 67 Jul 27 13:30 redhat.repo-rw-r--r--. 1 root root 529 Apr 27 2011 rhel-source.repo[root@poundgateway yum.repos.d]# |
By default, the repo file rhel-source.repo is disabled. To enable, edit the file rhel-source.repo and change the value
enabled = 1 |
or
enable = 0 |
For now you can leave this repository disabled.
Now, download the epel-release-6-8.noarch.rpm package and install it.
Important notes on EPEL
1. EPEL stands for Extra Packages for Enterprise Linux.
2. EPEL is not a part of RHEL but provides a lot of open source packages for major Linux distributions.
3. EPEL packages are maintained by the Fedora team and are fully open source, with no core duplicate packages and no compatibility issues. They are to be installed using the YUM utility.
The link to download the EPEL release for RHEL 6 (32-bit) is: http://download.fedoraproject.org/pub/epel/6/i386/epel-release-6-8.noarch.rpm
And for 64 bit, it is:
http://download.fedoraproject.org/pub/epel/6/x86_64/epel-release-6-8.noarch.rpm
Here, epel-release-6-8.noarch.rpm is kept at /opt:
Go to the /opt directory and change the permission of the files:
[root@poundgateway opt]# chmod -R 755 epel-release-6-8.noarch.rpm[root@poundgateway opt]# |
Now, install epel-release-6-8.noarch.rpm:
[root@poundgateway opt]# rpm -ivh --aid --force epel-release-6-8.noarch.rpmwarning: epel-release-6-8.noarch.rpm: Header V3 RSA/SHA256 Signature, key ID 0608b895: NOKEYPreparing... ########################################### [100%]1:epel-release ########################################### [100%][root@poundgateway opt]# |
epel-release-6-8.noarch.rpm installs the repo files necessary to download the Pound package:
[root@poundgateway ~]# cd /etc/yum.repos.d/[root@poundgateway yum.repos.d]# lltotal 16-rw-r--r-- 1 root root 957 Nov 4 2012 epel.repo-rw-r--r-- 1 root root 1056 Nov 4 2012 epel-testing.repo-rw-r--r-- 1 root root 67 Jul 27 13:30 redhat.repo-rw-r--r--. 1 root root 529 Apr 27 2011 rhel-source.repo[root@poundgateway yum.repos.d]# |
As observed, epel.repo and epel-testing.repo are the new added repo files. No changes are made in epel.repo and epel-testing.repo. Move the default redhat.repo and rhel-source.repo to the backup location. Now, connect the server to the Internet and, using the yum utility, install Pound:
[root@PoundGateway ~]# yum install Pound* |
This will install Pound, Pound-debuginfo and will also install required dependencies along with it.
To verify Pounds installation, type:
[root@PoundGateway ~]# rpm -qa PoundPound-2.6-2.el6.i686[root@PoundGateway ~]# |
The location of the Pound configuration file is /etc/pound.cfg
You can view the default Pound configuration file by using the command given below:
[root@PoundGateway ~]# cat /etc/pound.cfg |
Make the changes to the Pound configuration file as shown in the code snippet given below:
- We will comment the section related to ListenHTTPS as we do not need HTTPS for now.
- Add the IP address 192.168.10.30 under the ListenHTTP section.
- Add the IP address 192.168.10.31 and 192.168.10.32 with Port 80 under Service Backend Section, where [192.168.10.30] is for the Pound server; [192.168.10.31] for Web Server1 and [192.168.10.32 ] for Web Server2.The edited Pound configuration file is:
[root@PoundGateway ~]# cat /etc/pound.cfg## Default pound.cfg## Pound listens on port 80 for HTTP and port 443 for HTTPS# and distributes requests to 2 backends running on localhost.# see pound(8) for configuration directives.# You can enable/disable backends with poundctl(8).#User "pound"Group "pound"Control "/var/lib/pound/pound.cfg"ListenHTTPAddress 192.168.10.30Port 80End#ListenHTTPS# Address 0.0.0.0# Port 443# Cert "/etc/pki/tls/certs/pound.pem"#EndServiceBackEndAddress 192.168.10.31Port 80EndBackEndAddress 192.168.10.32Port 80EndEnd[root@PoundGateway ~]# |
Now, start the Pound service:
[root@PoundGateway ~]# service pound startStarting Pound: starting... [OK][root@PoundGateway ~]#To configure the service to be started at boot time, type:[root@PoundGateway ~]# chkconfig pound on[root@PoundGateway ~]# chkconfig list poundpound 0:off 1:off 2:on 3:on 4:on 5:on 6:off[root@PoundGateway ~]# |
Observation
Now open a Web browser and access the URL http://192.168.10.30. It displays the Web page from Web Server1ApacheWebServer1.linuxrocks.org
Refresh the page, and it will display the Web page from Web Server2 ApacheWebServer2.linuxrocks.org
Keep refreshing the Web page; it will flip from Web Server1 to Web Server2, back and forth. We have now configured a system where the load on the Web server is being balanced between two physical servers.


