Now empower your organisation the open source way! Learn about the Eucalyptus private cloud platform and then go on to install, configure and work with it.
Eucalyptus is an open source cloud platform that enables organisations to create private clouds inside their data centres using existing virtualised infrastructure.
First released in 2008, ‘Eucalyptus’ is actually an acronym that stands for ‘Elastic Utility Computing Architecture for Linking Your Programs to Useful Systems’.
Eucalyptus enables IT organisations to build Amazon Web Services (AWS)-compatible private clouds that can pool together existing virtualised IT resources and provide them to its customers in a flexible, on-demand, pay-as-you-go basis.
The Eucalyptus cloud platform primarily comprises of five main components, each briefly explained below:
Cloud controller (CLC): The cloud controller is essentially a Web-based interface between Eucalyptus and the outside world. It provides cloud administrators an interface with which they can configure and manage the cloud’s underlying compute, storage and network resources. It also handles high-level user authentication, quota management along with a few basic accounting and reporting mechanisms. Users can also query the CLC using Eucalyptus’s command line tools called Euca2ools.
Walrus: Walrus provides persistent storage capabilities to all of the virtual machines in the Eucalyptus cloud. It is basically a large storage container where users can upload data from any file type using simple HTTP put-get queries.
Cluster controller (CC): A typical Eucalyptus cloud set-up can comprise multiple nodes, which are actually hypervisors on which virtual machines are provisioned. These nodes can be collectively grouped and managed by using the cluster controller, which primarily looks after the inter-node communications and Service Level Agreements (SLAs) of each cluster.
Storage controller (SC): The storage controller provides persistent block-level storage for virtual machines that are launched within a Eucalyptus cloud. The SC interfaces with a wide variety of storage systems including local file systems, NFS, SAN and even iSCSI.
Node controller (NC): Node controllers or nodes are hypervisor-based virtualised servers that host virtual machines which are provisioned by the Eucalyptus cloud. Eucalyptus additionally provides an optional add-in component that even supports VMware ESXi hypervisor as a node, called a VMware broker.
Features
The latest release of Eucalyptus (Version 3.3.2) introduces many new features, some of which are explained below.
Auto-scaling: Mirrored on the concept of auto-scaling by AWS, Eucalyptus too provides similar APIs that help cloud administrators set rules and policies that enable applications running on virtual machines to scale-up and scale-down dynamically, based on fluctuating workloads.
Elastic load balancing: This is basically a service that provides better availability and scalability for applications running atop the Eucalyptus cloud. It automatically senses and distributes incoming application traffic and service calls across multiple running instances, thus improving the performance and uptime of the application.
CloudWatch: This provides monitoring for virtual machines and applications hosted on the Eucalyptus cloud. Using CloudWatch, users can programmatically track, collect and analyse metrics, set alarms to troubleshoot performance issues and take automated action as well, based on the state of the cloud environment.
Resource tagging: This allows users and cloud administrators to assign meaningful metadata to cloud resources. This helps in tracking, as well as eases management and monitoring of specific resource collections used across the cloud.
Maintenance mode: This feature enables cloud administrators to perform maintenance activities on the Eucalyptus cloud without any potential downtime. This helps make sure that the applications hosted on the cloud are always running and that they meet the required SLA levels as well.
Setting up Eucalyptus in your own backyard
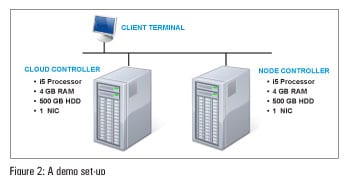
In this guide, let’s set up a simple Eucalyptus cloud on a set of two machines, one acting as the management server containing the cloud controller, Walrus, the cluster controller and the storage controller, and the other as the node controller running atop a KVM hypervisor.
Figure 2 shows the set-up diagram. In this scenario, we are using two simple desktop machines, each equipped with 4 GB RAM, a 500 GB hard drive and a VT-enabled (Virtualisation Technology) processor on-board. These are the bare minimum requirements to set up a Eucalyptus cloud. However, you can follow the same steps even if you have more machines with better compute capacity between them.
Note: The design can vary as per your requirements, although a minimum of two machines are required to set up the cloud.
Installing the node controller
There are two main ways of going about installing Eucalyptus. The first way is to download the required RPMs onto your machine, install each of them and then manually configure the cloud as per your needs. The second way is much faster and will get your Eucalyptus cloud up and running in a matter of minutes. For this tutorial, let’s use the second method, i.e., Eucalyptus Faststart. This is primarily a CentOS-based ISO with all the necessary Eucalyptus components embedded in it. All you need to do is burn the ISO to a DVD or USB and run it on your machine. A self-explanatory wizard guides you through the install process and sets up your Eucalyptus cloud for you.
Note: It is recommended that you install the node controllers first so that it becomes easier to add them to the cloud controller once they are all up and ready.
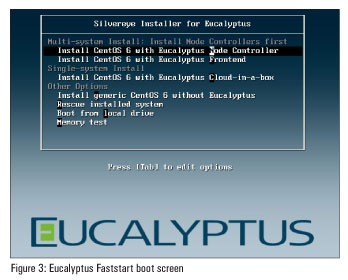
Installing the node controller is a very simple process. Once your machine boots from the Eucalyptus Faststart DVD, select the option ‘Install CentOS 6 with Eucalyptus Node Controller’ from the boot screen.
Next, select the appropriate ‘Language’ and ‘Keyboard settings’ according to your locale.
Provide a ‘Static IP’ and a suitable ‘Host Name’ to your node controller in the ‘Network Configuration’ wizard.
Provide a strong ‘Root Password’ for your node controller. Once done, your node controller along with the base OS will be installed. You will have to reboot your system once the installation completes.
Log in to the node controller using the root user’s username and password. A few scripts run automatically at this time to set the node controller’s networking configurations. Once completed, your node controller is ready to be added to a cloud controller.
Note: Follow the above mentioned steps for each of the node controllers that you wish to use for your cloud.
Installing the cloud controller
Installation of the cloud controller is very similar to the nodes, with a few exceptions. Once your machine boots from the Eucalyptus Faststart DVD, select the option ‘Install CentOS 6 with Eucalyptus Frontend’ from the boot screen.
Again, select the appropriate ‘Language’ and ‘Keyboard settings’ according to your needs.
Provide a ‘Static IP’ and a suitable ‘Host Name’ to your cloud controller in the ‘Network Configuration’ wizard.
Once done, you will be provided with an interface to supply a ‘Public IP Range/ List’ (see Figure 4) for your Eucalyptus cloud. You need to enter a valid IP address range here. These public IPs will be mapped to individual Eucalyptus instances (virtual machines) once they are launched in the cloud.
The rest of the installation process remains the same. Once the cloud controller reboots, it will start executing a lot of configuration scripts that will set Walrus, the cluster controller and the storage controller with a few default parameters. The scripts also create a CentOS 6 EMI (Eucalyptus Machine Image). You can use this EMI to launch multiple CentOS 6 instances in your cloud.
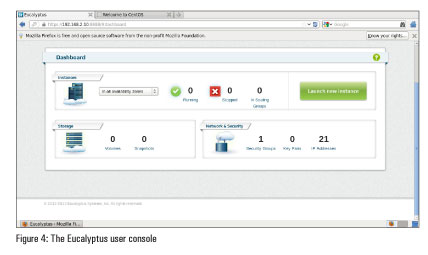
To test whether the installation was successful, open a Web browser and type in the following to view the Eucalyptus user console: http://<Cloud_Controller_IP>:8888
Launching your first instance
To launch your first instance, all you need to do is follow these simple steps:
1) Create a security group: A security group is similar to a firewall that protects your instance against network-related attacks. By default, all inbound traffic to the instance is blocked.
To create a security group, use the following syntax:
# euca-create-group 'd 'Description of the group' Group_Name

# euca-create-group 'd 'My First Security Group' TestSecurityGroup
Once your group is created, open the necessary ports such as SSH port 22 to obtain access to the instance.
To open a port for your security group, use the following syntax:
# euca-authorize 'P 'Protocol' p 'Port_No' 's 'IP_Source'Group_Name

# euca-authorize 'P 'tcp' 'p '22' 's '0.0.0.0/0' TestSecurityGroup
2) Create a key pair: A key pair acts as an authentication token between the users and their instances.
To create a key pair, use the following syntax:
# euca-create-keypair Key_Pair_Name' >> 'Key_Pair_Name'.private

# euca-create-keypair TestKeypair >> TestKeypair.private
3) Launch the instance: An instance is launched from a machine image (in this case, EMI). You will require an EMI ID to launch your first instance. This can be obtained from the Eucalyptus cloud user console.
To launch an instance, use the following syntax:
# euca-run-instances'EMI_ID' 'g 'Group_Name' 'k 'Key_Pair_Name'

# euca-run-instances 'EMI-E90A38DA' 'g 'TestSecurityGroup' 'k 'TestKeypair'
The instance can take a couple of seconds to launch. You need to note down the instance IP address either from the terminal or by using the Eucalyptus cloud user console. SSH into the instance using the earlier created key pair by using the following syntax:
# ssh -i <Key_Pair_Name> ec2-user@<Instance_IP>

# ssh -i TestKeypair ec2-user@192.168.2.100
References
http://www.eucalyptus.com/eucalyptus-cloud/get-started/try
http://www.eucalyptus.com/docs/eucalyptus/3.3/user-guide/toc.html


Interesting read. An important benefit of Cloud Server is that you can access what you need and when you need, provides you full flexibility to work. Ricoh data center also providing best services on Cloud Server.
Thanks for sharing the post with us. Looking forward for such nice posts…
Nice.. How to setup IaaS service? Please help me to setup. I use Eucalyptus 3.4.2.
could you please share the faststart iso file link , because the iso file i got (faststart 3.4.2) when i installed in node controller ,after login for root no scripts run ,
please help me with this
Dear Sir
I need Eucalyptus ISO file to install on computer for my research. Can you help me in this regard. the Email is sunny.uos@gmail.com
thanks
Nice & Helpful Post.
Best services on cloud hosting is also providing by 2GB
Hosting.
[…] Source: Build Your Own Private Cloud with Eucalyptus – LINUX For You […]
As an ICT service provider, http://primeinfoserv.com delivers Data Centre services, Enterprise-grade Cloud Services, Security services, Network services, Application services, Technology Integration services and related Managed service. Our Managed service plays a crucial role in providing end-to-end IT management services to transform an organization’s IT needs and align with current and future business needs.
how can i install eucalyptus cloud in cent os? can u give suggestions to download faststart iso image file for cent os 7.4?