A popular myth about Common Lisp is that it does not support a GUI. This is not true. Lisp systems have supported the GUI since the late 1970s — much before low-cost consumer computers adopted it. The Xerox Alto, developed at Xerox PARC in 1973, was the first computer to use the desktop metaphor and a mouse-driven GUI. It was not a commercial product. Later, Xerox Star was introduced by Xerox Corporation in 1981. This was the first commercial system to incorporate the GUI, and it came with Lisp and SmallTalk for the research and software development market (the Apple Macintosh, released in 1984, was the first commercially successful product to use a multi-panel window GUI).
Windows and Macintosh users occasionally find the Lisp GUI coarse and a bit unfamiliar. Several commercial Lisp environments offer graphical interface builders that let you build widgets with point/click and drag/drop techniques, but the look and feel is often “plain”. These Lisp environments typically provide wrappers around the collection of graphic routines supported by the OS, such that these wrappers can be used from within your Lisp program.
Examples using LispWorks and CAPI toolkit
LispWorks is an IDE for ANSI Common Lisp. It runs on Linux, Mac OS X, Windows and other operating systems. It uses Common Application Programmer’s Interface (CAPI), which is a library for implementing portable window-based application interfaces.
CAPI is a conceptually simple, CLOS-based model of interface elements and their interaction. It provides a standard set of these elements and their behaviours, as well as giving you the opportunity to define elements of your own. CAPI currently runs under the X Window System with either GTK+ or Motif, and on Microsoft Windows and Mac OS X. Using CAPI with Motif is deprecated.
Let’s create a few GUI elements using LispWorks and CAPI.
Menus
You can create menus for an application using the menu class. Let us start by creating a test-callback and a hello function, which we’ll need to create and test our GUIs.
(defun test-callback (data interface) (display-message "Data ~S in interface ~S" data interface))(defun hello (data interface) (declare (ignore data interface)) (display-message "Hello World")) |
The following code then creates a CAPI interface with a menu, Foo, which contains four items. Choosing any of these items displays its arguments. Each item has the callback specified by the :callback keyword.
(make-instance 'menu :title "Foo" :items '("One" "Two" "Three" "Four") :callback 'test-callback)(make-instance 'interface :menu-bar-items (list *))(display *) |
A submenu can be created simply by specifying a menu as one of the items of the top-level menu.
(make-instance 'menu :title "Bar" :items '("One" "Two" "Three" "Four") :callback 'test-callback)(make-instance 'menu :title "Baz" :items (list 1 2 * 4 5) :callback 'test-callback)(contain *) |
This creates an interface that has a menu called Baz, which itself contains five items. The third item is another menu, Bar, which contains four items. Once again, selecting any item returns its arguments. Menus can be nested as deeply as required, using this method.
The menu-component class lets you group related items together in a menu. This allows similar menu items to share properties such as callbacks, and to be visually separated from other items in the menus. Menu components are actually choices.
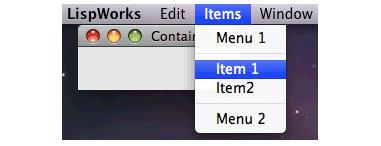
Here is a simple example of a menu component. This creates a menu called Items, which has four items. Menu 1 and Menu 2 are ordinary menu items, but Item 1 and Item 2 are created from a menu component, and are therefore grouped together in the menu, as shown in Figure 1:
(setq component (make-instance 'menu-component :items '("item 1" "item2") :print-function 'string-capitalize :callback 'test-callback))(contain (make-instance 'menu :title "Items" :items (list "menu 1" component "menu 2") :print-function 'string-capitalize :callback 'hello) :width 150 :height 0) |

Radio buttons
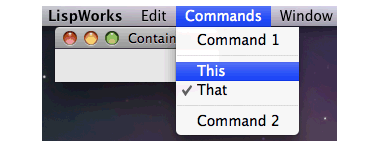
Menu components allow you to specify, via the :interaction keyword, selectable menu items — either as multiple-selection or single-selection items. This is like having radio buttons or check boxes as items in a menu, and is a popular technique among many GUI-based applications. The following example shows you how to include a panel of radio buttons in a menu (see Figure 2):
(setq radio (make-instance 'menu-component :interaction :single-selection :items '("This" "That") :callback 'hello))(setq commands (make-instance 'menu :title "Commands" :items (list "Command 1" radio "Command 2") :callback 'test-callback))(contain commands) |

The menu items This and That are radio buttons, only one of which may be selected at a time. The other items are just ordinary commands, as in the previous example. Note that CAPI automatically groups items that are parts of a menu component, so that they are separated from other items in the menu.
Checked menu
The above example also illustrates the use of more than one callback in a menu, which of course is the usual case when you are developing real applications. Choosing either of the radio buttons displays one message on the screen, and choosing either Command1 or Command2 returns the arguments of the callback.
Checked menu items can be created by specifying :multiple-selection to the :interaction keyword, as illustrated below (view Figure 3):
(setq letters (make-instance 'menu-component :interaction :multiple-selection :items (list "Alpha" "Beta")))(contain (make-instance 'menu :title "Greek" :items (list letters) :callback 'test-callback)) |

Note how the items in the menu component inherit the callback given to the parent, eliminating the need to specify a separate callback for each item or component in the menu. Within a menu or component, you can specify alternatives that are invoked by modifier keys for a main menu item.
The menu-item class lets you create individual menu items, which can be passed to menu-components or menus via the :items keyword. Using this class, you can assign different callbacks to different menu items. Remember that each instance of a menu item must not be used in more than one place at a time.
(setq test (make-instance 'menu-item :title "Test" :callback 'test-callback))(setq hello (make-instance 'menu-item :title "Hello" :callback 'hello))(setq group (make-instance 'menu-component :items (list test hello)))(contain group) |

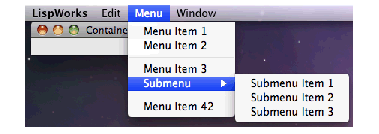
The combination of menu items, menu components and menus can create a hierarchical structure. The menu in the below code has five elements, one of which is itself a menu (with three menu items) and the remainder are menu components and menu items. Items in a menu inherit values from their parent, allowing similar elements to share relevant properties whenever possible.
(defun menu-item-name (data) (format nil "Menu Item ~D" data))(defun submenu-item-name (data) (format nil "Submenu Item ~D" data))(contain (make-instance 'menu :items (list (make-instance 'menu-component :items '(1 2) :print-function 'menu-item-name ) (make-instance 'menu-component :items (list 3 (make-instance 'menu :title "Submenu" :items '(1 2 3) :print-function 'submenu-item-name)) :print-function 'menu-item-name) (make-instance 'menu-item :data 42)) :print-function 'menu-item-name)) |

Rather than create GUI elements programmatically, LispWorks also contains an Interface Builder, which is a tool to construct graphical user interfaces for Lisp applications. You can design and test each window or dialogue in your application, and the interface builder generates the necessary source code to create the windows you have all you need to do is add callbacks to the generated code, so that your own source code is utilised.


uw
uw
wow coooool
wow coooool
wow coooool
wow coooool
wow coooool
wow coooool
Sir, I am an engineer student. Is it good to learn Lisp especially in India?
Answer plz
Lisp enlightens you as a hacker. Lisper Paul Graham explains this so
proficiently and methodically that it will be inappropriate to answer
this questions in any other words than his. Here is an excerpt from one of his essays:
The five languages (Python,
Java, C/C++, Perl, and Lisp) that Eric Raymond recommends to hackers
fall at various points on the power continuum. Where they fall relative
to one another is a sensitive topic. But I think Lisp is at the top. And
to support this claim I’ll tell you about one of the things I find
missing when I look at the other four languages. How can you get
anything done in them, I think, without macros?
Many languages have something called a
macro. But Lisp macros are unique. Lisp code is made out of Lisp data
objects. And not in the trivial sense that the source files contain
characters, and strings are one of the data types supported by the
language. Lisp code, after it’s read by the parser, is made of data
structures that you can traverse.
If you understand how compilers work,
what’s really going on is not so much that Lisp has a strange syntax
(parentheses everywhere!) as that Lisp has no syntax. You write programs
in the parse tress that get generated within the compiler when other
languages are parsed. But these parse trees are fully accessible to your
programs. You can write programs that manipulate them. In Lisp, these
programs are called macros. They are programs that write programs. (If
you ever were to enter The Matrix, you’d be happy that you are a Lisp
maestro).
We know that Java must be pretty good,
because it is the cool programming language. Or is it? Within the hacker
subculture, there is another language called Perl that is considered a
lot cooler than Java. But there is another, Python, whose users tend to
look down on Perl, and another called Ruby that some see as the heir
apparent of Python. If you look at these languages in order, Java, Perl,
Python, Ruby, you notice an interesting pattern. At least, you notice
this pattern if you are a Lisp hacker. Each one is progressively more
like Lisp. Python copies even features that many Lisp hackers consider
to be mistakes. And if you’d shown people Ruby in 1975 and described it
as a dialect of Lisp with syntax, no one would have argued with you.
Programming languages have almost caught
up with 1958! Lisp was first discovered by John McCarthy in 1958, and
popular programming languages are only now catching up with the ideas he
developed then.
So, now matter where you are in the globe – India or otherwise – you’ll always be a better programmer if you know Lisp.
Apparently the author sees no irony in writing a gush piece about a piece of proprietary (and eye wateringly expensive) software whilst declaring in that “His favourite past-time is to stop random strangers on the street and start talking about the benefits of open source over proprietary software”