The third and final part of this series [Part 1 & Part 2] shows you how to use the pySerial module, Arduino, and finally, how to combine everything learnt so far to build a full-fledged embedded system for image processing. In the previous article, I had covered the use of the OpenCV library for image-processing via the Python interface.
As I had mentioned in the first article of this series, pySerial is a library that provides Python support for serial communication. Now, let’s explore how to use it and send data to other devices via serial communication.
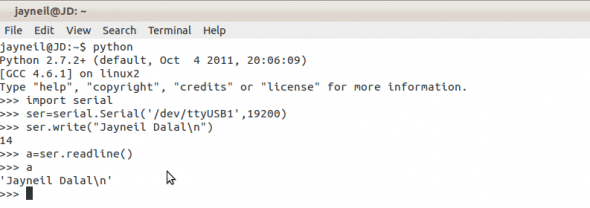
First fire up the Python interpreter (run python in a terminal). Then import the pySerial module (import serial). If this gives no errors, we’re ready — else you may need to install the package with the module. Now, since laptops don’t have serial ports, I used a USB-to-serial converter (db9) for this demo. I shorted the Data Transmitting (pin 3) and Data Receiving (pin 2) pins, so whatever information I would send via the pySerial module, I would get back. Given below is the code (pyserial.py) to illustrate this.
1 2 3 4 5 6 | #!usr/bin/pythonimport serialser=serial.Serial('/dev/ttyUSB1',19200)ser.write("Jayneil Dalal\n")a=ser.readline()print(a) |
The second line opens the desired serial port and sets the baud rate. The third line writes the data to the serial port; the fourth reads the data from the serial port and stores it in a variable, and the last line displays the value of the variable. If everything went well, the output should be the same string written to the serial port — "Jayneil Dalal\n".

Arduino
I had made a mention of Arduino in the first article. Now, let me explain how to use it, with a few examples. Let’s use the Arduino IDE (Figure 2) to write code. You can install it via the Ubuntu Software Centre by just searching for ‘Arduino’.

After the installation, launch it. Connect your Arduino to your computer via the USB cable. Then select the target board — go to Tools –> Board and make the choice. Next, configure the serial port via Tools –> Serial and select the available port. Connect the anode of the LED to pin 13, and the cathode to the GND (ground) pin. Now, we are all set to write our first bit of Arduino code (Arduino_LED.pde, shown below) to get an LED to flicker:
1 2 3 4 5 6 7 8 9 10 11 12 | int ledPin = 13; // LED connected to digital pin 13void setup() { pinMode(ledPin, OUTPUT); // sets the digital pin as output Serial.begin(9600); // opens serial port, sets data rate to 9600 bps}void loop() { digitalWrite(ledPin, LOW); // sets the LED on delay(1000); // waits for a second digitalWrite(ledPin, LOW); // sets the LED off delay(1000); // waits for a second} |
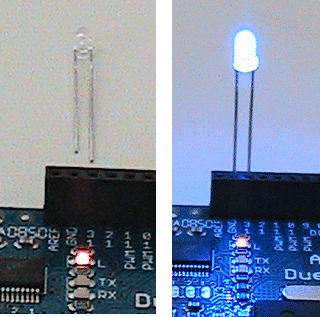
Now click the Verify button to check for errors in the program, and then click the Uploadbutton to dump the code to the Arduino. If everything has gone well, you will see the LED toggle ‘on’ and ‘off’ (Figure 3).

I have included comments in the code for further explanation. There are basically two modules in Arduino, which are setup and loop. The first runs once, while the latter runs infinite times. I defined a variable for the pin number to connect the anode of the LED. Then in setup(), I have declared that I will use that pin as an output pin. I then initialised serial communication with a baud rate of 9600. Now look at the loop() module. Here, I first set the value of pin 13 as ‘low’ (0, because the pin is digital). This will turn off the LED. After a delay of 1 second, I set the pin value to ‘high’ (1), which will turn on the LED, followed by another 1 second delay. This loop() will run forever, hence the LED will continue to turn on and off.
Now, I hope most of you have read the second article in this series, and are familiar with OpenCV by now. So here’s the OpenCV code (BuildingES.py) that will detect faces from a given image, and if the operation is successful, will trigger the Arduino via pySerial:
1 2 3 4 5 6 7 8 9 10 11 12 13 14 15 16 17 18 19 20 21 22 23 24 25 26 27 28 29 30 31 | #!/usr/bin/pythonimport cv #import the openCV lib to pythonimport serial #import the pyserial module#Module -1: Image Processinghc = cv.Load("/home/jayneil/haarcascade_frontalface_default.xml")img = cv.LoadImage("/home/jayneil/beautiful-faces.jpg", 0)faces = cv.HaarDetectObjects(img, hc, cv.CreateMemStorage())a=1print(faces)for (x, y, w, h), n in faces: cv.Rectangle(img, (x, y), (x+w, y+h), 255)cv.SaveImage("faces_detected.jpg", img)dst=cv.LoadImage("faces_detected.jpg")cv.NamedWindow("Face Detected", cv.CV_WINDOW_AUTOSIZE)cv.ShowImage("Face Detected", dst)cv.WaitKey(5000)cv.DestroyWindow("Face Detected")#Module -2: Trigger Pyserialif faces>0: ser=serial.Serial('/dev/ttyUSB0',9600) print(ser) ser.write('Y')else: ser=serial.Serial('/dev/ttyUSB0',9600) print(ser) ser.write('N') |
This code is quite similar to the Face.py code in the last article. Basically, I have now imported the pySerial module, which will trigger Arduino. When we perform face detection, all detected contours are stored in the ‘faces’ variable (this means a non-zero and non-negative value if the operation is successful). So we do a basic condition check, and if successful, trigger Arduino and send a letter ‘Y’ to the serial port — else send a letter ‘N’.
Now let us look at the Arduino code (BuildingES.pde) below, which will respond to the above OpenCV code:
1 2 3 4 5 6 7 8 9 10 11 12 13 14 15 16 17 18 19 20 21 22 23 24 | int ledPin = 13; // LED connected to digital pin 13char incomingBit; // for incoming serial datavoid setup() { pinMode(ledPin, OUTPUT); // sets the digital pin as output Serial.begin(9600); // opens serial port, sets data rate to 9600 bps}void loop() { if (Serial.available() > 0) { // read the incoming byte: incomingBit = Serial.read(); // say what you got: //Serial.print("I received: "); Serial.println(incomingBit); if(incomingBit == 'Y' || incomingBit == 'y') { digitalWrite(ledPin, HIGH); // sets the LED off delay(1000); } else { digitalWrite(ledPin, LOW); // sets the LED OFF } }} |
In the if condition in loop(), we used Serial.available(), which detects if any data has been sent to the serial port. If true, then Serial.read() will read the incoming character and store it in incomingBit. Then we can print what we have received from the serial port. After that, if the value of incomingBit is ‘Y’, we need to turn the LED ‘on’, else we turn it ‘off’. So, in a nutshell, if detecting faces from a given image was successful, this will turn on the LED.
Why are we doing all this?
I am sure a lot of you will still have questions. Why are we doing all this? Where is the embedded system I was talking about? Well, let us have a quick recap of what we have actually done. We first used image processing to do some task. Then, if that task was successful, we triggered Arduino and made it turn on an LED. Now think of the bigger picture. The LED can be replaced by any electronic appliance in your house, like a fan, refrigerator or TV. (Obviously you will need a relay to control these appliances.)
Look at this from the security point of view. We can design an embedded system that uses OpenCV for image-processing to detect an intruder, and trigger an alarm via the pySerial module and Arduino. This is just one example. There are many awesome things that an embedded vision system (a mixture of an image-processing and an embedded system) can accomplish! We used Python here as that made it very easy to import different modules and exchange data or information between those modules.
References
Acknowledgement
I would like to thank my colleagues Sohil Patel and Samarth Shah for their help and support. I would also like to thank Prof N P Gajjar and Prof Dhaval Shah for their guidance.


great !!! article . i am now going to try this out.
I didn’t get it, you are running the openCV code in the local machine and not on arduino development hardware. So, if somebody want’s to control electronics in a room then one has to capture the image via a image sensor then send it to a local machine to run the image processing code and then send back a controlling signal for the electronics to be controlled at the room.
I am looking for a h/w where I can run python based image processing libraries on the embedded h/w platform itself.