IPCop has an inherent lacuna in a very important area — it does not filter outgoing traffic based on TCP/UDP ports, but allows all outbound traffic (from the Green to the Red zone) on all ports. “URL Filter” addresses the filtering of websites only. An interesting add-on for this functionality is “Block Outgoing Traffic”, also called BlockOutTraffic or simply BOT.
With this, IPCop can filter outbound traffic based on Green IP/MAC addresses, Internet IP addresses and various services (ports), offering granular control over outgoing traffic, to conform with corporate Internet access policies. To achieve this, BOT creates iptables rules via the Web-based GUI.
It enables IPCop to divide the Green network into groups based on their IP (or MAC) addresses. These groups are then configured to access only the desired services such as HTTP, FTP, telnet, SSH, DNS, etc., either singly or by forming service groups. Control can be further tightened by allowing the services or their groups only to required Internet
addresses.
The parameters of a typical request from the internal network to the Internet include:
- Source: the IP address and the MAC address
- Destination: the IP address and MAC address (that of the default gateway)
- Source: Port number (TCP or UDP)
- Destination: Services
BOT allows the administrator to configure various groups by different parameters, as elaborated in Table 1.
| Group type | Group parameter |
| Internal computers (devices) | IP or MAC address |
| Destination | IP address |
| Services | Services required to access destination |
Note that source port number is considered not effective for filtering outgoing traffic, since it is generated by the requesting device.
To establish the access policy, BOT creates iptables rules to allow various groups of internal devices to access various groups of Internet destinations using groups of services.
Now let’s configure a typical Internet access control scenario, to help understand BOT installation and configuration, which appears tricky only until you understand the underlying concept.
We assume the IPCop box was configured as in the previous articles, with TCP 445 for Web access, TCP 800 as proxy port, and the IP address192.168.51.254. Download the BOT binaries.
As explained in earlier articles, copy the BOT binaries to the IPCop box using SCP. (Remember that the non-standard IPCop SSH port is 222 TCP.) Log on to the IPCop console locally or via SSH and untar the binaries and install BOT:
mkdir BOT
mv ./BlockOutTraffic-3.0.0-GUI-b3.tar.gz ./BOT
cd BOT
tar -xzf BlockOutTraffic-3.0.0-GUI-b3.tar.gz
./setup
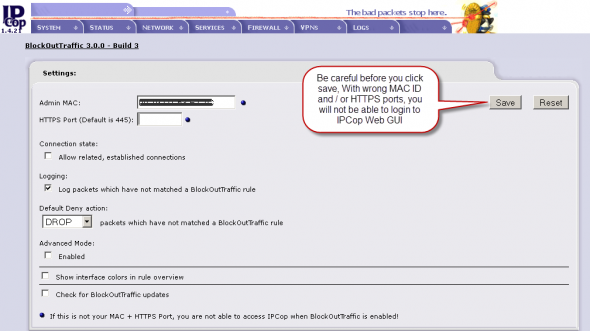
This completes the basic setup. Log out from the console/SSH. Further configuration is via the Web-based GUI, so visit it and select Firewall –> Block Outgoing Traffic. You should see something like what is shown in Figure 1.

Click Editto enter the settings menu. Here, you must enter the administrator PC’s MAC address and the IPCop proxy port. This is a security feature restricting IPCop Web GUI access only to this PC. Before saving the setting, re-verify both entries; if you enter the wrong values, you will be locked out of the IPCop Web-based GUI.

Next, click Enable BOT. You should see something like what’s shown in Figure 3.

Note: If you are locked out by incorrect MAC/proxy port entries, to regain access, you will require physical console access to the IPCop box, and will then have to run the following commands:
iptables -F BOT_INPUT # iptables -F CUSTOMFORWARD
After this, access the IPCop Web GUI and correct the MAC address/proxy port. Disable and immediately enable BOT.
Test configuration
Now, let’s do a test configuration to allow Internet access as detailed in Table 2. This configuration example assumes that all client browsers are configured to use IPCop proxy port 800.
| Group name | IP address | Services allowed | Service group | Service ports |
| MailAccess | 192.168.51.0/27 | POP3, SMTP | MailingServices | 110 and 25 |
| WebAccess | 192.168.51.32/27 | Internet access | InternetServices | IPCop Proxy |
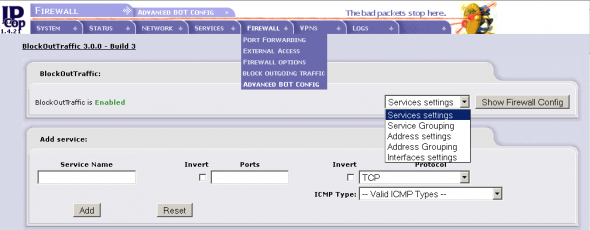
The first one allows email (POP3 and SMTP) access from the Green network to the outside (the Internet); the other from the Green network to the IPCop proxy (for Web browsing). Go to the administrator GUI’s Firewall –> Advanced BOT Configmenu option to create groups and access rules (Figure 4).

And then:
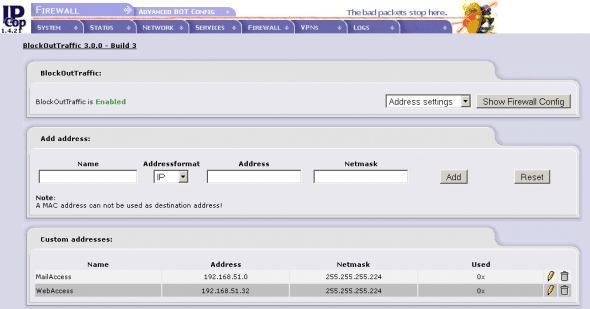
- Create the MailAccess list of internal PCs. Under Address Settings, configure MailAccess as Name, 192.168.51.0 as the IP address and 255.255.255.224 (CIDR /27) as the subnet mask.
- Create the WebAccess list of internal PCs. Under Address Settings, enter WebAccess, 192.168.51.32 and 255.255.255.224 respectively. Figure 5 shows the created rules.
- Create the IPCop Proxy custom service. Under Services Settings, enter Service Name as IPCopProxy, Port as 800 (the port defined in Services –> Proxy or Advproxy) and select the TCP Protocol.
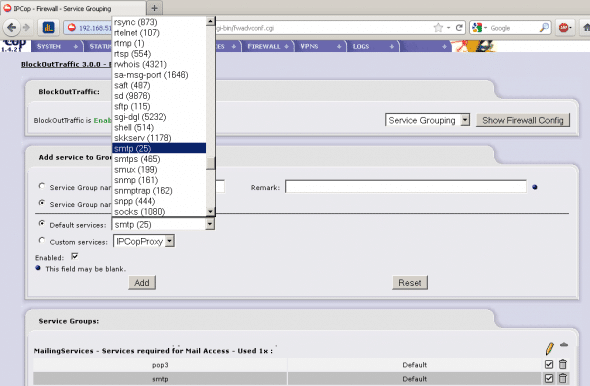
- Create the MailingServices group. Under Service Grouping, supply MailingServices as the Service Group Name. Select and add the POP and SMTP services from Default Services, as shown in Figure 6.
- Now, the final step is to create Access Control rules. Proceed to Firewall –> Block Outgoing Traffic and click on New Rule. Create the rule by selecting the following parameters:
- Source: Default network: Custom Address — MailAccess
- Destination: Other Network/Outside: Default networks: Any
- User Services: Service Groups: MailingServices
- Click Rule enabled, add a meaningful remark for this rule, like “MailAccess PCs can use MailingServices” and click Next. Here, you can review the rule. Click Save to create the rule.
Internet access is to be allowed only through the IPCop Proxy. Create an access rule for the WebAccess PCs, to permit access to the IPCop Proxy service:
- Source — Custom addresses — WebAccess
- Destination — IPCop Access — User Services — Custom services: IPCopProxy
- Rule Enabled
- Remark — WebAccess PCs can access IPCop Proxy
Save the rule.
All BOT rules are available for viewing, editing and duplicating from the Firewall –> Block Outgoing Traffic link. This completes BOT configuration. The access controls in Table 2 are implemented. WebAccess PCs can browse the Internet, but cannot access emails via email clients, while MailAccess PCs can use mail clients but cannot browse the Internet.
Configuration verification
Try browsing the Web from a PC with an address not mentioned in the WebAccess range, say 192.168.51.25. The browsing does not work, and the log confirms this by showing GREEN DROP under the Chain column. The log shows Dst Port as 800, by its default service, MDBS_DAEMON.
Now, try browsing the Internet from a PC with an address in the WebAccess range, say 192.168.51.35 — and as expected, it works. You can also check Logs –> Proxy Logs in the IPCop Web GUI to confirm this. You can further check POP and SMTP access from email clients on computers in the two groups, and see if it works as desired.

Troubleshooting
A few services may stop functioning after enabling BOT. This is because BOT blocks all traffic that is not explicitly allowed. Go to your BOT settings and enable the logging of packets that have not matched a BOT rule. Re-enable BOT and try your service again. Then look into the IPCop firewall logs under Logs –> Firewall Log for the blocked traffic — to get hints about which rule is missing. Now you should be able to create the missing BOT Accept rule.


Is it any better than IPTables?
[…] https://www.opensourceforu.com/2012/02/ipcop-block-outgoing-traffic/ Leave a Comment TrackBack URI […]
Why did you write an entire article (written just last month) about ipcop 1.4.21 when ipcop 2.0.4 is the current version and it’s been out in the major 2.x version since Sept 2011?
The most important reason – many addons are still not available for the latest version, 1.4.21 works perfect without any trouble even today.
Please check the same column June onwards for 2.0 series.
Thanks,
Rajesh
As you pointed out correctly, it does use IPTables, here are few important points:
User can configure the firewall easily from the web based interface.
Several functionalities such as IPSec VPN, time server are built in.
With several addons, the functionality goes to excellent levels, such
as OpenVPN server, URL Filter with auto blacklist updates, etc.
Please i need your help: i want just limit the Pop3 download with IPCop, is it possible? I suppose that with BOT i can only block the port but i just want to limit (for exemple 50kb) the pop3 download in order to avoid bad HDSL performance.
I have installed the BOT on my IPCop 2.1.4 but after installing the BOT I am not able to access any firewall feature from WebConsole and I am also getting error on CLI mode as well.
Error Message:
Can’t locate /var/ipcop/general-functions.pl in @INC (@INC contains:
/usr/lib/perl5/5.10.1/i486-linux /usr/lib/perl5/5.10.1
/usr/lib/perl5/site_perl/5.10.1/i486-linux
/usr/lib/perl5/site_perl/5.10.1 .) at /home/httpd/cgi-bin/fwrules.cgi
line 54.
For help, please send mail to the webmaster (root@localhost), giving this error message and the time and date of the error.
Could you please help me to resolve this error?
same problem here
BOT is to be installed only for 1.4.x IPCop versions, its functionality is inbuilt in IPCop 2.x