
I assume my readers already know the basics, so I will dwell more on new concepts and processes. Our first app is a simple TorchLight example; you can find many demos on the Internet that change the screen background to white, emulating a torch with the light from the screen. Here, we will access the camera flash (now found on most camera phones) to build our example. Figure 1 is a design diagram. Before moving to the implementation, be aware that this app will only work for phones with a flash — and camera — so it should not be listed in the market for phones lacking this feature.
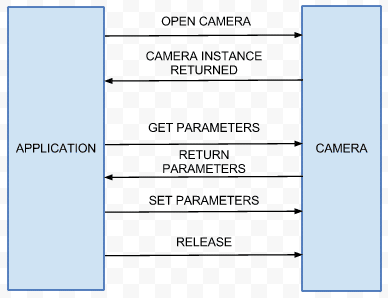
As per the design, you first need to access the phone’s flash. Flashlight is a component of android.hardware.camera. Once you get access to it, get the parameters from the existing Flashlight, then override them for your functionality, and then release the camera object for other applications to use.
Torch app implementation
Create an Android project named “SimpleFlashLight”. To use a hardware component, you need to claim it, in the manifest file. Since Flashlight comes under Camera, your app needs permission to access both:
<uses-permission android:name="android.permission.CAMERA"></uses-permission>
<uses-permission android:name="android.permission.FLASHLIGHT"></uses-permission>
To restrict app availability to only phones with the required hardware, add the following XML to allow filtering of devices that this app will be compatible with:
<uses-feature android:name="android.hardware.Camera" android:required="true"></uses-feature>
<uses-feature android:name="android.hardware.camera.FLASHLIGHT" android:required="true"></uses-feature>
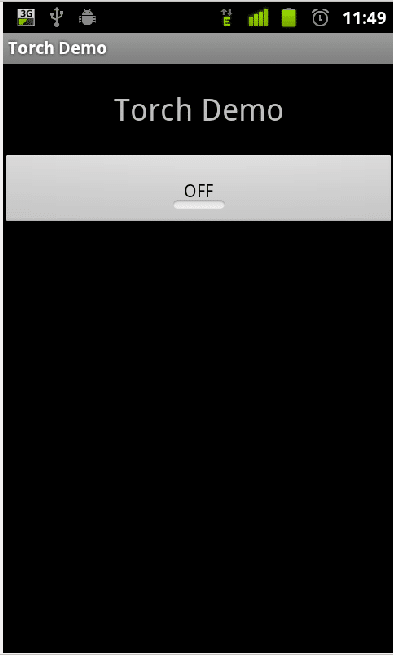
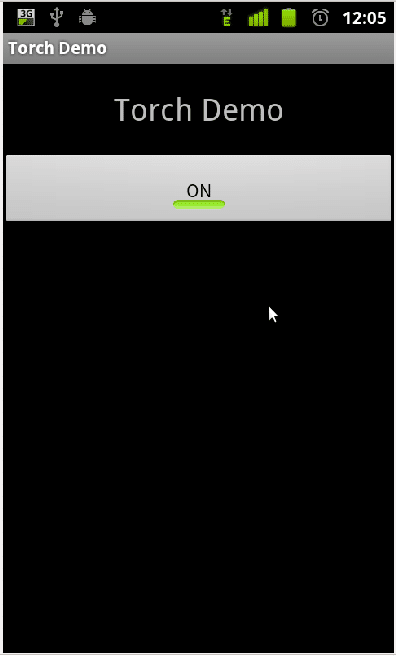
Now, let’s design a simple layout with a TextView as the tile, and a simple ToggleButton to switch the light on/off:
<LinearLayout xmlns:android="http://schemas.android.com/apk/res/android"
	android:orientation="vertical" android:layout_width="fill_parent"
	android:layout_height="fill_parent">
	<TextView android:layout_width="fill_parent"
		android:layout_height="wrap_content"
                android:text="@string/app_title" android:gravity="center"
		android:padding="20dip" android:textSize="25sp"/>
	<ToggleButton android:layout_height="wrap_content"
		android:layout_width="match_parent" android:text="ToggleButton"
		android:id="@+id/toggleButton1"
                android:padding="20dip"></ToggleButton>
</LinearLayout>
Now, for the business logic. You should get the Flashlight parameters, then set the flash mode of the Flashlight to FLASH_MODE_TORCH to switch on, and reset the Flashlight to FLASH_MODE_OFF to switch off. Here’s the code:
public class MainActivity extends Activity {
	Camera cam;
	ToggleButton mTorch;
	Parameters camParams;
	private Context context;
	AlertDialog.Builder builder;
	AlertDialog alertDialog;
	private final int FLASH_NOT_SUPPORTED = 0;
	private final int FLASH_TORCH_NOT_SUPPORTED = 1;
	/** Called when the activity is first created. */
	@Override
	public void onCreate(Bundle savedInstanceState) {
		super.onCreate(savedInstanceState);
		setContentView(R.layout.main);
		context = MainActivity.this;
		if(context.getPackageManager().hasSystemFeature(
			PackageManager.FEATURE_CAMERA_FLASH)){
			mTorch = (ToggleButton) findViewById(R.id.toggleButton1);
			....... logic......
	else{
			showDialog(MainActivity.this, FLASH_NOT_SUPPORTED);
		}
Now the first condition to check is whether the device has the flash feature; if yes, then proceed, else show an alert dialogue like in Figure 2.
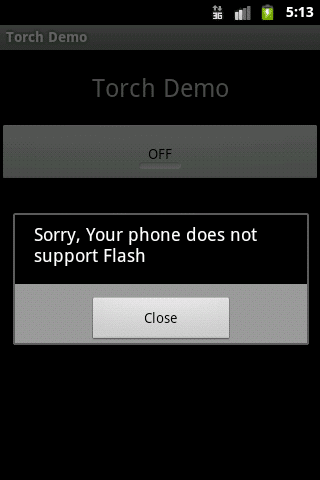
Then you get a reference to your ToggleButton using the findViewById() method.
		mTorch.setOnCheckedChangeListener(new OnCheckedChangeListener() {

			@Override
			public void onCheckedChanged(CompoundButton buttonView,
                                    boolean isChecked) {

				try{
					if(cam != null){
						cam = Camera.open();
					}
You then need to override the ToggleButton‘s onCheckedChanged method to handle state toggles. The Boolean parameter isChecked specifies whether the state is ON or OFF. Next, get hold of the camera object to access it:
					camParams = cam.getParameters();
					List<String> flashModes =
                                        camParams.getSupportedFlashModes();
					if(isChecked){
						if(flashModes.contains(
							Parameters.FLASH_MODE_TORCH)) {
                                        camParams.setFlashMode(
							Parameters.FLASH_MODE_TORCH);
					}else{
						showDialog(MainActivity.this,
                                                           FLASH_TORCH_NOT_SUPPORTED);
						}
					}else{
					camParams.setFlashMode(Parameters.FLASH_MODE_OFF);
						}
						cam.setParameters(camParams);
						cam.startPreview();
					}catch (Exception e) {
						e.printStackTrace();
						cam.stopPreview();
						cam.release();
					}
				}
			});
The above code makes the camera flash operate as a torch. After you get the current parameters of the camera object, get its supported flash modes (which are generally [auto, on, off, torch]). Check if the array contains FLASH_MODE_TORCH. If yes, then the torch mode is supported, otherwise an error dialogue is displayed. Once flash mode parameters are set, these are set for the camera object, and the camera preview is started to switch the flash on. The stopPreview call is to switch the flash off.
	@Override
	protected void onResume() {
		// TODO Auto-generated method stub
		super.onResume();
		if(cam == null){
			cam = Camera.open();
		}
	}

	@Override
	protected void onPause() {
		// TODO Auto-generated method stub
		super.onPause();
		if(cam != null){
			cam.release();
		}
	}
These life-cycle callback methods are implemented because we don’t want to hold on to the camera object all the time; so release it as soon as the activity goes into a pause state, and regain control of the camera object to access it. cam.release() is used to release control of the camera object.
	@Override
	protected void onStop() {
		// TODO Auto-generated method stub
		super.onStop();
		cam.release();
	}
}
Accelerometer
Now that you know how to access phone hardware, it’s time to look at some sensors. The most common of many sensors is the accelerometer. Let’s build a simple app named “Accelerometer Values” in which you can try and get the accelerometer values whenever you change the direction of your phone, and display acceleration in all (X, Y and Z) axes.
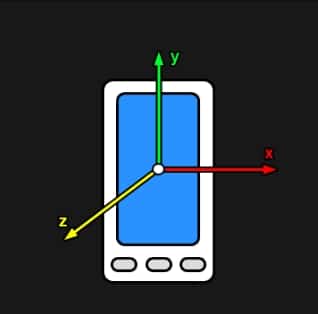
The accelerometer sensor is meant to simulate the acceleration forces like the speed changes that you see while playing games on phones. The values returned by the accelerometer for each axis range between (+/-)0–10.
Let’s look at how to design this app. With three axes in your coordinate system, you will need six text fields to display six different values for the (+/-) X, Y and Z axes.
<LinearLayout xmlns:android="http://schemas.android.com/apk/res/android"
	android:orientation="vertical" android:layout_width="fill_parent"
	android:layout_height="fill_parent" android:layout_gravity="center"
	android:background="@android:color/white">
	<TextView android:layout_width="match_parent" android:text="@string/x_axis"
		android:layout_height="wrap_content" android:gravity="center"
		android:textSize="25sp" android:padding="10dip" android:textColor="@android:color/black" />
	<LinearLayout android:id="@+id/x_axis"
		android:layout_width="match_parent" android:layout_height="wrap_content"
		android:background="@android:color/black">
		<TextView android:text="X-AXIS (+)ve:" android:layout_width="wrap_content"
			android:id="@+id/txtSensorValueLeft" android:textSize="30dip"
			android:layout_weight="1" android:layout_height="wrap_content"
			android:gravity="left"></TextView>
		<TextView android:layout_width="wrap_content" android:text="X-AXIS (-)ve:"
			android:textSize="30dip" android:layout_weight="1"
			android:id="@+id/txtSensorValueRight" android:layout_height="wrap_content"
			android:gravity="right" />
</LinearLayout>
Here, you have laid out a single TextView to display the axis name, followed by two text views to display the positive and negative values of the axis, repeated for the Y and Z axes.
<TextView android:layout_width="match_parent" android:text="@string/y_axis"
		android:layout_height="wrap_content" android:gravity="center"
		android:textSize="25sp" android:padding="10dip" android:textColor="@android:color/black" />
	<LinearLayout android:id="@+id/y_axis"
		android:layout_width="fill_parent" android:layout_height="wrap_content"
		android:orientation="vertical" android:gravity="center"
		android:background="@android:color/black">
		<TextView android:layout_width="fill_parent" android:text="Y-AXIS (+)ve:"
			android:layout_height="wrap_content" android:textSize="30dip"
			android:layout_weight="1" android:id="@+id/txtSensorValueUp"
			android:gravity="center" />
		<TextView android:layout_width="fill_parent" android:text="Y-AXIS (-)ve:"
			android:layout_height="wrap_content" android:textSize="30dip"
			android:layout_weight="1" android:id="@+id/txtSensorValueDown"
			android:gravity="center" />
	</LinearLayout>
	<LinearLayout android:layout_width="match_parent"
		android:layout_height="wrap_content" android:background="@android:color/black"
		android:padding="5dip">
	</LinearLayout>
	<TextView android:layout_width="match_parent" android:text="@string/z_axis"
		android:layout_height="wrap_content" android:gravity="center"
		android:textSize="25sp" android:padding="10dip" android:textColor="@android:color/black"/>
	<LinearLayout android:id="@+id/z_axis"
		android:layout_width="fill_parent" android:layout_height="wrap_content"
		android:orientation="vertical" android:background="@android:color/black">
		<TextView android:layout_width="wrap_content" android:text="Z-AXIS (+)ve"
			android:layout_height="wrap_content" android:textSize="30dip"
			android:layout_weight="1" android:id="@+id/txtSensorZValueUp" />
		<TextView android:layout_width="wrap_content" android:text="Z-AXIS (-)ve"
			android:layout_height="wrap_content" android:textSize="30dip"
			android:layout_weight="1" android:id="@+id/txtSensorZValueDown" />
</LinearLayout>
After laying out the UI, you have to actually get access to the sensor and display the values it returns. First, reference the UI widgets in your Java class, so declare variables for each:
private SensorManager mSensorManager;
	private Sensor mAccelerometer;
	private TextView mSensorValuesLeft;
	private TextView mSensorValuesRight;
	private TextView mSensorValuesUp;
	private TextView mSensorValuesDown;
	private TextView mSensorValuesZUp;
	private TextView mSensorValuesZDown;
Next, reference them in your Java class; this can be done with the following code. (These basic concepts were covered in my article in October 2010 edition.)
	/** Called when the activity is first created. */
	@Override
	public void onCreate(Bundle savedInstanceState) {
		super.onCreate(savedInstanceState);
		setContentView(R.layout.main);

		mSensorValuesLeft = (TextView) findViewById(R.id.txtSensorValueLeft);
		mSensorValuesRight = (TextView) findViewById(R.id.txtSensorValueRight);
		mSensorValuesUp = (TextView) findViewById(R.id.txtSensorValueUp);
		mSensorValuesDown = (TextView) findViewById(R.id.txtSensorValueDown);
		mSensorValuesZUp = (TextView) findViewById(R.id.txtSensorZValueUp);
		mSensorValuesZDown = (TextView) findViewById(R.id.txtSensorZValueDown);
The basic classes used to access sensors are: SensorManager, Sensor, SensorListener and SensorEvent.
The SensorManager class provides an app the ability to access sensors and interact with them. The Sensor class is the model class for sensors, and provides the basic API to get values from the underlying sensor. The SensorListener class is a listener class (like a button onClick listener). It allows the app to register itself with the listener, to receive notifications of changes on the sensors, with the new values. The SensorEvent class interacts with the sensors, and has some basic methods that access sensors and retrieve data in case of any event or change.
Sensors are provided by the system service, so first claim the sensor service from the system service with the following code:
mSensorManager = (SensorManager) getSystemService(Context.SENSOR_SERVICE);
Now go ahead and use the above to implement your app:
mAccelerometer = mSensorManager.getDefaultSensor(Sensor.TYPE_ACCELEROMETER);
mSensorManager.registerListener(this, mAccelerometer,
				SensorManager.SENSOR_DELAY_UI);
Start by getting hold of the sensor using the getDefaultSensor() method, which returns the default sensor for the type passed as a parameter. You have requested Sensor.TYPE_ACCELEROMETER. After getting the sensor, register your app with the sensor listener, to be able to listen to changes detected by the sensor, with RegisterListener(). SensorManager.SENSOR_DELAY_UI represents the delay in listening to sensor events. This constant specifies listening at speeds normal for a user interface, because continuous listening to sensors drains the battery very quickly. Other constants are SensorManager.SENSOR_DELAY_FASTEST, SensorManager.SENSOR_DELAY_NORMAL, and SensorManager.SENSOR_DELAY_GAME, whose purposes are obvious.
@Override
	public void onAccuracyChanged(Sensor sensor, int accuracy) {
		/*
		 * You could have values defined for x, y and z axes and add these
		 * values to the original values while using it in your app
		 */
	}

	@Override
	public void onSensorChanged(SensorEvent event) {

	}
There are two methods that need to be overridden: onAccuracyChanged() and onSensorChanged(). The first is used to calibrate the sensor if required (you implement it if you want a custom calibration, not the default). onSensorChanged() is invoked every time a change is detected by the sensor. The SensorEvent parameter will hold the values for all three axes.
@Override
	public void onSensorChanged(SensorEvent event) {
		if (event.sensor.getType() != Sensor.TYPE_ACCELEROMETER)
			return;
		// X-axis
		if (event.values[0] > 0) {
			mSensorValuesLeft.setText("X-axis (+)ve: "
					+ Integer.toString((int) event.values[0]));
		} else if (event.values[0] < 0) {
			mSensorValuesRight.setText("X-axis (-)ve:: "
					+ Integer.toString(((int) event.values[0]) * -1));
		}

		float y = event.values[1];
		if (y > 0) {
			mSensorValuesUp.setText("Y-axis (+)ve: "
					+ Integer.toString((int) y));
		} else {
			mSensorValuesDown.setText("Y-axis (-)ve: "
					+ Integer.toString((int) y * -1));
		}

		float z = event.values[2];
		if (z > 0) {
			mSensorValuesZUp.setText("Z-axis (+)ve: "
					+ Integer.toString((int) z));
		} else {
			mSensorValuesZDown.setText("Z-axis (-)ve: "
					+ Integer.toString((int) z * -1));
		}
	}
The logic is very simple: the SensorEvent variable is an array holding 3 values corresponding to the X axis (element 0) and to the Z axis (element 2) respectively. Use simple if-else logic to set the values to their corresponding TextViews. If the value is positive, then assign it to the positive value of the axis, otherwise set the negative value of the axis. The negative value is multiplied by (-1) so that it will be displayed as a (+)ve value for the (-)ve axis.
@Override
	protected void onPause() {
		// TODO Auto-generated method stub
		super.onPause();
		mSensorManager.unregisterListener(this);
	}

	@Override
	protected void onResume() {
		// TODO Auto-generated method stub
		super.onResume();
		mSensorManager.registerListener(this, mAccelerometer,
				SensorManager.SENSOR_DELAY_UI);
	}

	@Override
	protected void onStop() {
		// TODO Auto-generated method stub
		super.onStop();
		mSensorManager.unregisterListener(this);
	}


As discussed earlier, do not listen to sensors all the time, because it could lead to a serious battery drain — so register in onResume() and unregister in onPause() and onStop(). Now, extend this app by showing a list of sensors such that when a user clicks one, the respective sensor demo app is opened. To accomplish the above task, I will create another activity, and show a list of sensors supported by the device. (Reference for the concepts below can be found in my previous article of FragmentDemo, published in May 2011.)
mSensorManager = (SensorManager) getSystemService(Context.SENSOR_SERVICE);
		mSensorList = mSensorManager.getSensorList(Sensor.TYPE_ALL);
		ArrayList<String> mSensorNames = new ArrayList<String>();

		for (Sensor sensor : mSensorList) {
			mSensorNames.add(sensor.getName());
		}

		adapter = new ArrayAdapter<String>(MainListActivity.this,
				android.R.layout.simple_list_item_1, mSensorNames);
		setListAdapter(adapter);
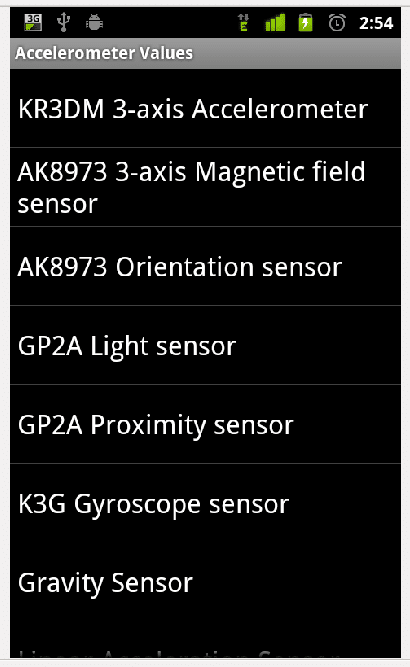
Here, you get the instance of the Sensor service, and then get a list of available sensors using the SensorManager method getSensorList(). Set up an adapter for the list, and display it to the user.




where are the previous parts of this series?
where are the previous parts of this series?dfdfd
where are the previous parts of this series?