
Before I jump into the topic, let me explain what OpenOTP is, and why we may need it. Password-based authentication has been around for a long time — perhaps even during the days of the Colosseum! — but is a debatable method, because our secrets are not as secret as we would like them to be. Social engineering, shoulder-surfing (when you log in), eavesdropping, etc., can capture your secret/password. Besides, some people use weak passwords based on easily-found personal data, like ex-girlfriends’ or spouse’s names, dates of birth, etc. This is where two-factor authentication comes in, helping to keep your network secure.
Two-factor authentication is any mechanism where more than one thing is required to authenticate a user. The two components of two-factor authentication are:
- Something you know (e.g., password/PIN, etc)
- Something you have (a token, cell phone, etc)
The “two-factor” or “strong authentication” mechanism is based on one-time passwords (OTP). In this mechanism, instead of authenticating with a simple password, every user will use an OTP, generated from a device (hardware token), or by an application, perhaps on their cellphone. This is, no doubt, more secure than a static password, because the attacker needs to know both the PIN, and possess the token/device you are using. If the attackers try eavesdropping on your login session too, they won’t succeed, since a one-time password is valid for only one session. Once an OTP is generated, it cannot be reused.
One of the biggest issues with two-factor authentication is expense, because special-purpose hardware tokens have a cost — and also, the authentication server has license costs. Besides, the algorithm used to produce the codes is only known to the company — i.e., it is proprietary. The solution I’m proposing is open source, and the hardware token will be replaced by your cellphone.
In my current assignment, I had to come up with a solution that would support OTP for applications like RADIUS, SSH, Apache, and some other Web services as well.
Out of personal interest, I had in the past, used open source tools like OPIE (One-time Passwords In Everything), Mobile-OTP, Google Authenticator, etc., but the problem with these is that the secret and passphrase are stored in plain text files on the desktop filesystem. There are no schema available to integrate these applications with OpenLDAP or any directory service.
I also had to invest a lot of time and effort on scalability, service uptime, and plugins for different applications. I was looking for something that could store everything centralised in a directory server like OpenLDAP, and also was very scalable and highly available. After a bit of searching, I found a couple of open source enterprise product candidates. After some testing, I approved of OpenOTP.
An advantage of OpenOTP is that we can use cellphones as our token device, which reduces the solution cost, since we don’t need to buy hardware tokens (though this product supports those as well). Also, it’s certified on the Open Authentication Framework (OATH). OpenOTP supports OATH HOTP (event-based), TOTP (time-based) and OCRA (challenge-based) standards for both software and hardware tokens. Many OATH-compliant software tokens are available for Android, iPhone, J2ME cellphones, Windows Mobile, Palm, BlackBerry, etc.
Overview
OpenOTP is an enterprise-grade two-factor authentication solution based on open standards and technologies. It provides multiple authentication methods for LDAP users, which rely on OTP, including Mobile-OTP software tokens, SMS OTP, Secure Mail OTP and YubiKey. It is completely free for up to 25 users. If you need more users, then you have to buy a licence. To learn more, please visit the official website.
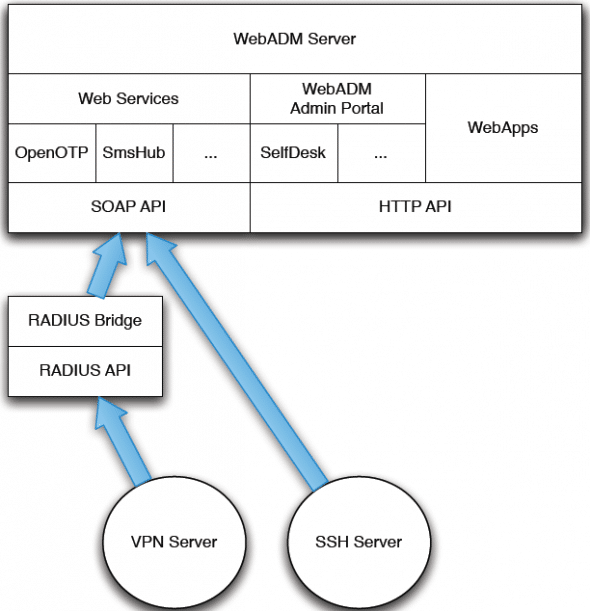
The OpenOTP solution is composed of the WebADM server application, the OpenOTP SOAP service, the optional RADIUS Bridge, User Self-service Desk, and the end-user Web application. The main components in the solution are:
- WebADM, Web services (e.g., OpenOTP), Web apps (e.g., SelfService)
- The LDAP server
- RADIUS Bridge
- PAM Bridge
The WebADM server contains:
- The SOAP APIs for the installed Web services
- The Web apps
- The admin portal
- The PKI server
- The session server
This article will not cover all these components; for a better idea of each component, please have a look at the product website. We will cover installation and configuration of OpenOTP, and how to configure some applications like SSH and RADIUS Bridge. Figure 1 shows the interaction of the components.
The current version of WebADM supports any 32-bit or 64-bit Linux with GLIBC >=2.5 and installed 32-bit binaries. The installation package contains the required dependencies, so you don’t need to install anything extra. However, WebADM needs an LDAP server like OpenLDAP, and for logging, an SQL database (MySQL or PostgreSQL). I am using OpenLDAP and MySQL. This product can run both on a physical machine, or on a virtual machine. For the hardware requirements, please check the product website.
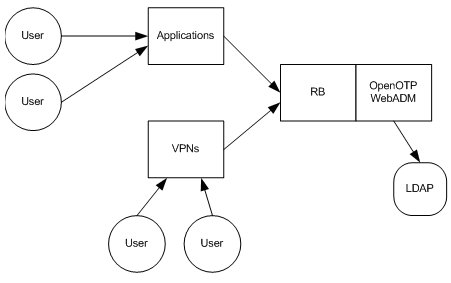
Figure 2 shows (at a high level) an overview of how OpenOTP might be integrated into your infrastructure.
Installing the product
Download the tarball from the product website, uncompress it, and run it, as follows:
gunzip webadm-all-in-one-1.1.x.sh.gz
sh webadm-all-in-one-1.1.x.sh
For a basic installation, just keep hitting Enter till the installation is over. My installation directory is /opt/webadm. This script creates the WebADM system user, sets filesystem permissions, creates directories for configuration files, logs, etc.
Configuring OpenLDAP
The steps below are if you are setting up a new LDAP server. If you already have an existing OpenLDAP installation, then edit the configuration files /opt/webadm/conf/webadm.conf and /opt/webadm/conf/servers.xml to make the necessary changes. These files are self-explanatory and well-documented, but you can scan the procedure below as well.
Make sure that OpenLDAP related packages are installed, using your distribution’s package manager. Copy the WebADM schema to the existing schema directory, and add this schema to the /etc/openldap/slapd.conf file:
cp /opt/webadm/doc/OpenLDAP.schema /etc/openldap/schema/webadm.schema

include /etc/openldap/schema/webadm.schema
Now we have to modify our suffix and rootdn, and also add ACLs for the webadm user. You could instead use the default LDAP user for webadm too, but it’s not recommended, for security reasons. Here, I’m using example.com as my DC:
Suffix 	"dc=example,dc=com"
Rootdn	"cn=Manager,dc=example,dc=com"
Add admin ACLs for the WebADM user (read and write permission to the entire LDAP tree) in slapd.conf:
Access to *
by dn="cn=admin, dc=example, dc=com" write
by self write
Now, we add the domain to the OpenLDAP tree. Create an LDIF file, with your favourite editor, and save it as example.ldif, with these contents (modify them to suit your domain):
dn : dc=example,dc=com
dc: example
ou: rootObject
objectClass: top
objectClass: dcObject
objectClass: organizationalUnit
dn: cn=admin,dc=example,dc=com
cn: admin
sn: admin
objectClass: person
objectClass: inetOrgPerson
Initialise the OpenLDAP directory by adding the just-created LDIF:
# slapadd –v –l example.ldif
ldapadd to add this admin user instead of slapadd.Finally, restart OpenLDAP with /etc/init.d/ldap restart.
Configuring MySQL
We must create a webadm database to store audit logs and localised messages, and a webadm user with a password of our choice, with full permissions on that database. My example uses the username webadm and the password password. Make sure the MySQL service is running; log in with the client, as root; create the webadm database, and assign permissions, as follows:
mysql –u root –p
mysql> create database webadm;
GRANT ALL ON *.* TO webadm@”localhost” identified by ‘password’;
Configuring WebADM
Let’s then configure WebADM to use our OpenLDAP and MySQL servers. All the configuration files are in /opt/webadm/conf. Edit server.xml and change the following, customised according to your setup:
<LdapServer name="LDAP Server"
host="localhost"
port="389"
encryption="NONE"
cert_file=""
key_file=""
/>
<SqlServer name="SQL Server"
type="MySQL"
host="localhost"
port="3306"
user="webadm"
password="password"
database="webadm"
/>
Now we come to WebADM’s main configuration file, webadm.conf. Most of the settings work out-of-the-box with any supported LDAP backend, and with very minor changes. The file itself is very well documented so please read the comments before making changes. We need to change the LDAP tree base (suffix) in the following settings (adapting the domain name to your domain):
auth_mode DN
list_domain yes
proxy_user	       "cn=webadm,dc=example,dc=com"
proxy_password         "testing123"
super_admins           "cn=admin,dc=example,dc=com”
optionsets_container   "dc=OptionSets,dc=example,dc=com"
webapps_container      "dc= webApps,dc=example,dc=com"
websrvs_container      "dc= WebSrvs,dc=example,dc=com"
mountpoints_container  "dc=MountPoints, dc=example,dc=com"
domains_container      "dc=Domains, dc=example,dc=com"
clients_container      "dc=Clients, dc=example,dc=com"
Now we are ready to start the webadm service. If you want to change the port it listens on, you can modify /opt/webadm/bin/webadm. By default, the Web server listens on port 443 (SSL), and the SOAP server on ports 8080 and 8443 (SSL). The settings are HTTP_PORT, SOAP_PORT_SSL, etc. To start the service, run:
#/opt/webadm/bin/webadm start
Navigate to WebADM (https://<your-server-address>). Only the user(s) given as super_admins in webadm.conf can run the graphical setup. So, log in with your admin account and run the graphical setup via the Setup button that appears on the home page.
WebADM requires a DN-based login until the setup is completed. Then it will use the login mode as configured in webadm.conf. The graphical setup process will:
- Create the required database tables (as specified in
conf/database.xml). - Register the required LDAP schema objectclasses and attributes.
- Create the proxy user (if it does not already exist).
- Create the WebADM LDAP containers (as defined in
conf/webadm.conf).
This article will not describe in detail how to use the WebADM GUI — for that, take a look at the WebADM manual. This GUI is the centralised point for LDAP and OpenOTP administration activities like creation, deletion, modification, etc.
Once you log in to the console, you can see that some domains have already been created, like dc=clients,dc=MountPoints,dc=ObjectSets,dc=WebApps,dc=WebSrvs, etc. These are created by the setup script for use by WebADM.
Test user
Now we have to create a user for our test setup. For this, let’s create a different OU called People. Once the OU is created, you can see it in the left pane. To create the WebADM user, follow the steps shown below:
- Click Create, and you will see the screen shown in Figure 3.
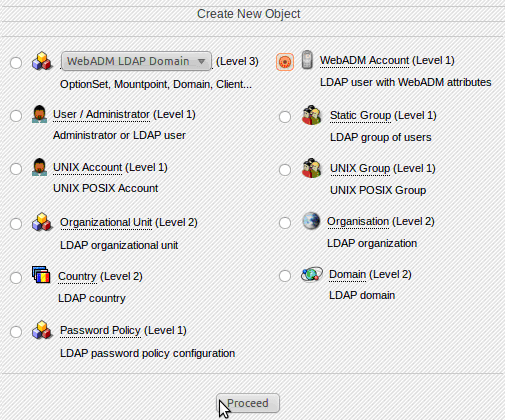
Figure 3: WebADM Account - Select WebADM Account and click Proceed. Provide all necessary information, like CN, Last Name, Login Name, password, etc. Then click Proceed and click Create the object.
- After creating testuser, Figure 4 is the screen you will see.
- Now we change OpenOTP settings like Token, PIN, etc. Click the Application menu, select OTP Authentication Server and click Configure. You will see the screen shown in Figure 5.
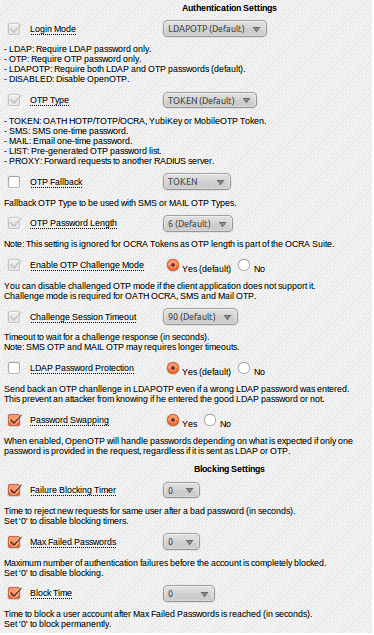
Figure 5: Configuration - Now configure the OpenOTP application as per your needs, like the default OpenOTP authentication mode, domain name, host-name of your server, etc. The basic setting is Login Mode (authentication mode). I used LDAPOTP, to require both LDAP and OTP passwords, which is the default. If you enable Password Swapping, it will accept either LDAP or OTP.
- Now click Proceed, then click testuser and click OTP Server. You will see the screen shown in Figure 6.
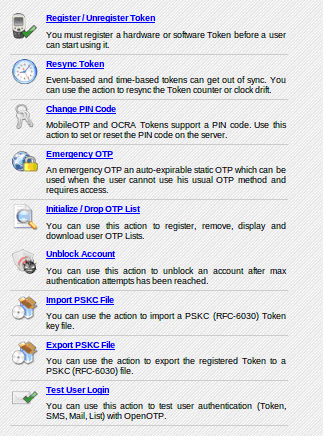
Figure 6: OTP Authentication server - Select Register/Unregister Token; you will see the screen shown in Figure 7.
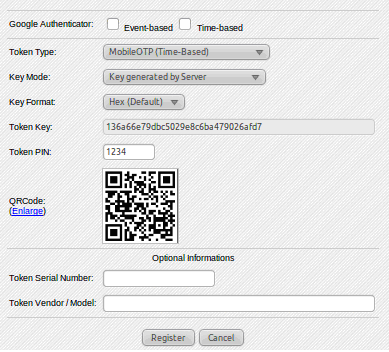
Figure 7: Token registration - Select Mobile OTP (Time-Based). If you have an existing key, you can put it in the Token Key field, or you can let the server generate a key.
- Then you enter your Token PIN, click Register, and you are done.
So now our test user is ready to use Mobile-OTP. You can download the relevant application from your Apps store. (I’m using “Droid OTP” for my Android device.) Launch it, and enter your secret PIN to generate the passwords you can use to log in to different applications. Next, let us look into how to configure applications like SSH and RADIUS.
Configuring SSHD for OTP passwords
Download libopenotp-1.0.4-1.tgz and pam_openotp-1.0.4.tar.gz from the downloads section on RCDevs website and decompress them. For 32-bit architectures, the default modules are present in the build_linux32 subdirectory of the extracted libopenotp tar, but for 64-bit, you have to compile it. For my 64-bit setup, I compiled and installed libopenotp with make && make install. I then moved /usr/local/lib/libopenotp* to /usr/lib64.
After getting libopenotp into the appropriate directory, run an ldconfig.
Next, compile pam_otp with make. Copy pam_openotp.so to the architecture-specific security directory: for 64-bit, /lib64/security/ and for 32-bit, /lib/security. On 64-bit, remove the pam module from /lib/security/.
Edit /etc/pam.d/sshd and replace the line “auth include system-auth” with the following, replacing myserver with the WebADM server’s IP address:
auth required pam_openotp.so server_url="http://myserver:8080/openotp/" client_id="SSH"
My file now looks like this:
auth    required 	pam_env.so
auth   required	pam_openotp.so server_url=http://192.168.0.1:8888/openotp/ client_id="SSH" password_mode=2, default_domain="example"
README file in your OpenOTP PAM module distribution for configuration details.Next, let’s configure the OpenSSH service. Edit /etc/ssh/sshd_config. Enable OpenSSH challenge response mode with ChallengeResponseAuthentication yes. Enable OpenSSH password authentication with PasswordAuthentication yes. Enable OpenSSH with PAM with UsePAM yes. Save and exit. Restart the SSH service.
Now if you try to connect as the test user (for example, ssh testuser@192.168.0.1) from any box, it will prompt you for an OTP password, and not the normal password.
RADIUS Bridge (RB)
OpenOTP RADIUS Bridge provides the RADIUS API for OpenOTP. It is an optional server component to be deployed on your OpenOTP installation and is implemented over the open source FreeRADIUS software.
Installation and configuration
Download RADIUS Bridge from the downloads section on RCDevs website and install it using the self-installer script (for example, sh radiusd.1.0.6-1.sh). The installation creates the RADIUS Bridge system user and sets filesystem permissions. Edit /opt/radiusd/conf/openotp.conf and change the following parameters, adapting them to your environment:
Server_url = http://192.168.0.1:8080/openotp/
Password_mode = 2
Default_domain = "example"
Data_is_vps = yes
For more information regarding the settings, please look at the README file.
Start the radius service with /opt/radiusd/bin/radius restart. If required, add your RADIUS network access clients (for example, your VPN server IP address) in /opt/radiusd/conf/clients.conf. Each client must be configured with an IP address and a RADIUS secret. By default, RADIUS Bridge accepts requests from any client using the RADIUS secret “testing123”. If you want the RADIUS server to reply with a value-attribute pair, make sure all the attribute and value pairs exist in the /opt/radiusd/lib/dictionaries/dictionary.XXX file, and specify the same in the Reply-Data section of the user (in the WebADM GUI console) as follows:
192.168.0.1:Vendor-XXX-Profile-ID=2000,192.168.0.2:Vendor-XXX-Profile-ID=3000
This means that if testuser logs in from 192.68.0.1, the network access client will get a value of 2000, while if the person logs in from 192.168.0.2. it will get a value of 3000.
We are done!
OpenOTP is pretty vast, and everything can’t be covered in a single article. We covered the basic setup and configuration. For other services, please check the documentation available at the website. This product is scalable and you can also configure the services in HA mode.
If you want to go ahead with two-factor authentication, and don’t want to invest, then you can also check OPIE, Google Authenticator, etc.


Used the VMWare Appliance for testing user with mail authentication, but the mail delivery was not taking place using the SMTP server(zimbra)..
Any Help..
i have downloaded the VMWare app from rcdevs.com which has inbuilt ldap server and otp pre-installed running on CentOS. i created a test user in the ldap root directory and then configured the email id of d user as admin@ab.xyz.com(which is the admin id of zimbra mail server) changed the servers.xml file in /opt/webadm/conf/ so that it can use the zimbra mail servers SMTP for sending mail(also disable sendmail on this VMWare OS) den wen i go to d user in ldap in webadm and den to OTP Authentication Server – Test User Login-entered the LDAP password then it ask for the mail password-but i dont receive any mails wen checked in the mails-in the logs it gives the follwng mesg-Jan 31 14:30:13 rcvm sendmail[11456]: r0V90DXp011456: to=admin@ab.xyz.com, ctladdr=webadm (101/101), delay=00:00:00, xdelay=00:00:00, mailer=relay, pri=30400, relay=[127.0.0.1] [127.0.0.1], dsn=4.0.0, stat=Deferred: Connection refused by [127.0.0.1]
CentOS? I could only run WebADM on Debian
Good guide, but one problem:
how do I set the initial admin password?
“Only the user(s) given as super_admins in webadm.conf can run the graphical setup. So, log in with your admin account and run the graphical setup via the Setup button that appears on the home page.”
I guess I have to use “cn=admin,dc=example,dc=com” as user name, but what is the password? How do I configure the LDAP server properly?
One problem?? How about there NO mention of this only works on Debian based distros?
slappasswd
http://www.howtoforge.com/install-and-configure-openldap-on-centos-5
Google is your buddy
what about mysql otp?
This is an excellent guide for a relatively intensive and little documented integration.
Not really
dn : dc=example,dc=com
dc: example
ou: rootObject
objectClass: top
objectClass: dcObject
objectClass: organizationalUnit
dn: cn=admin,dc=example,dc=com
cn: admin
sn: admin
objectClass: person
objectClass: inetOrgPerson
“str2entry: entry -1 has multiple DNs “dc=example,dc=com” and “cn=admin,dc=example,dc=com”
What’s up with that?
yeah..this “guide” is flat out fail
what?
Exaclty
Finally I was able to get this setup to a point. It was very difficult with the changes from openLDAP 2.3 to 2.4
Now, just like others I am, having trouble logging in..
If I use your webadm as the user, the log file reports
” Invalid credentials for LDAP proxy user ‘cn=webadm,”
The same is I use “admin” even though I am using the “Password1234” as the password…what gives?
o deployed the openOTP,but i just cannot login with admin account to run graphic setup,how should i fix the problem,thx!
if you’ve receive the comment,please send me an email :sherwinwangs@hotmail.com
I think the main issue i have with your article is that you mention that your solution is open-source multiple times, and yet you insist on using OpenOTP, which isn’t open-source and charges for licenses.
sir please send my facebook two step
verification code i didn’t received
sir palace my facebook 2 step verification code didn’t received