Creating and optimising a Web application is a task in itself, let alone managing and getting up to speed with application servers, while taking care of load-balancing and scalability issues. All this setting up and configuration take a toll on actual development. Why not have a framework that allows you to create Web applications and just forget about the rest?
Here is Google App Engine, which allows us to develop applications on its platform, and conveniently allows easy management — with the potential to run our applications on “Google-scale infrastructure”. (You know what that means, and the kind of reliability it represents!) This not only gives you a lower time-to-market for your product, but also considerably decreases maintenance and development costs. In short, it is one of the best Platform-as-a-service (PaaS) cloud computing services available out there.
Google App Engine is a product best supported on Python, along with Java — and Google’s new Go language is currently an additional and experimental feature. Since I am more familiar with Java, I will only be able to explain things from the Java perspective; variations in other languages are easier to grasp if you have sufficient knowledge in that field.
App Engine provides standard Java APIs, along with some that are specific to this environment. It is understood that if you want to make your application portable to other Web application containers, you should steer clear of these App Engine-specific APIs.
The Jetty servlet container is used to host applications, and supports the Java Servlet API up to version 2.4. It provides access to databases via Java Data Objects (JDO) and the Java Persistence API (JPA). App Engine uses Google BigTable as the distributed storage system for persisting application data. If you want more information on BigTable and similar NoSQL databases, you can read my article on the subject from February 2011.
The Eclipse environment
Google offers an Eclipse plugin that provides both Google App Engine and GWT development capabilities. It also makes deploying and developing applications on App Engine easier. You can easily install it from here using the Eclipse Update Manager.
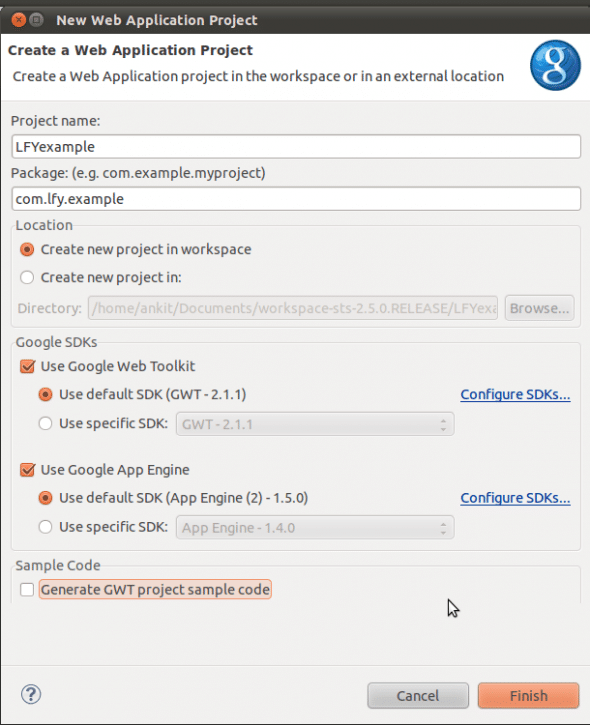
To start a new App Engine application, click the new Web application project button, which will take you to a screen similar to what is shown in Figure 1. Fill in details like the project name, package and the instance of App Engine SDK to use.

The Eclipse plugin allows you to run applications for the Google App Engine locally, in an environment that simulates the App Engine environment, and is accessible at http://localhost:8888/. It has an admin console (like that in Figure 2), which allows you to view your Local Datastore, Task Queues, Inbound Mail, XMPP, Backends, etc, at http://localhost:8888/_ah/admin/. The Eclipse environment creates a default directory structure resembling the one shown in Figure 3.


Deploying applications
To deploy your application to Google servers, you need an App Engine account or a GMail account. Go to appengine.google.com and log in with your Google account information. After that, you will have to confirm your mobile number by an SMS sent to your number, and then you can create your application by providing a unique application identifier and application title.
Now, enter these details in the Eclipse plugin to enable direct deployment from there. To set up deployment for your application to App Engine, you need to mention your application ID in the file war/WEB-INF/appengine-web.xml under the tag application you had created during the App Engine registration. To illustrate this, let’s take an “LFYExample” application:
<?xml version="1.0" encoding="utf-8"?> <appengine-web-app xmlns="http://appengine.google.com/ns/1.0"><application>LFYexample</application> <version>1</version>...other possible elements...</appengine-web-app> |
You can verify these settings by going to the App Engine setting under the Google context menu, which should show you a screen like that in Figure 4.

This application can now be easily deployed by clicking the Deploy button, followed by a Deploy screen (Figure 5). After this, your application can easily be found online, at an address such as http://lfyexample.appspot.com.

So, without going into the details about application development, I have briefly covered how we can work with the platform, and get it started and installed on Eclipse.


