
Turnkey Linux is a virtual appliance library that integrates and polishes the very best open source software into ready-to-use solutions. Each virtual appliance is optimised for ease of use, and can be deployed in just a few minutes on bare metal, in a virtual machine, or on the cloud.
Before we get into setting up our own LAMP Virtual Server using a preconfigured ISO, let us evaluate our options.
Prerequisites
- Virtual Machine software: VMWare Player or Oracle VirtualBox? For the purposes of this article, we will use the free VMWare Player 3, which you can download from here.
- Download the LAMP server ISO image from Turnkey’s website.
- Once the above ISO has been downloaded, place it on your desktop or home directory.
- A host operating system — Linux, Windows, BSDs or whatever. Unfortunately, I’m using a Windows host as I write this article, since I don’t currently have any Linux host at my disposal.
Installing into a VM
- Launch VMWare Player.
- Click the Create a New Virtual Machine option.
- You will now be presented with the New Virtual Machine Wizard, as shown in Figure 1, asking for the install source (your optical drive, or an ISO image), or whether you would like to install the OS later. Choose the last option, and click Next.

Figure 1: New Virtual Machine Wizard - In the Guest Operating System screen (see Figure 2), choose Linux, and Ubuntu, and click Next.
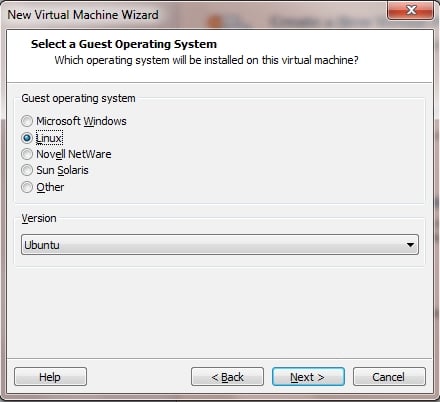
Figure 2: Choosing a Guest Operating System - Give the VM a name, and click Next.
- Now, you need to allocate disk space. As you can see in Figure 3, I have chosen 8 GB; feel free to choose whatever is appropriate for your environment, and click Next.
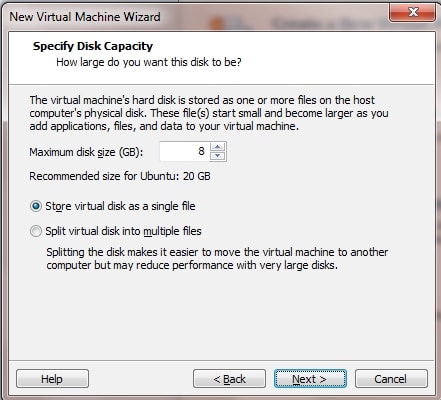
Figure 3: Disk Configuration - In the final screen of the wizard (Figure 4), click Customize Hardware.

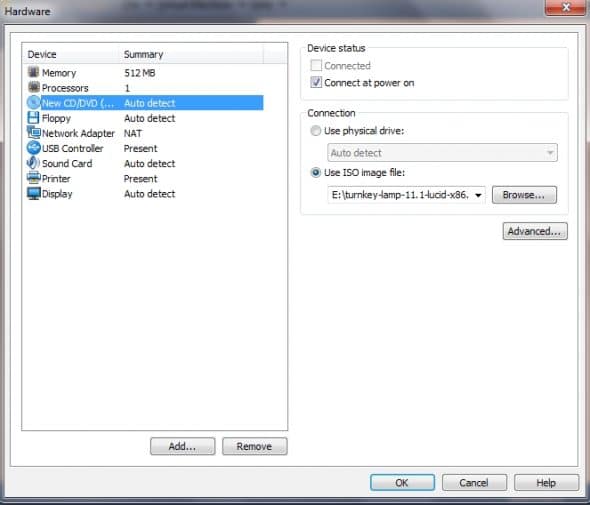
Figure 4: Final screen - We need to set up our Turnkey LAMP ISO as the media to boot from (see Figure 5). Click New CD/DVD, and in the Connection section, choose Use ISO image file; click Browse and navigate to the location of the Turnkey Linux LAMP ISO, and choose it.
- Now, click OK twice, and click Play Virtual Machine.
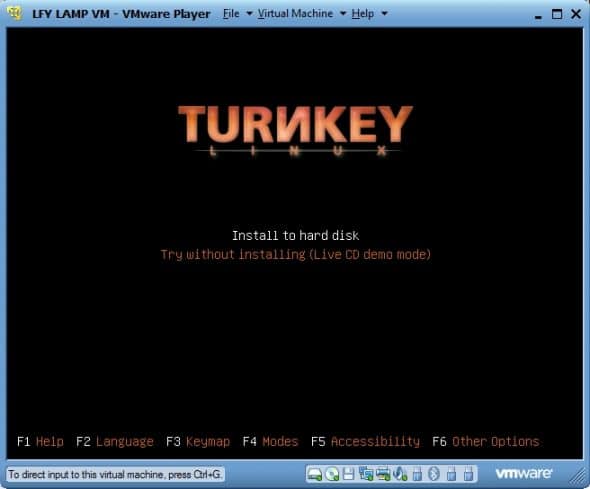
- At the Turnkey Linux bootloader screen (see Figure 6), choose Install to Hard disk and hit Enter.
- Follow the on-screen instructions, and choose to install with auto-partitioning. Choose the second option that shows up, Guided Partitioning — Use Entire Disk.
- When it comes to choosing the GRUB installer, choose Yes.
- When the installation is done, click Yes to reboot.
- Enter the passwords for the root and mysql users, when prompted.
- The Backup and Migration utility (TKLBAM) doesn’t require setting up an Amazon EC2 instance. It works with local installations just as well. However, if you wish to store your backup data on Amazon, you need to subscribe to Amazon’s cloud storage service. Click Skip for the time being…
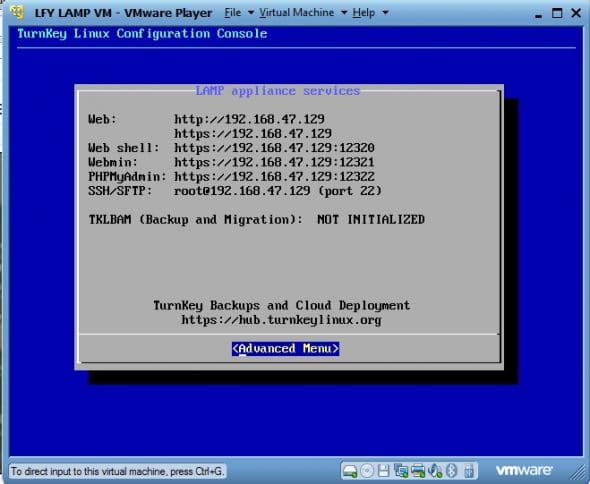
- You will now be prompted to install security updates; please choose Install, as it is a one-time operation. Once the updates have been applied, you should see a screen like the one shown in Figure 7.
Checking it out
Do a test connection to the appliance by visiting the IP address mentioned in the console, which may differ for your installation. Figures 8 and 9 show the server home page and Apache service status.

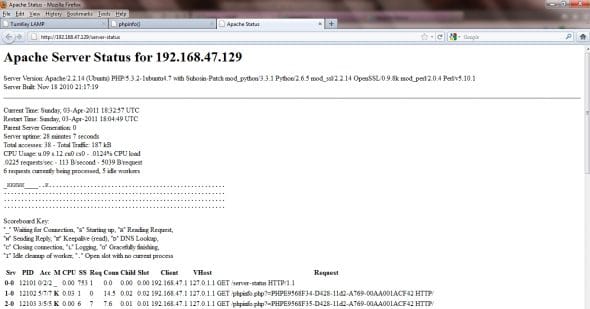
To make things even more user-friendly, Turnkey Linux has included the famous Webmin (Web-based server administration for managing Linux servers) as part of this appliance. To access the Web Console, from the home page click the Webmin icon. You will be asked to accept the security settings; do so and you will be taken to the Webmin login page.Log in as root, with the password you set during the first boot. The Webmin home page is shown in Figure 10.

Now wasn’t that a breeze? You now have your personal LAMP stack up and running, ready to serve your websites…
I hope you found this tutorial informative and feel free to share your feedback.








@LinuxForYou get LAMPython up and running in less then 8 minutes – http://t.co/d0Ct31CU #opensource #india #linux #debian Live + install cd
@LinuxForYou do post a article on how to port forward if we r connected via router
a better option is available in india – http://sourceforge.net/projects/djangolive/
use it as live cd, test apps and if needed, install it on HDD, VM, cloud..anywhere. Updates will be available in feb 2012.
[…] https://www.opensourceforu.com/2011/06/lamp-server-in-10-minutes-turnkey/ […]
No 64bit version of any appliance available yet. Great appliances, but very disappointed to see lack of 64bit support.
64bit support is on the way!
[…] Turnkey: Build LAMP Server in Under 10 Minutes […]
so, the easy part was googling how to setup the website after installing turnkey. The hard part is fiunding anyone who has an answer on how to set up a website afeter successfully installing turnkey lamp. and the best part is, I hate you .
Just want a simple god damned guide and yet everything is get vmware get oracle blah blah blah as if thats the damn hard part… ffs
Welcome to Linux bro…
Things basically could not be more simple though. What you need to do is just FTP in to the files as usually tk sets itself under the root directory and hence visiting your localhost won’t serve the correct stuff. Not very userfriendly… but not really hard to understand or fix.
once insatlled, how does one configure apache to display a website from the /var/www directory instead of the turnkey web interface??
A better way to setup a PHP based server is by using some PaaS where you can launch a server with PHP already installed on it in just one click, like Cloudways PHP MySQL hosting. Using this platform, you can launch managed servers, which mean you don’t have to manage your servers yourself.