Initially, the Fragments API was available only in the Android 3.0 SDK. To overcome criticism of “Android not being backward-compatible”, Google released a compatibility package that allowed previous versions of the API to support this new feature. Along with the Fragments API, this compatibility package also provides support for some other Google-specific APIs like market billing and market licensing.
Fragments, as the name suggests, are nothing but small chunks of the UI, which constitute a single Activity. They can be treated as individual portlets of a portal page. Though very similar to an Activity in terms of looks, lifecycle, etc, a fragment is different from an Activity in the sense that it should always reside in an Activity; fragments cannot exist independently.
Advantages of fragments
- It can modularise a single Activity into smaller units of the UI, making it easier to manage.
- A fragment need not be used with the same host Activity, but can be reused by other activities; and is hence very flexible.
- A fragment could exist without a UI screen, which means it could be used as an invisible worker for the Activity.
- A fragment allows us to maintain a “back-stack” of its state, or transactions, so we can traverse its transactions when we press the Back button on the device.
- Makes the application compact, using less activities, by increasing the number of fragments in a single Activity.
The basic design principle we will use to build the sample application is very simple, and is illustrated in Figure 1.

Before getting started on building the application, let’s get a head start on the Fragments API. To create a Fragment, we need to extend the class with Fragment. There are different kinds of fragments available, such as a ListFragment (similar to a ListActivity), a DialogFragment (similar to a Dialog Interface) and a PreferenceFragment (similar to a PreferenceActivity).
Fragment callbacks
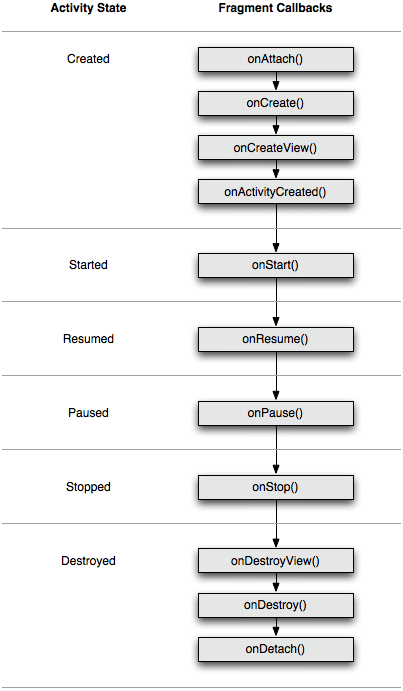
Let’s discuss callbacks during the fragment’s lifecycle (see Figure 2). As we already know, a Fragment cannot exist on its own; it has to be associated with an Activity. Therefore, the Activity class needs to be extended with FragmentActivity.

The initialisation of the fragment is done in the onAttach() method, which is invoked when the fragment is associated with an Activity. The onCreate() method is invoked when the fragment is created. A UI is associated with a fragment by invoking the method onCreateView(), which associates the fragment id with a UI layout. If you don’t want to associate a UI with a fragment, then you can pass “null”. Fragments are destroyed when the Activity is destroyed, and that’s when the onDestroyView() and onDetach() methods are called.
Building the application
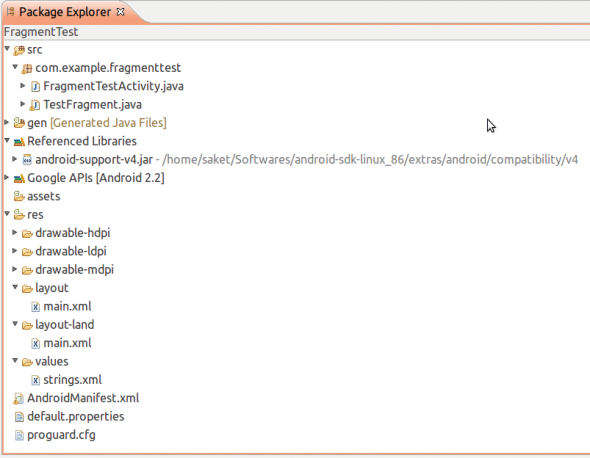
Now, let’s get started with building our application, EFY Group. Figure 3 gives you the complete package structure of the application. It is clear that we will have two classes, one for the Activity (FragmentTestActivity), and one for the fragment (TestFragment).

In the beginning, I had discussed backward-compatibility support for fragments, in relation to which I have referenced an external jar file, <android sdk home>/extras/android/support/v4/android-support-v4.jar. This library provides the necessary API support for Fragments. In this application, I will be using the Android 2.2 library (Froyo) to demonstrate the Fragments API. I have uploaded the application to GitHub, so you can get the code for the application there.
To begin, let’s create an Android Project with the following specifications:
- Project Name: FragmentTest
- Android Target: 2.2
- Application Name: EFY Group
- Package Name: com.android.saket.fragments
- CreateActivity: FragmentTestActivity
- MinSDKVersion: 8 (OPTIONAL)
Then let’s create another class, named TestFragment, with the superclass android.support.v4.app.Fragment.
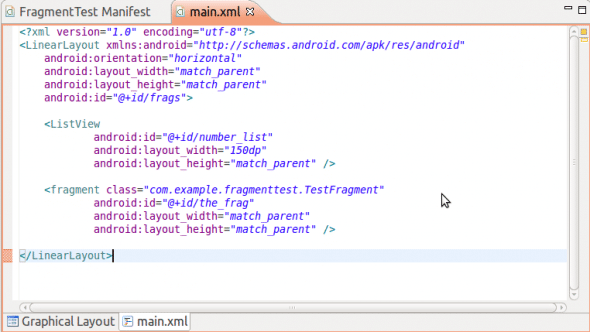
Next, we set the layout for our application. Referring back to Figure 1, you can see that there is a ListView to list all the magazines published by the EFY Group, and an ImageView to display an image of the selected magazine. Figure 4 shows you the layout structure in main.xml.

We can also create a folder, layout-land, and emulate the same main.xml in this folder, so that when the device orientation changes, the application layout changes from portrait to landscape, and vice-versa.
Now that we have the layout defined, what remains is the code behind it. Let’s start with the FragmentTestActivity class. In the onCreate() method, set the list adapter to hold a string array of EFY Group magazine titles. Also set the listener on the list items, so that you can perform some action when an item from the list is clicked.
public void onCreate(Bundle savedInstanceState) {
    super.onCreate(savedInstanceState);
    setContentView(R.layout.main);
    ListView l = (ListView) findViewById(R.id.number_list);
    ArrayAdapter<String> magzTitles = new ArrayAdapter<String>(getApplicationContext(),
                android.R.layout.simple_list_item_1,
                    new String[]{"Electronics For You",
                             "Linux For You",
                             "Facts For You"});
    l.setAdapter(magzTitles);
    l.setOnItemClickListener(this);
}
In the onItemClickListener() method, perform the main task of managing the fragment. Obtain the instance of the fragment by passing the position of the clicked item. Now, you need to replace the fragment element in main.xml with the new fragment TestFragment, which has a meaningful UI associated with it.
To accomplish this, get the instance of the FragmentTransaction class. This API allows you to add, remove and replace a fragment programmatically. Replace the R.id.the_frag, which corresponds to the <fragment> element of main.xml, with the newly created fragment f. The setTransition() method signifies the kind of transition that happens with the fragment. Some of the transition values are shown below.
TRANSIT_FRAGMENT_CLOSE— Fragment is being removed from the stack.TRANSIT_FRAGMENT_FADE— Fragment should simply fade in or out; i.e., there should be no strong navigation associated with it, except that it appears or disappears for some reason.TRANSIT_FRAGMENT_OPEN— Fragment is being added onto the stack.TRANSIT_NONE— No animation for transition.TRANSIT_UNSET— Not set-up for a transition.
The addToBackStack() method adds the fragment transaction to the fragment stack, so that when the back button is pressed on the device, you go to the last transaction of the fragment, and do not exit the application. After the transaction is set up, commit it, as follows:
public void onItemClick(AdapterView<?> parent, View view, int position,
        long id) {
    Fragment testFragment = new TestFragment(position+1);
    FragmentTransaction ft = getSupportFragmentManager().beginTransaction();
    ft.replace(R.id.the_frag, testFragment);
    ft.setTransition(FragmentTransaction.TRANSIT_FRAGMENT_OPEN);
    ft.addToBackStack(null);
    ft.commit();
}
Now, set up the fragment class, TestFragment. We initialise the position of the clicked item from the list to a variable, magznumber. As discussed earlier, if a fragment is being associated with a UI, then the onCreateView() method is used to inflate the view to the fragment. Here, create a linear layout for the fragment, and then load it with the appropriate image of the magazine in an ImageView, and this ImageView is added to the linear layout:
public View onCreateView(LayoutInflater inflater, ViewGroup container, Bundle saved) {
    Context c = getActivity().getApplicationContext();
    LinearLayout l = new LinearLayout(c);
    LayoutParams params = new LayoutParams(LayoutParams.WRAP_CONTENT,
        LayoutParams.MATCH_PARENT, 0);
    l.setLayoutParams(params);
    ImageView i = new ImageView(c);
    switch(magznumber){
    case 1:
        i.setImageResource(R.drawable.efymag);
        break;
    case 2:
        i.setImageResource(R.drawable.lfymag);
        break;
    case 3:
        i.setImageResource(R.drawable.ffymag);
        break;
    }
    l.addView(i);
    return l;
}
Figures 5 to 7 show some screenshots of the application when it is deployed; in turn, they show the application with the Electronics For You, LINUX For You and Facts For You list items selected, with the corresponding image loaded in the ImageView.


This application can be taken to the next level by embedding a WebView instead of an ImageView, and launching the selected magazine’s website. Happy coding!


I suspect that this application, as written, will blow up if you change the device/emulator from landscape to portrait layout. Replacing a “layout” fragment with a “dynamic” fragment seems to be a no-no.
This is one of the challenging and good post.I like your blog clarity.Android is one of the first moving mobile application.Nice post.Android app developers
Shared well.. With a view on rapid technology development especially mobile application development how this UI reaches the end android application users ? now android 4.0x platform was running in the market and mostly all android applications are succeeded with a view on social media. 4.0 x was developed extremely with a view on social media only.
But ur Sharing was very impressive. Thank you
This is great application. I gonna like it very much .
Great applications for the modern users, great job here!
I get a force Close, due to wrong constructor (Lint says so)… Good Day