In this article, I have seven tips for you, which I have found very helpful in my daily usage of Ubuntu. Without much ado, let’s get right into them.
Install Synapse, a fast, light application launcher
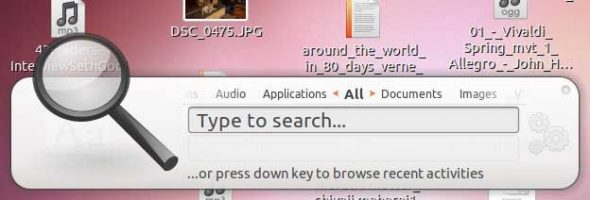
Forgot, or don’t want to remember, what sub-menu your favourite application is in? Use an application launcher instead! A little window that appears on pressing a key combination, it lets you search for an “activity” and press Enter to launch it. If you’ve forgotten the name of the application, you can even enter a semantically-related term: for example, Web, Internet, or browser, for the Firefox browser; word or word processor for OpenOffice.org Writer; spreadsheet for… you get it!

App launchers abound, but I’ll suggest Synapse (see Figure 1). It’s light, fast, and easy to use, as well as a small download (less than 1 MB!). You’ll need to tell Ubuntu where to find Synapse, since it’s not available by default. In Ubuntu Software Centre, click Edit –> Software Sources. Enter your password when prompted, click Add and enter the following line: ppa:synapse-core/ppa.
Click Add Source. Back in Software Centre, click the Reload button. After reloading, search for, and install the synapse package. I recommend you also install zeitgeist, which gives Synapse the smarts to list commonly/recently used applications, thus tailoring the list to suit your daily usage.
Once both are installed, add Synapse to your GNOME Startup Applications, so it will start automatically when you log in. Go to the System menu –> Preferences –> Startup Applications. Click Add. In the Name entry, type Synapse app launcher or any short name you choose; in the Command entry, enter synapse. Click the Add button and you’re done.
From your next login onwards, you just hit Ctrl+Spacebar to activate Synapse.
Speed up OpenOffice.org
OpenOffice.org could be faster (couldn’t everything?). To reduce the time it takes to open, add the OpenOffice.org Quickstarter to Startup Applications, using the procedure explained above, but change the Name to OOo Quickstarter and the Command to ooffice -quickstart. From your next login onwards, when you launch an OpenOffice.org component, you’ll see that it opens faster than before — because it is preloaded when you’re logging in. This does consume some memory, and slows down your login a little, so depending on the amount of RAM on your system, and how fast a processor you have, you might want to undo this later — if so, just return to Startup Applications, select the entry you’d created, and click Remove.

Additionally, if you have a lot of RAM on your system (modern computers come with 2 to 4 GB of RAM) then you can increase the memory reserved for OpenOffice.org, to a maximum of 256 MB. Visit Tools –> Options in any OOo component; select the Memory option on the left. Type in 128 or 256 in the Use for Openoffice.org entry. Click OK and see the difference in OOo’s performance.
Control your CPU speed with the scaling applet
To use a car analogy, your processor operates in various “gears”, depending on the workload of your system. You can manually put your processor into top gear, and your computer performs heavy tasks faster. To do this, right-click the top panel, and select Add to Panel. From the list of applets, select and add the CPU Frequency Scaling Monitor applet.
Right-click the applet and choose Preferences. Choose which processor or core (listed as CPU0 and CPU1 on a dual-core system, for example) you wish the applet to monitor. For multi-core/multi-processor systems, you should add one applet per core to the panel, and choose the relevant CPU in each applet’s Preferences.

You can change the processor/core speed by clicking the applet. You can choose Performance when doing “heavy” tasks like watching videos or copying big files. Geeky fun! However, this could consume more power, and heat up the processor (reducing battery life, and the overall life of your system). A good choice is Ondemand, which lets Linux auto-boost your CPU speed when it needs more processing power, and drop back to minimum speed afterwards — a good balance between performance and power-saving, extending the battery life and cool running.
Label your partitions
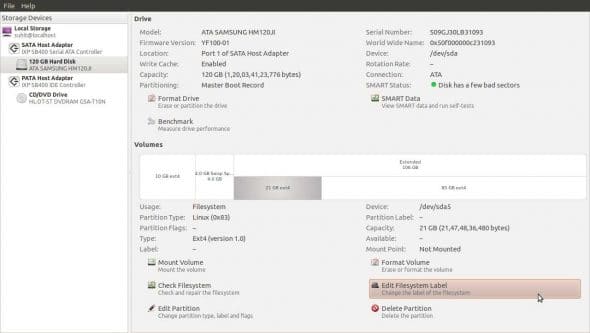
The Nautilus file manager labels partitions as “10 GB filesystem”, “150 GB filesystem” and so on, which can be perplexing. Give them sensible labels like “Backups”, “Movies”, whatever. From the main menu, head to System –> Administration –> Disk Utility. Select Hard Disk. Select the partition you’d like to label; check that the partition is unmounted first, then click Edit Filesystem Label (see Figure 4).

Enable useful Compiz effects
Ah, Compiz! Who doesn’t love Compiz for eye-candy? Now you’ll love it for its usefulness. First, install the Simple CompizConfig Settings Manager by searching for “simple ccsm” in the Software Centre. Launch Simple CCSM, and click the Effects tab. Enable the Expo and Scale effects. Now click the Desktop tab. If you don’t need the Ubuntu-default four desktops, reduce Desktop Columns to two; this will save memory. Now click the Edges tab. You’ll see the image of a computer screen. Click one of its red-coloured edges. A large pop-up menu will appear; select Scale: initiate window picker for all windows.
Now, when you move the mouse pointer to the chosen edge, your windows conveniently arrange themselves (see Figure 5). I use this as an alternative to Alt+Tab for switching between applications. Assign actions to other edges if you like! Your left edge could be the window picker and the right could be Expo, for instance. And oh — at any time, press Esc to return to the desktop!

Move window buttons from left to right
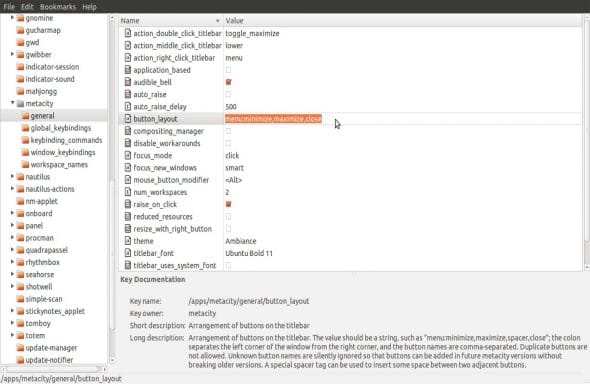
Why do Americans drive on the right? Why does Ubuntu put the close, minimise and maximise buttons on the left? Shift the buttons to the right if you like them the old way. Press Alt+F2 for the Run Application window, or better, use Synapse! Type gconf-editor as the command to run, and press Enter. Navigate to apps –> metacity –> general. Change the button_layout option to menu:minimize,maximize,close (no spaces between commas!) as seen in Figure 6. Hit Enter.

Enhance Nautilus with Nautilus scripts
You can install third-party scripts that add functionality to Nautilus’ right-click menu. First, head to gnome-look.org and navigate to the Nautilus scripts page. There, you have hundreds of scripts. I recommend that you at least get “Send to”, “Send link to Desktop”, “Backup” and any of the “Rename multiple files” scripts. There are also scripts that can convert multimedia files, download pictures from a camera, upload to Facebook, GMail or Flickr, burn a disc… and remember, each functionality is available by just right-clicking one or more files or folders. Beat that, Windows!
Extract the downloaded scripts, and copy them to your .gnome2/nautilus-scripts folder. Note that this is a hidden folder. Navigate to your home folder, and press Ctrl+H to make hidden folders visible (and the same key combination to hide them again when done). Navigate into .gnome2/nautilus-scripts and paste the copied scripts.

There are hundreds of possible tips and tweaks for your Ubuntu desktop. I have covered a few that will speed up your workflow. There are many websites that deal with customising your GNU/Linux desktop, both for utility and cosmetics. You’ll realise that your desktop is truly yours — an expression of individuality. That freedom is only available in the free-software world.


using………11.10