Data recovery (also called data carving) tools aim at recovering the data contained in a forensic image, which may have been lost due to one or more of the following reasons:
- Deletion/corruption of the file/directory containing the data.
- Corruption of the underlying filesystem.
- Deletion/repartitioning of the partition containing the data.
- File containing the data is embedded into another data file.
- The extension has been changed for the file containing the data.
Since the associated metadata structures are overwritten in all these scenarios, data cannot be identified or extracted in the regular way, and hence is called lost. To recover such lost data, usually certain content/attributes related to the data (or files containing the data) are given as an input to data recovery tools. The tools then scan the provided forensic image to try and find the required data.
Data recovery tools play an important role in most forensic investigations, because smart malicious users will always try to delete evidence of their unlawful acts. Some important data recovery tools provided by BackTrack are described below. To know more, refer to thus paper on “The Evolution of File Carving” [PDF].
Foremost
Foremost is one of the popular data recovery tools. It can recover deleted data files of a particular type, from a forensic image acquired via tools such as dd. The foremost method of recovering deleted file(s) is based on the internal structure of a file, which usually includes attributes such as unique signatures, file headers, file footers, etc.
For example, given a header and footer for a particular type of file to be recovered, it will start reading memory blocks from a media image. Once a matching header is found, the header, and the data following the header, is written into a separate file, until the matching footer is found, or a given file-size limit is reached. However, due to its extraction procedure, Foremost has limitations when the files are fragmented, when the file header is overwritten, when it is a common string, or is changed due to operations such as compression.
Foremost has a number of built-in extraction routines, which are meant for recovering a variety of file types, such as JPG, PNG, BMP, etc. However, if one cannot find built-in support for extracting a particular type, the Foremost configuration file is handy. You can easily tweak foremost.conf to include support for a specific file type.
Usage
Usage is as foremost <options>, where some of the important options are:
-s <number>— This skips<number>blocks in the input image before beginning search of headers.-i <image>— This command specifies the input image or partition for Foremost.-o <out>— It specifies the output directory for storing recovered files. In case you are searching a live partition, do not specify an output directory that is on the input partition.-c <config_file>— Specifies the configuration file to be used.-b <block-size>— This specifies the block size to be used; the default is 512.-t <type1, type2>— This specifies (comma-separated) the different file types to be extracted.-w— This is to write an audit file,audit.txt, containing relevant recovery information, in the output directorybut do not write recovered files into the output directory.-q— It enables quick mode; searches are performed on block boundaries.
Example
foremost -t gif,pdf -o /tmp/recovered -i image.dd |
This example searches the image image.dd for GIF and PDF files. If found, the recovered files are stored in the directory /tmp/recovered.
Scalpel
Scalpel is a complete rewrite of Foremost version 0.69, employing some innovative techniques to enhance performance and decrease memory usage. Similar to Foremost, it reads a database of header and footer definitions, and extracts matching files from a set of block devices or image files — which include raw images, AFF images, RAM dumps or swap dumps, irrespective of the underlying file system.
But unlike Foremost, where you can give file types on the command line itself, Scalpel requires you to edit the configuration file containing the database of headers and footers. By default, all headers and footers are enabled, so you need to comment out all except those that you want recovered. To learn more, refer to this article.
Magic Rescue
Magic Rescue is another tool to recover deleted files of one or more types, from a block device. To recover a particular type of file, it first scans the input block device in read mode for the magic bytes associated with that type. If found, it calls an external program to recover the corresponding file.
This procedure of recovering a particular file type is called a recipe, and it is documented in what is called a recipe file. Magic Rescue comes with a number of recipes meant for recovering various common file types. Also, you can write a recipe file to recover a specific file type.
When compared to Foremost, Magic Rescue is slightly more advanced and complex, but at the same time, if a recipe associated with a file type is comprehensive, then Magic Rescue can recover the associated files more effectively, compared to Foremost.
Usage
Usage is as magicrescue <options> <devices>, where <devices> is a comma-separated list of block devices to be searched, and <options> a list of options to be used. Some of the important options are:
-r <recipe>— It specifies a recipe name, recipe file, or directory containing recipe(s) to extract one or more file types.-b <block_size>— This is to scan files that start at a multiple of the<block_size>argument. The option applies only to recipes following it.-d <output_dir>— This specifies the output directory to put recovered files. Again, do not use an output directory present on the same block device that you are scanning to recover files.
Example
magicrescue -r jpeg-jfif -r jpeg-exif -d /tmp/output /dev/sda1 |
In this example, the block device /dev/sda1 is scanned to recover JPEG files into the /tmp/output directory. It is possible that one ends up recovering thousands of files. In such cases, the magicsort utility can be of help; it sorts the files present in a directory by invoking the file utility on each and every file in the directory. To learn more, refer to the magicrescue man page.
PhotoRec
This is another popular file/data recovery utility. Unlike Foremost, Scalpel and Magic Rescue, all of which are command-based, this one is a terminal-based utility, and hence many find it more friendly. Originally intended for graphics files, it has been extended to other file types as well.
PhotoRec can today recover most common photo formats, audio file formats such as MP3, and document formats such as PDF, HTML, MS Office, etc. Also, it can recover such file types from a variety of media, including hard disks, CD-ROMs, DVDs, USB drives, and flash memory cards. Like other data-recovery tools, PhotoRec is safe to use, as it will never attempt to write to the drive or the memory card from which files need to be recovered from.
Before starting PhotoRec, you should ensure that the required media is available on the system. If you have a memory card, insert it in the card reader, and so on.
To begin with, PhotoRec will first ask a user for source media selection, from a list of available media on the system. Next, users have to choose the type of partition table on the selected media. Following this, a list of partitions on the selected media will be presented. Also, a menu of actions is presented at the bottom of the terminal (see Figure 1):
- Search: Starts the recovery process on the selected partition.
- Options: Presents a variety of PhotoRec options for the recovery process.
- File opt: Lets you enable/disable recovery of certain file types.
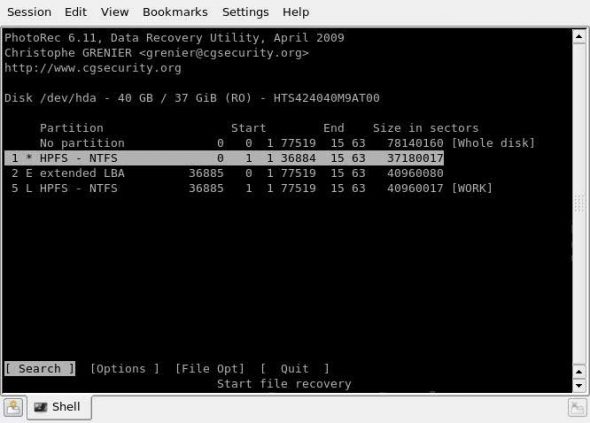
After selecting the “Search” menu item for a particular partition, the user is asked whether to recover the whole partition, or only unallocated space. The first option is generally selected when the filesystem gets corrupted, while the latter is selected when the underlying filesystem is intact, and the user wants to recover only the deleted files.
Last, the user has to choose the output directory used for writing recovered files. After this, recovery begins; you will see a screen showing the progress of the recovery. Once completed, a summary is displayed. If interrupted, the recovery process can be resumed at the next start-up of PhotoRec. For a step-by-step guide on how to use PhotoRec, refer to this article.
TestDisk
TestDisk is a powerful data-recovery tool, which recovers lost data partitions and/or makes non-bootable disks bootable again. Such cases can occur due to faulty/malicious software, certain viruses, or due to human error (such as accidentally erasing the partition).
TestDisk supports all popular partition table types, including the widely used PC/Intel partition table, Apple partition map, GUID partition table and Sun Solaris slices. Also, it has support for most filesystems, including Windows FAT/NTFS, Linux ext2/ext3/ext4, Linux RAID, Linux swap and Apple HFS/HFS+/HFSX.
TestDisk starts by asking the user for an optional log file for the details of the recovery process. After this, the user is asked to select the appropriate media, and the type of the partition table. Next, the user is provided with a menu like that in Figure 2.
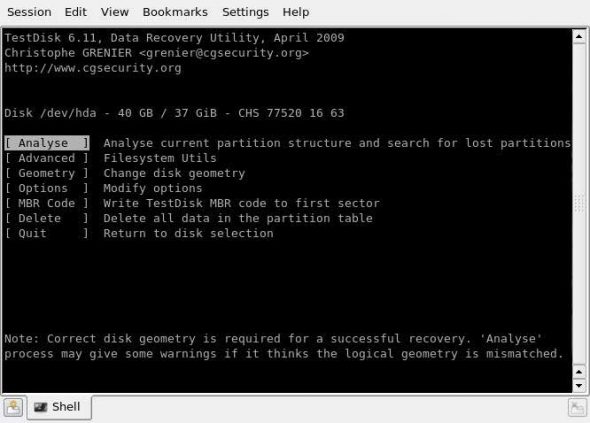
- Analyse: This lets the user analyse the current partition structure, and subsequently search for lost partitions. Each discovered partition is added to the list of found partitions, which are displayed after the end of the search process. One can use shortcuts such as ‘P’ to list files, and ‘T’ to change the partition type on any found partitions. The string ‘Ok’ appears at the bottom of this list; if the partition structure is correct, pressing ‘Enter’ will present options to either write the data into the partition table, or do a deeper search for partitions.
- Delete: This will delete all partition data from the partition table. Both the MBR code, and the signature bytes (if any), remain the same.
- MBR code: Selecting this option will overwrite the MBR code with a copy of a standard Master Boot Record. This option might be useful in cases where the system fails to boot using the selected media.
- Disk geometry: This option is an advanced one, and changes the disk geometry parameters (cylinders, head, sectors and sector size) for more comprehensive disk analysis. Based on these parameters only, TestDisk searches the partitions, and calculates their corresponding sizes. These parameters will not affect the hard disk until the user writes the data to the drive. Therefore, these parameters should be proper ones. The TestDisk utility, by default, gets these parameter values using BIOS calls under DOS, or specific system calls under Linux, Sun Solaris and Windows. If these default parameter values differ from those that are used while creating the partition table on the disk, warning messages will be displayed on the screen during the ‘Analyse’ phase. Hence, in such cases, this option allows tweaking of these parameters for the ‘Analyse’ phase.
- Options: This allows the user to tweak certain options used in the ‘Analyse’ phase.
- Advanced: It allows the user to fix the boot sector from a backup boot sector for a partition, to fix the MFT (Master File Table) for a partition, to image a particular partition, or to un-delete a partition.
To learn more, refer to this step-by-step guide.
Data recovery/carving from media/images plays an important role in digital forensic analysis, as it helps in recovering data linked to a cyber crime. Also, the same set of tools can be helpful to those who have lost their data due to accidental deletion of files/directories, corruption of the filesystem holding the data file, or corruption/reformatting/deletion of the partition where the data resided. By exploring the various tools available for data recovery/carving from media/images in BackTrack, users will certainly find this Live Linux distribution very useful.
After data recovery comes the last part of a digital forensic investigation — comprehensive data analysis to find strong evidence related to the cyber crime. But that’s for another article…






We just downoaded backtrack 5 and it now includes PTK Forensics.
Ooookay, where is part 1?
How to use
Whe will article nr 3 be provided?
When do you pretendo to release Part. 3? Nice work, waiting for part 3!!!