I use Ubuntu’s 10.04 32-bit desktop edition, and Python 2.6.5. We can use GUIs in Python in many ways, such as the PyZenity module, the Tkinter toolkit and PyQt (a Nokia framework). In this article, we are going to talk about the PyZenity module and the Tkinter toolkit.
Creating GUIs using PyZenity
This is the fastest and simplest way to create a GUI. It mixes the Zenity utility with Python. Before going directly to PyZenity, I would like to demonstrate the Zenity utility. It comes preinstalled on most systems. Just go to the terminal and type zenity --title="Demo" --info --text="hello" and you will see something like what’s shown in Figure 1 — an information box, with its title being “Demo”, and the message “Hello”. Explore the Zenity man page for more details on Zenity.

The PyZenity module is an easy way to use the Zenity utility in Python. To use it, you have to download and compile it manually. You can check out the source code here. I’m using version 0.1.4. Follow the steps given below to install the
tar.gz file:tar zxf PyZenity-0.1.4.tar.gzcd PyZenity-0.1.4python setup.py install |
After installing, I would recommend you first visit the documentation for this module. This Web page lists all the possible GUI items you can create using this module, and their various parameters. For example, you can make info boxes, menu boxes, error dialogue boxes, progress bars, etc.
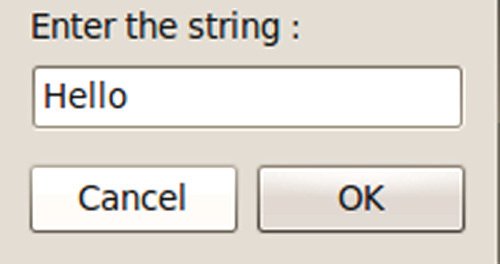
After you scan the available functions, let’s try making an input box, using the GetText function. Enter the following code, save it as demo1.py, and run it (the output is shown in Figure 2):
import PyZenity a=PyZenity.GetText(text="Enter the string : ", entry_text="", password=False) print a |

This will accept “Hello” as your input string, and will display it on the console as soon as you press Enter or the OK button. It will return None if you press the Cancel button.
Let’s try and understand the program better. We call the GetText function following the general syntax of module.function(). The text option is the message to be shown; entry_text stands for the initial value of the text-box, which is an empty string in this case. password=False means that you want the text to be visible to the user, not masked with asterisks. This is the beauty of this module, just 3-4 lines of programming and your GUI is ready.
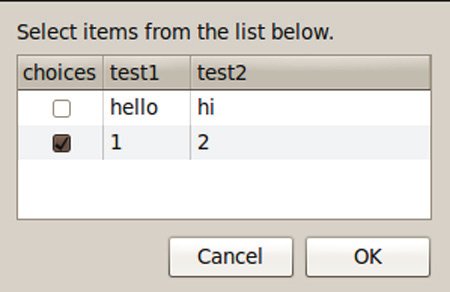
While I was using this module, I had some difficulty in understanding its List function, because of the confusing parameters. Let’s quickly take a look at it (save as demo2.py). The output is as shown in Figure 3.
import PyZenity x=PyZenity.List(["choices","test1","test2"], title="selection", boolstyle="checklist", editable=False, select_col="ALL", sep='|', data=[["","hello","hi"],["","1","2"]]) print x |

Let’s review the parameters quickly:
- The first parameter is a tuple that names the columns of your list (here — choices, test1 and test2).
- The title for the dialogue box (“selection”).
boolstyle: This is the checklist or radiolist in the first column of the list.editable: Offers the option of whether the list should be editable or not.select_col: The column number whose value is to be returned if you select a row.sep: The row separator during the return.data: Must be in tuples, or in tuples of tuples. Fills out the columns row-wise. Since we have selectedboolstyle=checklist, the first column should be empty, otherwise it will overwrite the selection boxes. There should be an input for every column and every row.
A List dialogue box will give you an output in the form of a tuple only. You can check that out by running the above program. To explore more interfaces, read the documentation.
Drawbacks of PyZenity
Even though PyZenity is very fast and simple, there are a limited number of GUI forms that you can make using this module. You cannot modify the basic GUI according to your needs. If you need two buttons in the info box, you can’t have it with this module — which provides you with an info box with one button only. And you cannot modify that info box since it is a predefined GUI. So, PyZenity is good, but to a limited extent.
Create GUIs using Tkinter
Tkinter is my favourite among all the toolkits. It’s like creating the GUI from scratch. It takes some time to learn to use it, but believe me, it is worth spending every second of that time. It is the most portable GUI toolkit for Python. It is also known as the top, thin, object-oriented layer of Tcl/Tk.
Get started with this module. The Tkinter toolkit comes with the Python interpreter built in, so you don’t need to manually download and install it. To use Tkinter, you have to import the classes from this package by using from Tkinter import * at the top of your program. Let’s write a “hello world” GUI with it (demo3.py; the output is as shown in Figure 4):
from Tkinter import *root=Tk() #1root.title("demo") #2l=Label(root, text="Hello World", width=20) #3l.pack() #4root.mainloop() #5 |

Let’s understand, one line at a time, what has happened above:
- We have created a Tk root widget (it must be created in almost every program). It acts as a parent to all the widgets, and is a simple window with a title bar.
- We set the title text of the window here.
- We created a label using the
Labelclass, with root as its parent widget (containing it). - We call the
packmethod on this widget, which tells it to size itself to fit the given text, and make itself visible. - We entered the Tkinter main loop. The program will stay in the event loop until you close the window. The application window will appear only after you enter the main loop.
Tkinter offers many widget classes, such as Button, Label, Entry, Checkbox, Bitmap (for .xbm image), etc., which let you create GUIs as per your need. These classes have many functions available to modify the style of your widget.
Some of the important functions are grid(), pack(), configure(); each function contains a lot of parameters/arguments, like width, height, sticky, etc. Refer to the Web for more functions and parameters.
We can also bind an event to a particular widget, if we want to. Let’s create a dialogue box with the help of the class method, which accepts the first and last name from the user. This program will demonstrate many useful aspects of Tkinter (demo4.py; the output is as shown in Figure 5):
from Tkinter import *class diag: def __init__(self, parent): #1 self.parent=parent self.parent.bind("<Return>", self.ok) #2 self.parent.bind("<Escape>", self.quit) #2 self.l1=Label(self.parent, text="First") self.l1.grid(row=0, sticky=W) #3 self.l2=Label(self.parent, text="Second") self.l2.grid(row=1, sticky=W) #3 self.e1=Entry(self.parent) #4 self.e1.grid(row=0, column=1) self.e1.focus_set() #5 self.e2=Entry(self.parent) self.e2.grid(row=1, column=1) self.b1=Button(self.parent, borderwidth=2, text="OK", width=5) #6 self.b1.grid(row=2, column=1, columnspan=2) self.b1.bind("<ButtonPress-1>", self.ok) self.b2=Button(self.parent, borderwidth=2, text="Cancel", width=5)from Tkinter import *class diag: def __init__(self, parent): #1 self.parent=parent self.parent.bind("<Return>", self.ok) #2 self.parent.bind("<Escape>", self.quit) #2 self.l1=Label(self.parent, text="First") self.l1.grid(row=0, sticky=W) #3 self.l2=Label(self.parent, text="Second") self.l2.grid(row=1, sticky=W) #3 self.e1=Entry(self.parent) #4 self.e1.grid(row=0, column=1) self.e1.focus_set() #5 self.e2=Entry(self.parent) self.e2.grid(row=1, column=1) self.b1=Button(self.parent, borderwidth=2, text="OK", width=5) #6 self.b1.grid(row=2, column=1, columnspan=2) self.b1.bind("<ButtonPress-1>", self.ok) self.b2=Button(self.parent, borderwidth=2, text="Cancel", width=5) self.b2.grid(row=2, column=2, sticky=W) self.b2.bind("<ButtonPress-1>", self.quit) def ok(self, event=None): #7 print "value is : ", self.e1.get(), self.e2.get() self.parent.destroy() def quit(self, event=None): self.parent.destroy() root=Tk() d=diag(root) root.mainloop() self.b2.grid(row=2, column=2, sticky=W) self.b2.bind("<ButtonPress-1>", self.quit) def ok(self, event=None): #7 print "value is : ", self.e1.get(), self.e2.get() self.parent.destroy() def quit(self, event=None): self.parent.destroy() root=Tk() d=diag(root) root.mainloop() |

Let’s try to understand the program, with reference to the numbered lines:
- We defined the constructor of the class
diag, in which root is the parent widget. - We called the
bindfunction to handle an event. When Enter was hit, it called theokfunction; for Esc, it called thequitfunction (defined in the class). - We have defined the place of the widget label by assigning it Row number 0. You can also assign a column to the widget according to your need.
- We used an
Entryclass to let the user enter text. - This set the focus to the Entry widget (making it the active control) when the program is run.
- We used the
Buttonclass to create buttons. - And defined the
okandquitfunctions to handle the respective events.
It’s so good to program using Tkinter. You define every single step according to your need, and can play with the widget in your own way. One more piece of good news is that you can use the most popular canvas widget too, by using the Canvas class — it provides structured graphical facilities for Tkinter, and is mostly for drawings like graphs, etc.
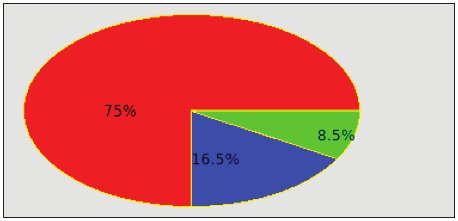
Here’s a very small demo of how to make a stats analysis using the Canvas class (demo5.py; output shown in Figure 6):
from Tkinter import *root=Tk() c=Canvas(root) c.pack() xy=20, 20, 300, 180 #create an arc enclosed by the given rectanglec.create_arc(xy, start=0, extent=270, fill="red", outline="yellow") c.create_text(100, 100, text="75%") c.create_arc(xy, start=270, extent=60, fill="blue", outline="yellow") c.create_text(180, 140, text="16.5%") c.create_arc(xy, start=330, extent=30, fill="green", outline="yellow") c.create_text(280, 120, text="8.5%") root.mainloop() |

In this program, xy are the end-points of the rectangle in which the arcs are to be enclosed. Then we called the
Canvas class, and using that widget, we created arcs with appropriate text positions. For more details regarding Canvas, refer to the Web.
I hope you liked playing around with GUIs using the Tkinter toolkit. You can also combine the use of both PyZenity and Tkinter in the same program. Queries and suggestions are always welcome, so feel free to ping me!


Thanks for this post . I want to develop an cross platform python gui application , that will also use a MySQL data base. Which gui package do you suggest ?
very useful for beginners
The optic of Tkinter dialogs doesn’t fit to the rest of my system. That’s why I use PyGtk.
Hi,
I tested demo2.py and I got a problem with boolstyle at line 188 of PyZenity.py.
The solution was to edit PyZenity.py line 186
…
if not boolstyle == ‘checklist’ or boolstyle == ‘radiolist’:
…
I’m using python 2.6.4 under fc 13 (2.6.34.9-69.fc13.i686.PAE)
Anyway, this page has been very useful.
thx
I’m certainly no expert or I wouldn’t have found this page but the demo4 code won’t work as shown. About half of it is duplication. This works
—————————————————
from Tkinter import *
class diag:
def __init__(self, parent): #1
self.parent=parent
self.parent.bind(“”, self.ok) #2
self.parent.bind(“”, self.quit) #2
self.l1=Label(self.parent, text=”First”)
self.l1.grid(row=0, sticky=W) #3
self.l2=Label(self.parent, text=”Second”)
self.l2.grid(row=1, sticky=W) #3
self.e1=Entry(self.parent) #4
self.e1.grid(row=0, column=1)
self.e1.focus_set() #5
self.e2=Entry(self.parent)
self.e2.grid(row=1, column=1)
self.b1=Button(self.parent, borderwidth=2, text=”OK”, width=5) #6
self.b1.grid(row=2, column=1, columnspan=2)
self.b1.bind(“”, self.ok)
self.b2=Button(self.parent, borderwidth=2, text=”Cancel”, width=5)
self.b2.grid(row=2, column=2, sticky=W)
self.b2.bind(“”, self.quit)
def ok(self, event=None): #7
print “value is : “, self.e1.get(), self.e2.get()
self.parent.destroy()
def quit(self, event=None):
self.parent.destroy()
root=Tk()
d=diag(root)
root.mainloop()
———————————————————–
I think.