
KGDB is an amazing Linux kernel debugging tool. It can debug the kernel while it is running, set breakpoints, and step through the code. Earlier, KGDB used to be a bunch of patches that had to be carefully merged into the mainline kernel. However, since version 2.6.26, KGDB has been merged into the mainline, and only needs to be enabled during kernel compilation.
A typical KGDB setup requires two machines connected by a serial cable: one as a source machine on which debugging is done, and the other (destination) which is being debugged. With virtualisation, however, we can do away with that second machine.
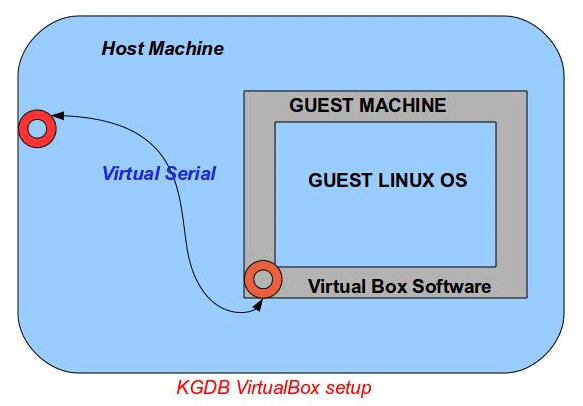
When we combine VirtualBox with KGDB on a single machine, the host OS is the ‘source’ machine, while the guest OS (Linux kernel compiled with KGDB enabled) is the “destination”. A virtual serial port is enabled between the host and the guest. Figure 1 displays such a setup.
Prerequisites
For this setup, we’ll need:
- The host running a Linux system (you can have a host OS other than Linux, but this article does not cover that). My host system runs Ubuntu Maverick Meerkat 10.10, 64-bit.
- VirtualBox software installed on the host OS. I used the VirtualBox 4.0 distribution-specific binary obtained from the project website.
- The
socatbinary installed on the host. This is used to link the pipe file (FIFO) that is created by VirtualBox, with a pseudo-terminal on the host system. Here’s the download link. Normally, GDB takes a physical terminal file (likettys0) as the remote target, but in our case, we will instead provide a pseudo terminal created bysocatas the remote target for GDB. Refer to thesocatman pages for more information. - A VM installed with a Linux guest OS (I used Fedora 14). The VirtualBox documentation shows how to create a VM, if you need it, so I won’t repeat it here. Help on how to install an OS in a VirtualBox VM is also in the documentation. I downloaded the Fedora 14 ISO from the Fedora site, attached it to the VM, and booted the VM and installed Fedora.
- The Linux kernel source is accessible to the VM (and the host, too — see below). This can be picked up from kernel.org; I used version 2.6.37. It is used to recompile the guest OS kernel with KGDB-specific options. How to get the source available in the VM is described under “File-sharing between machines” subsection below.
Setting up the guest
Configuring the virtual serial port in VirtualBox
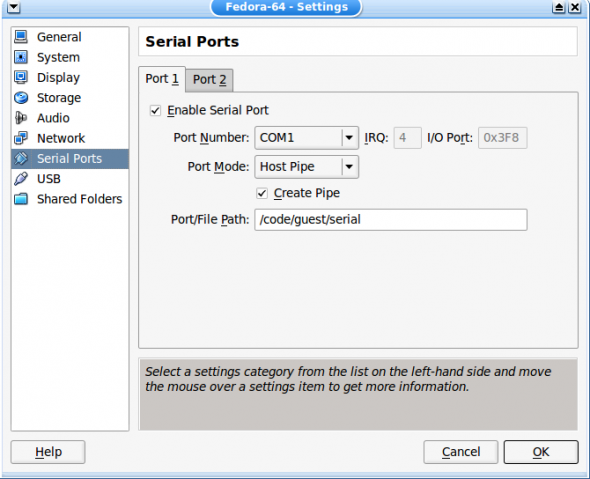
Right-click your virtual machine instance, and go to the Settings tab. On the Port 1 tab, choose “Enable Serial Port”. Select “Port Mode” to be “Host pipe”. Enter a pipe file-name in the “Port/File Path” text field, as shown in Figure 2.
File-sharing between machines
I have set up networking for the VM and in my Fedora guest, so that I can easily access files on the host. You could set up an optional NFS server on the host machine, and create an NFS share for the kernel source directory. This share is mounted within the guest, and the kernel is compiled and installed from the guest command prompt. View Figure 3 for an idea of my setup.
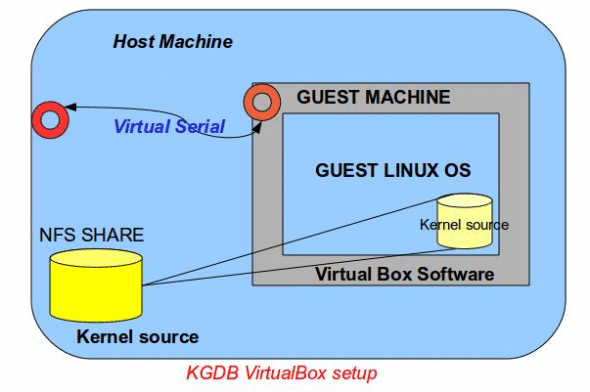
There are many benefits in such a setup — the shared kernel source can be used to directly do a make install of the kernel within the guest. While debugging, you will need the kernel source files in the host OS, so that they are accessible to GDB — and let’s not forget the vmlinuz file, which is passed as one of the arguments to the debugger. If you are debugging kernel modules, you can edit the module source (in the NFS-shared folder) from the host, while you debug the guest. There are many other ways of doing this, which you can explore on the Internet.
Preparing and installing the kernel on a guest OS
The kernel source can be compiled either on the guest or the host. Since I have Ubuntu on the host and Fedora in the guest, I preferred to compile the kernel in the guest itself. Wherever you compile it, you will obviously need the build environment set up. Again, preparing a build environment is a task that is documented very well on the Internet. An important point to note is that compiling the kernel in the VM (guest OS) is extremely time-consuming.
During kernel configuration (once you do a make menuconfig) ensure you enable the following options:
- Kernel hacking –> (options for kernel hacking)
- Kernel debugging (features for kernel debugging)
- Compile the kernel with debug info (kernel and modules are compiled with the
-goption) - Compile the kernel with frame pointers (frame-pointer registers are used to keep track of stack)
- KGDB: Kernel debugger –> (enable KGDB)
- KGDB: Use over serial console (enable serial console support) (see Figure 4)

Once the kernel is compiled, if you do a make modules_install and install from within the guest, it will install the newly compiled kernel. Figure 5 shows the Grub option for the new kernel after a guest reboot.

Editing the bootloader
To enable KGDB serial console support from the guest, we need to append the options kgdboc=ttyS0 and 115200 kgdbwait to the kernel command-line. Here, kgdboc (KGDB over console) uses ttyS0 with the baud rate defined as 115200. The kgdbwait option tells the kernel to wait until we connect to it with GDB.
From the Grub boot-loader screen, press e and append the options to the kernel line, as shown in Figure 6.

An alternative, if you plan to be debugging frequently, is to edit the bootloader configuration file (/etc/grub.conf, in my case) and update the kernel command line, as shown in Figure 7. This second method requires a reboot of the VM to activate the new kernel options, if you haven’t edited at the GRUB prompt.

Booting with KGDB options
Once you have these options in the kernel command-line and boot from it, the kernel boots till it gets to the stage where it waits for the remote GDB connection over the (virtual) serial port, as shown in Figure 8.

Linking the serial file on the host to the pseudo-terminal
We need to use socat to do this linking, with the following command:
# socat -d -d /code/guest/serial PTY:
Here, PTY: is the pseudo-terminal, and /code/guest/serial is the virtual serial port pipe file created by VirtualBox on my host machine as per the VM settings done earlier. When this command is run, it returns the pseudo-terminal number that’s allocated (in my case, /dev/pts/7), as shown in Figure 9.

It’s important to remember that you should not terminate the socat command; it needs to be running in the background for us to be able to use the pseudo terminal, else it breaks the stream.
Firing up GDB
Enter the kernel source directory on the host, and start GDB, telling it to connect to the remote target, which is the pseudo-terminal number returned by socat:
# cd linux-2.6.37
# gdb ./vmlinux
(gdb) target remote /dev/pts/7
This connects us to the waiting Linux kernel session in the VM. If we type continue at the GDB prompt, we will see booting resume in the VM’s guest OS. To be able to get back the GDB prompt on the host, you need to run the following command in the guest:
# echo g > /proc/sysrq-trigger
This will break the running session, and give you control in GDB. This can be used to insert break-points and do other debugging operations, like those seen in Figure 10. If you need to debug a kernel module, insert the module in the guest, obtain the .text address of the module (/sys/module/<module_name>/sections/.text) and use it as an argument for the GDB command add-symbol-file.
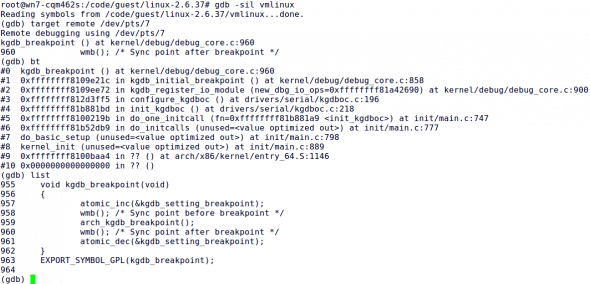
As you can see, with the above setup, a great deal of control can be achieved in debugging the live kernel.




http://www.linuxheaven.net/2012/02/17/five-lightweight-linux-distributions-you-should-know/
Thanks a lot!
good!
This is really amazing article and works exactly as it said. For more information about module debugging please refer “http://stackoverflow.com/questions/6260927/module-debugging-through-kgdb”
Can you please help me with preparing and installing the Kernel on guest OS in detail ( preparing the build environment and how to use make menuconfig in VirtualBox). I know to build Kernel from source tree on a real machine but unaware for VirtualBox. OR explain the way to get the source tree from my host to the Virtual Box