All GSM devices use a SIM, a secure smart card, which holds information about the network and the user setting. Android currently provides a read-only interface via the telephony APIs, to access the physical device and SIM information. So, what does the information constitute, and how is it useful? Let’s first get familiar with the context and the basics, before delving into the telephony API.
Telephony metrics relevant to programming
Telephony-related metrics can be broadly classified into SIM-related information, physical device-related information, and network provider-related information. Table 1 summarises some important metrics.
| SIM | Physical Device | Network Provider |
| Serial Number | Device ID | Call state |
| Subscriber ID | Software version | Country |
| Country | Phone type | Operator |
| State | USB vendor ID | Operator name |
| Operator name | S/N or serial number | Operator location |
The information above includes the following:
- The SIM Serial Number (SSN) on the SIM card uniquely identifies the SIM card. It’s also referred to as the Integrated Circuit Card ID (ICCID). This holds information related to the SIM’s country, state and operator.
- The International Mobile Subscriber Identity (IMSI) identifies the subscriber (Subscriber ID), and network details such as the provider network’s operator country, operator code/name and network state. In addition, Location Area Identity (LAI) provides the region within a provider network, which appears as the operator’s location.
- The International Mobile Equipment Identity (IMEI) number uniquely identifies a GSM device internationally. This number is often printed on the instrument panel, and can usually be retrieved by typing
*#06#on the phone’s keypad. A stolen or lost phone is tracked (or blocked) by its IMEI. - In addition to the above metrics, during the setup of a development environment with a real device, programmers need to determine a few physical device metrics, such as: (a) USB vendor ID of the device, for the creation of permissions for the device in app debug mode, and (b) device serial number (that appears as a S/N) printed on the device — this is seen as the device, when testing and developing in an IDE such as Eclipse (see Figure 1). Though many popular USB vendor IDs are publicly listed, yours may not be. Both these bits of information can be retrieved using a procedure listed in the box item below.

| Retrieving crucial hardware device metrics | ||
To retrieve the USB ID, use lsusb, as shown below:
The above two lines indicate two mobile phones connected to my system via USB, in device debug mode. The four-digit vendor ID of the HTC phone is 0bb4 and that of the unlisted Micromax (appears as ONDA) is 19d2. Along with the vendor ID are the bus number details (001) of the phone, and the device number (005/006). You may note that the device number is not constant, and will change each time you plug/unplug the phone, or enable/disable debugging on your device. Type the following to determine the serial number and the OS details of the mobile (in this case, the HTC), using udev, which is used by the OS to dynamically map, present, and control USB devices:
|
The Android Telephony package
Programmers will need ways to not just retrieve telephony data, but also to dial a phone number, intercept outgoing phone calls, or send/receive SMS messages. This is achieved with a combination of classes provided in the android.telephony package, along with inbuilt Intents and phone services.
The most important of these is the TelephonyManager class, which can be used to retrieve metadata about the SIM card, the physical device and the network provider. Programmers will need to use the Android Context, through the getSystemService() method, with a constant as shown below, to obtain an instance of the TelephonyManager class.
// ..creating TelephonyManager from Contextfinal TelephonyManager mytelMgr =(TelephonyManager)this.getSystemService(Context.TELEPHONY_SERVICE); |
With this handle, telephony data can be retrieved. Sample code to retrieve the phone’s call state, using the getCallState() method, is shown below.
public String getCurrentCallState(final TelephonyManager mytelMgr) { int callState = mytelMgr.getCallState(); String callStateString = "NOTKNOWN"; switch (callState) { case TelephonyManager.CALL_STATE_IDLE: callStateString = "IDLE"; break; case TelephonyManager.CALL_STATE_OFFHOOK: callStateString = "OFFHOOK"; break; case TelephonyManager.CALL_STATE_RINGING: callStateString = "RINGING"; break; }} |
Additionally, it is often important to know the change in the call or service state of the phone, in an app. For example, you may want to mute your application when a call arrives. This is done by attaching a listener, called PhoneStateListener to the TelephonyManager.
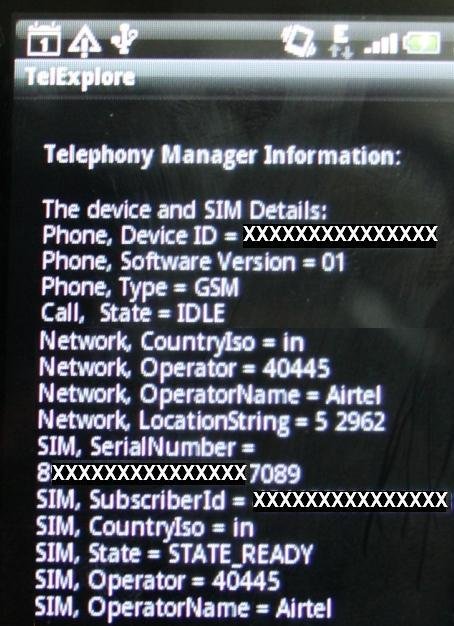
Finally, it is important to note that information retrieval via TelephonyManager is permission-protected. For the application to access this information, the android.permission.READ_PHONE_STATE permission has to be set in the app’s manifest.xml. Figure 2 shows some metrics retrieved using TelephonyManager.

The Android emulator includes a mock GSM modem that you can manipulate using the
gsm command from the console. An alternative would be to simply use the Swiss knife, which is the Dalvik debug monitoring service (DDMS), which lets you simulate special device status and activities.
With respect to Telephony actions, you can simulate phone calls and send/receive SMS messages to/from the emulator. Other than this, the state of the phone, the network speed and latency (GPRS, EDGE, UMTS, etc.,) can also be set. DDMS can be launched from the tools/ directory in your Android SDK distribution. As we discussed earlier, it could be useful for situations where the existing functionality of App needs to be enhanced with SMS sending feature. Or for building specialized SMS App, such as being able to set a time when the message would leave your phone.
With this background, let’s look at the steps to incorporate SMS feature. As we discussed earlier, it could be useful for situations where the existing functionality of App needs to be enhanced with SMS sending feature. Or for building specialized SMS App, such as being able to set a time when the message would leave your phone.
The steps to sending a simple text message:
- The app incorporates the
android.telephonypackage. - Permissions must be set in the manifest file to send and receive SMS messages, as shown below:
- Send SMS —
android.permission.SEND_SMS - Receive SMS —
android.permission.RECEIVE_SMS
- Send SMS —
- The app uses an instance of
SmsManager, retrieved using the static methodgetDefault():finalSmsManager sms = SmsManager.getDefault() ; - A
PendingIntentis created in order for the application to track message delivery status. (APendingIntentprovides a means for an application to work beyond its life, for a particular Intent. Even after the owning application dies, aPendingIntentcreated by it can be run later.) This pending intent is invoked when the sending handset receives an acknowledgement from the network that the destination handset has received the message.finalPendingIntent sentIntent = PendingIntent.getActivity(this,0,newIntent(this,SmsSendCheck.class),0); - To send a simple text message, the sample code would be like what’s shown below:
sms.sendTextMessage("98867xxxxx",null,"Test message from laila!", sentIntent,null);
The complete working code for sending SMS can be found here.
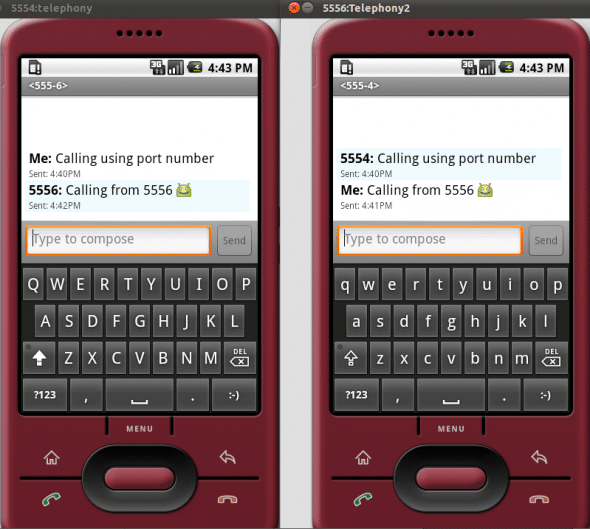
One simple way to test complete SMS functionality, especially the acknowledgement, with a pending intent, is to create two Emulator instances. Let’s say that the instances are 5554 and 5556 (see Figure 3). This number is also the port number, and the emulator can be called at this number. This is a nice way to test without incurring network provider call charges during development and testing periods.

You can read more on SMS emulation here.
Summary
With this background, interested developers may take a deep plunge into programming with the help of Android Telephony API website. Another related area to understand would be the standards that are part of 3GPP Evolution model.


Where can I find the application TelExplore?
Exists a possibility to print the results to a log file so I can use ADB to read it via USB connection?