
Taking detailed, usable notes is not only an art, but also the hallmark of an effective worker. Fortunately, this is an area where the workman can blame his tools. But before you throw out the paper notebook and pencil, do check out which of these tools add value to your laptop-cum-office.
Note-taking has always been a chore — more so during those unstructured, so-called brainstorming or ideation meetings, during which people jump from idea to idea; or worse, go round in circles but still expect lucid minutes of the meeting within one business day. Whether it’s capturing your professor’s insightful lecture, or documenting details of that research project — good notes that can be referred to and understood weeks or months after they are written, are an important asset.
The tools we are going to discuss mimic typical note-taking styles that you are already aware of. You may have written datelined journals, or notes in folders. You may have discovered the convenience of a wiki format for taking notes. What these tools (also called “outliners”) bring you are additional facilities that paper and pencil just cannot match.
RedNoteBook
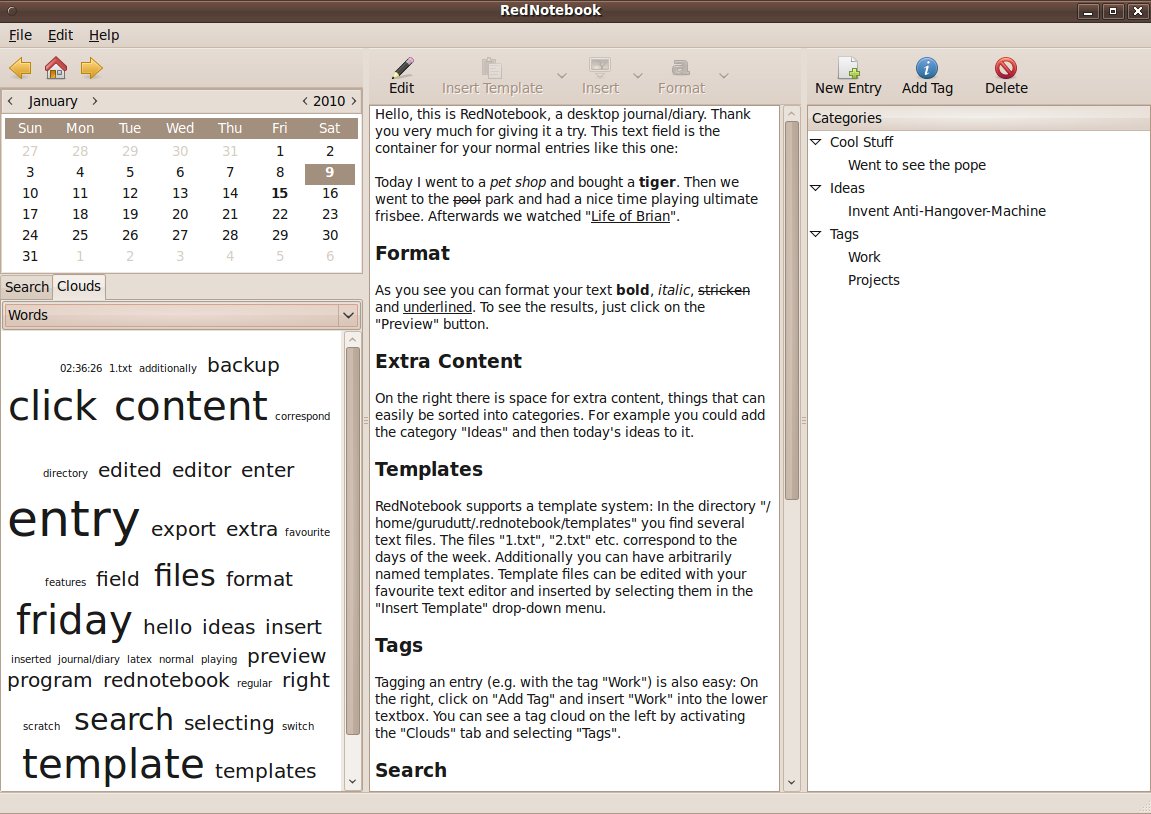
There aren’t very many pure journal applications in Linux; at least, I could not find any that stand out. RedNoteBook is feature-rich, and simple to use, even if it has a slightly odd way of assigning categories and tags to journal entries.
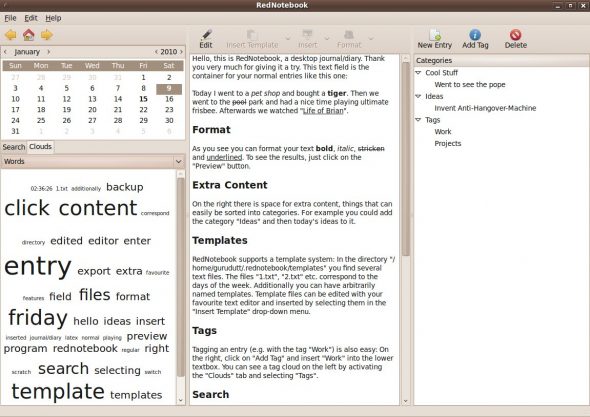
From the screenshot in Figure 1, you will note the three vertical panes. The left top is the calendar, and the left bottom is a search pane with a weighted keyword cloud, and a search-as-you-type text entry pane. Actually, the right-most pane is a distraction, except when you create a new journal entry.
To create an entry, just click on a date and start typing. Make sure you are in edit mode — the Edit/Preview button toggles this. Wiki syntax is supported: __underline__, **bold**, and ===Title === work as expected. A Ctrl+D gets you the date stamp. A neat feature is templates based on weekdays. For instance, the journal template for Friday is 5.txt. With weekday templates, you can automatically log those pre-scheduled activities like the staff meeting on Mondays, and the design review meeting on Thursdays.
Once you have created an entry, at the right-most pane, use the “New Entry” button to assign a category and a sub-category to your journal entry. You can also add optional tags. It is possible to export journal entries to HTML, filtered by categories and a date range.
Multiple entries (say, for different projects), under different exclusive categories for a particular date, are not possible within the same journal. Of course, you can always create multiple journals as a trivial solution.
NoteCase
Just do an “Insert Node”, or hit the <Insert> key to get started. The first node is the root node for your notebook. From this point, you can type into the right pane (corresponding to the active node), or keep inserting child nodes, delineating the structure of your notebook. To get a feel of what a fully populated notebook looks like, check out the Help section, which opens up a Help notebook.
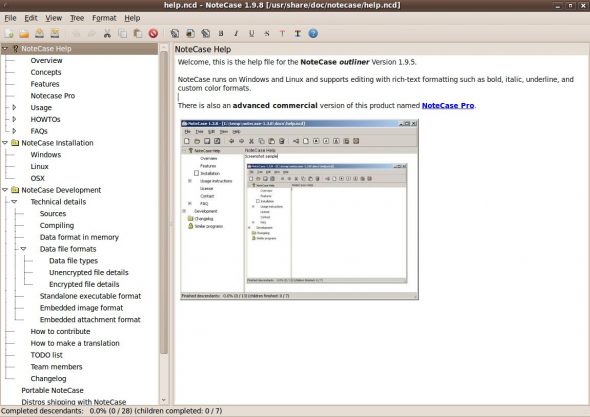
Wiki syntax does not work, but you can use the toolbar to format your text. You will miss the bulleted list format option, though. If you visit “Node Properties” (click the secondary mouse button on the node), you can add tags that will help you with searching the notebook, or associate an icon with a particular node. You can also insert pictures.
To use NoteCase as a journal, all you have to do is use the date/time string (a <Ctrl><Shift>T gets you the date string in five formats) to name a child node. You can then drill down another level for multiple project entries in your journal.
Hyperlinking across pages is possible; just select the text for your hyperlink, and use the link wizard on the tool bar. A parent node is also a page, and you can make it look like a ‘Table of Contents’ by creating hyperlinks to the child pages. Exporting to HTML creates a single huge file for the entire notebook, which will not suit certain kinds of content.
There is a paid-for “Pro” version of NoteCase available, which has more features. The free/open source version seems to have been abandoned by the author in favour of the Pro version, though it is still available in the Ubuntu repository. However, this version is available under a BSD licence, so people have the freedom to fork the project if they’d like to modify it.
KeepNote
A gem of an outliner, this one does not give you much to complain about. It is a shade better than the previous two tools. An Evolution-like interface lets you see the notebook tree in the left pane, with the right pane split horizontally, allowing you to view notes like email. The user interface does not cease to amaze. You can open multiple tabs, with each tab exposing different sub-sections of the notebook tree.
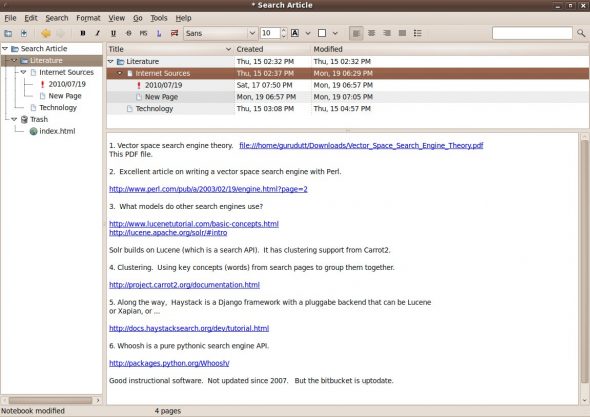
There are a greater number of built-in icons to choose from, to associate with nodes. In addition to pages, KeepNote also lets you create folders that contain sub-trees of pages. Folders give an additional structural element to your notebook. Note-to-note links are possible in pages; a <Ctrl>L gets you going. You can type the name of a page as a hyperlink, with a list of suggestions popping up.
Alternatively, you can have your own name for the hyperlink, and type the target page into the text bar that opens up at the bottom. A screen-shot feature is available, but do remember to configure helper applications in the “Preferences” page. Sorting is possible on columns in the list view. What’s more, it gets saved on a per-folder basis, so you can sort a journal folder on date, and a notes folder on title, all in the same notebook.
If all this were not enough, you can even write extensions. There are two available on the KeepNote website: one that lets you import NoteCase notebooks (yes, the outliner we discussed previously) and another which even lets you import a hierarchy of folders as a notebook. The latter is bound to be a gift to all you systematic types, who already keep well-organised folders. Installing a new extension is as simple as downloading it and using the “Preferences” page to install it. The notebook structure is also amenable to direct browsing, should the need arise, and you can also edit the pages and inserted images with your favourite applications. But there’s more…
Exporting to HTML does justice to the notebook format. The exported notebook offers a split-pane view, with the tree nodes listed in the left pane respectively hyperlinked to pages that open in the right pane. This ensures that you have the same ease of navigation with an exported notebook as you have with the outliner proper.
KeepNote does not allow you to name a page with a date stamp, though it gives you a lot of options to format the date stamp. You have to insert the date stamp, available via the menu, into a page — and then use it to rename a node, unless I have missed something in the documentation. But I can already see you sweeping this aside, given the many features stacked in favour of KeepNote.
ZimWiki
ZimWiki claims to be a desktop wiki, and does a great job of it. It is very good for taking notes on the fly, because it has first-class support for wiki syntax. For instance, if you have enabled “CamelCaps”, then typing “TomsIdeas” will create this word as a hyperlink. The target page for this link comes into existence when you click the hyperlink and enter some content. Similarly, you can make text **bold**, //italicised//, or __underscored__, and these are just some of the many formatting actions you can do with the wiki syntax. Referring to the Help section is the best way to view and understand ZimWiki features. Remember to enable View–>Index to see the tree view in the left pane.
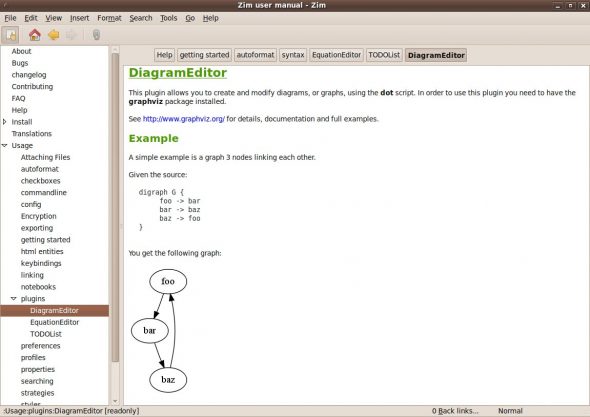
ZimWiki can be a great notebook, and also an aid to decent documentation in rushed or “live” situations such as meetings or lectures, especially if you are a touch-typist. The one thing that ZimWiki can lay strong claim to is being a journal with action item tracking. To start a journal, bring up the calendar widget (View–>Calendar), and click on a date. The tree pane on the left automatically creates a hierarchical structure with year, month, and date. Start typing into the date node to make that page permanent. This allows you to have a “sparse” journal, where you have pages only for those days when you have something to write about. Action or “To-Do” items can be entered on any page within their specific context. You can manage them centrally via the View–>TODO List menu item, which consolidates all “To-Do” items across the notebook into a single view.
A quirk I could not get around was that items in the index or tree view sort themselves in alphabetical order, whether you want it or not. I would prefer that the nodes stayed in the order in which I inserted them, with an option to sort them at will.
A final note
This has by no means been an exhaustive list, and I am sure you will find more applications in this category. With FOSS software, your favourite application is yet to come. Meanwhile, enjoy taking down those notes with these tools — at least until the novelty wears off!



I definitely recommend CherryTree – the formatting and linking functions are much more elaborate than the ones discussed here.