The Colour and Drawing tools
These are similar to what we use in real life—a pencil, colour box, eraser, dropper and brushes. The only difference is the ‘gradient’. I will include colour swatches in this section, which is reminiscent of the square-shaped colour cubes that are generally used in Indian schools.
Bucket fill: Everyone who has used a computer will be aware of this tool. The most common tool that newbies start playing with is Bucket fill, a basic necessity for any image editor available off-the-shelf. Apart from filling normal colours/patterns, it also allows you to provide a pre-set colour effect to the filled colour. You can change options easily from the Tools section.
Blend tool/Gradient: This is not just another paint fill tool. The beauty of this tool is that it lets you provide a cool blend of multiple colours. The blend can also be considered as a first step to creating high-end wallpaper. There are a number of integrated options available under the Tools menu, allowing you to create assorted effects with just a click. To apply the gradient, set any two colours in the colour swatches and while retaining the left click, drag a line in the worksheet. Leave it once you’ve got the desired direction for the gradient effect.
Tips: Though Bucket fill is the preferred tool to fill in colour, to save time, you can just drag and drop colour from the colour swatches. Make sure you are on the correct layer and the selection is active.
Pencil/Paintbrush/Airbrush: All three tools give somewhat similar results and do pretty much what their names suggest. The Pencil is designed to provide a hard line with the aim of replicating the experience of actually drawing with a pencil.
The Brush tool, on the other hand, offers more, making it a decent option for shading and colouring. It is really handy when doing portraits or to create a matte look.
The Airbrush is the most unique that you will come across. You can easily control the amount of colour needed by varying the speed and pressure [in case of a pen and a tablet surface]. All the three brushes share a setting, and the new brush dynamics is available for all of them.
Eraser: This lets you erase any unwanted additions you have made while drawing.
FG/BG Colour Swatches: These are the applets with which you can select colours from the vast colour template on offer by the GIMP (Figure 9).
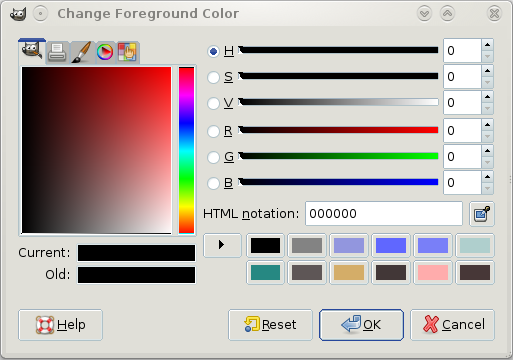
Ink: The Ink tool is another special brush generally used to provide bold and thick effects. It is highly customisable and has three pre-configured brushes that can be modified using the shape column. The calligraphy brush is a special feature of the Ink tool.
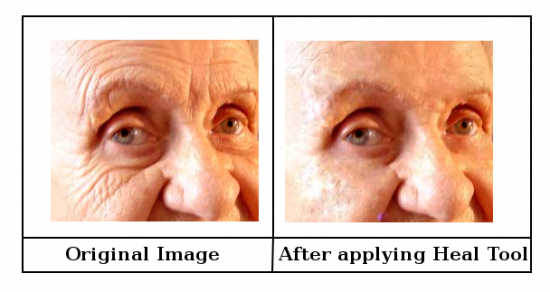
Clone/Heal: This lets you copy a small part of the image, patterns, or colours using the currently selected brush. This tool has many uses and is mainly preferred by photo experts who fix old, torn images. You can even remove face blemishes and make an image look clear. We will look at fixing photos later, in upcoming tutorials. To use the Clone tool, we first need to select a part as a source image. Press Ctrl to activate this and then left click to clone a part of the image. Once done, use it like a brush to go over the bad parts in the image.
The Heal tool is just another modified version of the Clone tool, though much better when it comes to fixing photographs. Just press Ctrl+click to copy the area selected, and then use it as a simple brush to clean up what’s not required (Figure 10).
Clone perspective: Clone perspective is the same as Normal perspective, but only applies to a cloned layer. You just need to provide a vanishing point; the rest of the procedure is the same as with the Clone tool.
Blur and Sharpen: The Blur and Sharpen tools use the Brush tool to provide the mentioned effect. The Blur tool blurs while the Sharpen tool sharpens the image to provide a better look. The Blur tool is generally used in small images or at the borders of an image to fix the unwanted parts. To provide large-scale blur effects, navigate to Filter → Blur and select the type of blur you want to provide. You can switch between the Blur and Sharpen effect at the Tools menu.
Smudge: This mixes the surrounding colours and gives a blurred effect. It is actually a special feature of the Blur tool, also referred to as Motion blur. The Smudge tool can be used to provide a water-smudged effect.
Dodge and Burn: The Dodge tool provides light and the Burn tool provides the darkening effect to an image. These tools also depend on the brush to perform this function.
This completes the humdrum part of the GIMP. So, as of now, we know a bit about interfaces, layers and a little about the tools used to manipulate images. In the next article, we will use the first two selection tools, mentioned in this article, and create some exquisite effects along with other requisite tools. So, stay tuned.












[…] […]
[…] […]
Nice work buddy…Keep the good work up. Will be watching you..
Thank you, your explanations are short and to the point, which makes it easy to understand.
I look forward to more similar tutorials.
I am a Gimp beginner.