Selection tools
The true test of any image-editing program is a comprehensive set of selection tools, which have a wide range of features that go far beyond their stated purpose. You can create stupendous effects only with selection tools. The GIMP comes with quite a few selection tools for various purposes.
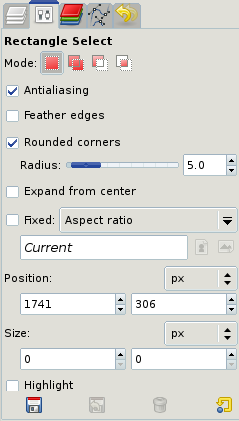
Rectangle Selection: This is the first selection tool that you see in the GIMP’s Toolbox. You can vary its settings to create assorted polygons. You can also use this tool to create rectangles with round edges that come very handy while creating buttons and banners. Just click on the rounded corners in the Tools option to create round-cornered rectangles within seconds.
To draw a rectangle, select the tool from the Toolbox, and by holding the left mouse button in the Click position, drag and expand the figure as much as you want. For the settings, check out Figure 3.
Ellipse Selection: The Elliptical selection tool lets you create ellipses and circles in much the same way as the Rectangular selection tool. Just select and drag as much as you want to.
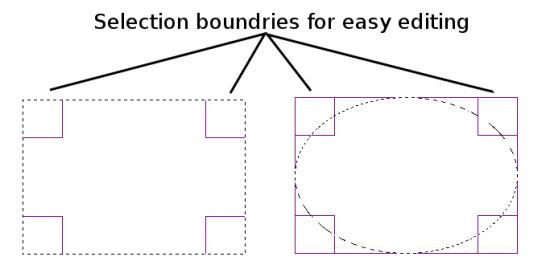
Tips: The GIMP provides easy-to-fix options for Rectangle/Ellipse selection tools. Notice the square at the corner while you are drawing a rectangle or an ellipse. Just move the pointer to the corner and adjust the selection according to your needs, as shown in Figure 4.
Free Hand Selection/Lasso: Free hand selection is a decent alternative to the Path tool. With the GIMP 2.6, this tool received many new features like the ability to make selections in multiple clicks, so that you don’t have to hold the left click button down in order to complete the selection. Although this tool is generally used to make faster outlines/paths to achieve rough results, you can also do precise drawings with it. However, once the path is created you cannot edit it.
Fuzzy Selection: This selection tool lets you create a selection across a small section, keeping either a layer or a colour as reference. It has very limited scope and will only let you select a small area. A better alternative to Fuzzy select is Colour select. Grab the tool and click the colour you want to select.
Colour Selection: This is a modified and more profound version of Fuzzy select, the difference being that Fuzzy select will only select a continuous area and will not cover different layers, while Colour select makes a complete selection over various layers (refer to Figure 5).

The Scissor: An alternate to the Lasso tool, the Scissor tool is meant to select sharp edges with a high colour contrast. It provides precise control over sharp corners and maintains it without distorting the selection at the borders. Unfortunately, this does not offer the refined features of the Path tool. You have to complete the selection in one go. And in case you make a mistake, you have to start all over again.
Foreground Selection: This is one of the most efficient tools for quick selections, using similar colours as reference. Foreground selection lets you isolate the foreground of any image in a few simple clicks. The only drawback is that it will only isolate the same colours, and will fail to select a multi-colour/gradient object from the image.
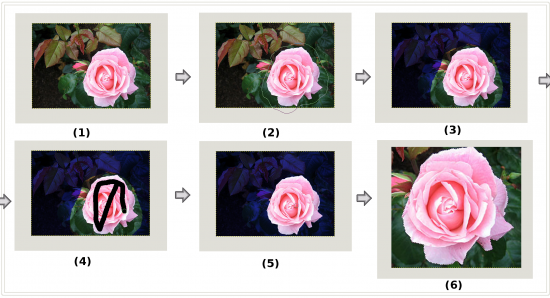
To isolate an image from the background [refer to Image 5], first open the image in the GIMP. Select the Foreground selection tool and draw a rough selection around it (Step 2). Notice that initially this selection works in the same way as Lasso selection does. Once you have completed the selection, the tool will apply a blue mask in the non-selected area (Step 3). In the next step, draw a continuous line above the colour you want to isolate (Step 4). The tool changes the brush in every step, so it’s pretty easy to use.
After applying the brush, the Foreground selection will isolate all the objects with the selected colour and apply the mask to the free area (Step 5). Press Enter if you are satisfied and copy the isolated selection (refer to Figure 6).
The Path: This is the king of all selection tools and one of my favourites as well. The Path tool has a vast repertoire; it can be used for selecting and isolating images, creating lines and paths, providing astounding effects to wallpapers when coupled with the Gradient and Brush tool, and a lot more. You can modify every section of the path, which is not possible in Free hand selection.
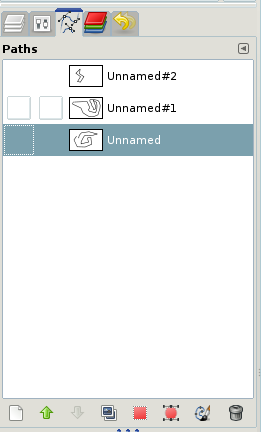
The GIMP stores the history of all the paths created, thus restoring a path for future editing and making learning easy (Figure 7).
That sums up the basic selection tools. We will get started with a couple of more complex ones from the next tutorial onwards, learning about them in detail to create exquisite effects.




[…] […]
[…] […]
Nice work buddy…Keep the good work up. Will be watching you..
Thank you, your explanations are short and to the point, which makes it easy to understand.
I look forward to more similar tutorials.
I am a Gimp beginner.