The Toolbox that appears on the left of the main window is the foundation of the GIMP. Initially, it may appear mind-boggling, especially for a person who has no background or experience with any graphics editing program. While a detailed description of the Toolbox is out of the scope of this article, it would be helpful to get acquainted with each tool that comes with it.
Note that this tutorial will begin with a modified version of the Toolbox since we had learnt about customising the GIMP interface in the first article under this series. You can get to know more about that in LFY’s July 09 issue.
Before we get started, we will cover ‘selections’. Here, rather than discussing any type of selection tool, we will learn about the nature of selection.
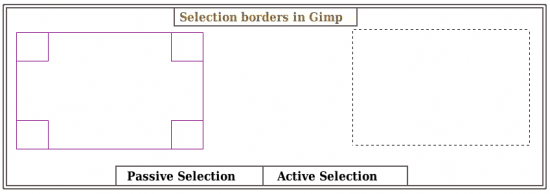
A ‘selection’ can be done by using different tools; you can use ‘figure selection’, ‘colour selection’ or even ‘path selection’. Every ‘selection’ shows two types of traits, i.e., passive and active.
Passive selection: A ‘passive selection’ transpires at the time of drawing or editing a selection, and does not allow any drawing or painting while working with it. The passive selection will either vanish or change into active mode if you attempt to draw anything inside it.
Active selection: An ‘active selection’ is just a normal selection in which you can draw or paint. To distinguish between the two, the GIMP drafts the active selection with continuous blinking/moving dots. Refer to Figure 1 for more accurate details.

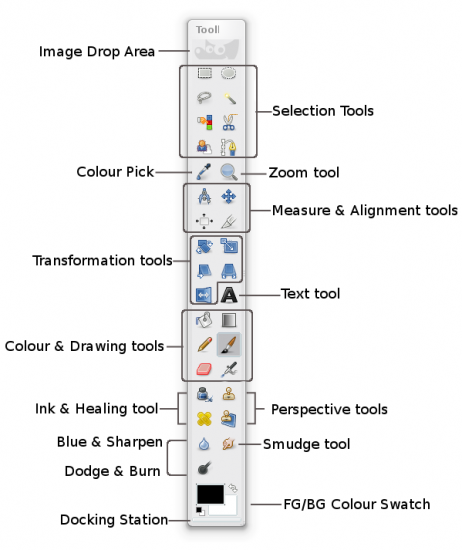
The modified Toolbox, shown in Figure 2, comes with 33 tools and two colour swatches. Some of these tools have analogous tasks but they tend to achieve them in different ways.

I have segregated the tools into different categories to help you understand them easily. In this tutorial, we will learn the basic aspects and use of the various tools, and will continue learning about them in more detail in upcoming tutorials (refer to Figure 2).
Drop area
The Toolbox starts with a faint ‘wilber’ logo from the top. This is a drop down area, where you can just drag and drop an image and start editing. It’s very handy when working with congested desktops.


[…] […]
[…] […]
Nice work buddy…Keep the good work up. Will be watching you..
Thank you, your explanations are short and to the point, which makes it easy to understand.
I look forward to more similar tutorials.
I am a Gimp beginner.