Get set
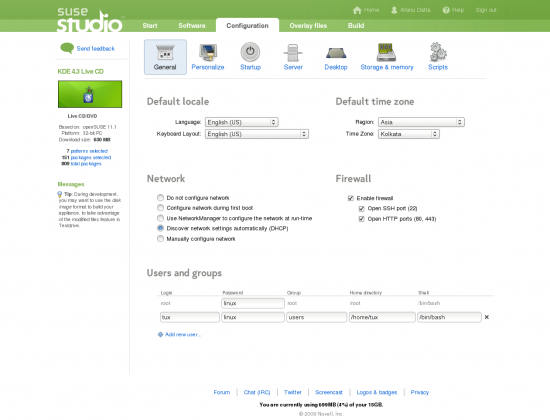
It’s now time to access the Configuration section, which is further divided into seven sections.
Under General (Figure 3), you’ll need to set your language, keyboard layout, region and time zone choices. Next up, you can configure your network settings between an unconfigured network, configure on first boot, use NetworkManager, DHCP, and manual configuration. Leave the firewall off or on (with options to open default SSH and HTTP/HTTPS ports). And, finally, set the root password and add new users. By default, there’s a user account called tux and its password (and that of the root’s, too) is linux. You’re free to change all these here.
In the Personalise section, you’ll be able to set a logo and background for your appliance. There are a few images available by default with the option to add new logos and wallpapers. A nice touch by the Studio team is a live preview for Grub, the boot screen, the console and login screen option to give you an idea how they would look with your selection of graphics. I added a KDE logo to give it a more KDE feel and chose one of the wallpapers provided by SUSE.
Under the Startup tab you get to select the default run level (I wanted 5 for the graphical mode) and there’s the option to add EULA (even multiple ones). The Server tab doesn’t have much besides configuring the MySQL database, while the Desktop tab lets you set the user to auto-login and add start-up programs for users. The Storage and Memory section lets you set the RAM and disk size if you’re creating a VMware or disk image. And, finally, the Scripts tab lets you add a custom script (if you wish to) at the end of the appliance build or when you finally boot it.
The next major section is called Overlay files. This one gives you a way to “…optionally add custom files to your appliance. Files added here will be copied into the appliance after packages are installed.” You can upload files or set Studio to fetch it from a URL and then set the location to store the file, set the owner, group and permissions, etc. I didn’t need this option, but it could come in real handy if you need it, for example, to upload a set of documents/media files, or even programs that the live user can access. There’s another use that I’ll come back to later.
Go!
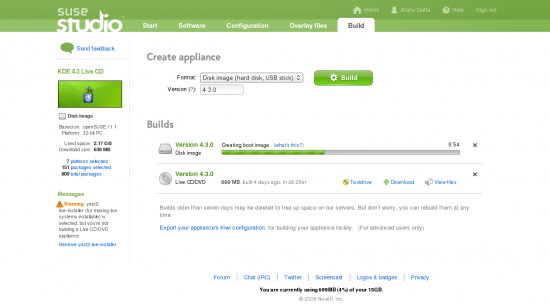
Well, well, now that you’re done with the configurations, it’s time to hit the Build tab to run a build of the appliance/distro (see Figure 4). You’ll require to select a build format between the live CD/DVD ISO, a disk image (for the hard drive and USB sticks), VMware image, and Xen image. We wanted a CD ISO, so if that’s the case for you too, simply select that and hit Build and when done, download the ISO. By the way, the left-side pane is pretty smart. If you’re creating an ISO image, it’ll suggest you add the YaST Live Installer package as well, so that you can install the live CD to a hard disk if you wish.
But wait! The download takes too much time. Do we really need to wait that long just to check if everything is working as planned?
This is where the Testdrive feature (accessible when the build is ready) comes into play. You can live boot your appliance right inside your browser (see Figure 5) to test whether everything is in place and working as planned. This also gives you another level of fine-grained customisation to add to your appliance using a feature called Modified Files. Note that this feature doesn’t work when your build is an ISO, so choose any of the other build formats if you need to use this feature.
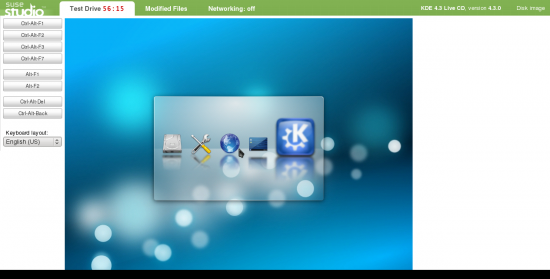
This tab lists whatever changes are done while you’re running the image on your browser—every change is listed here since the Testdrive session began. So, if you want all the options and settings that you configured in your live session (for example, a set of active KDE widgets on the desktop) to stay in your final build, then go to this tab and select the changes that you need (while leaving out the rest that’s not necessary) and add it to the appliance. Switch to the Overlay Files tab to see a new entry there (Figure 6). Read more about this feature at Nat Friedman’s (SUSE Studio is his baby) blog: http://nat.org/blog/2009/07/linux-in-the-browser.
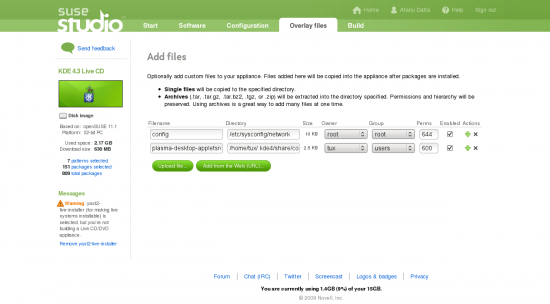
Kill the Testdrive session, rebuild the appliance and run Testdrive again to see if your changes appear fine, out-of-the-box. Once you’re satisfied, go back to the build tab and this time build a final ISO, if you wanted that instead—like I did.
Now download it and test it on a few systems to see if everything works as planned. There is a possibility you might have missed out on something. Don’t worry—go back to Studio, access your appliance and add, delete, build, Testdrive and download again—your appliance settings will be there till you delete them. Of course, you can create multiple appliances and keep all of them online for easy access and modifications at a later time.
Well, that’s about it—to give you an idea of what’s possible with SUSE Studio. Take it for a test run and check its potential.
It looks like building GNU/Linux distros and appliances of your own choice just got WAY too easy! Good job, Nat and the team at Novell!


