Typically, for a systems integrator (SI) or even a systems administrator, installing, configuring and then setting up an operating system as per the requirements is a time-consuming job, to say the least. It involves adding all the extra essential apps, deleting all that’s not required, configuring other apps, etc.
What if you’re an ISV? You offer customers an application but don’t have an OS. You sell (support) or give away your application and whether it works or not depends on the person installing it on top of an OS on the other side of the fence. Still, you’ll have to make sure that it runs properly on that OS, while sitting on this side. Or you could dictate the terms under which your application has to be used—that the customer needs to run a particular OS, for instance—which, most often, is the case anyway. The result? Some of your potential customers couldn’t care less about your product.
Or, maybe you’re just a regular Linux user who needs to create an OS that gives you all the applications and settings out of the box, just the way you like it. Because, configuring a default installation your way takes too much time. And if you need to do that every few months after a new release, it becomes quite tiresome.
What if all of you had a way to simply customise an OS with only the applications you needed and nothing extra? If, as the producer of a third party software (an ISV), you could just add your application atop the base OS, build an ISO or a virtual appliance, test it, then download and use/distribute it?
I’m sure a lot of you have probably been doing precisely this for some time—but the process isn’t as straightforward as you’d want it to be. A rather wizardish approach would make things easier.
Well, I don’t know what the team behind a Web service called SUSE Studio [susestudio.com] had in mind—maybe they had the same plans—but it seems this service just ended up solving a lot of issues, including the ones mentioned above. All at one go!
So, now that we’ve understood the target audience for this sort of service, let’s get started, shall we?
On your marks
Well, to begin with, it’s a Web-based service! The good thing is you can use your OpenID (or even Gmail and Yahoo! IDs) to sign in. It doesn’t force you to sign up for a Novell account. The bad news is that the service is by invitation only, for now. Remember when Gmail was launched in 2004? Send them a request, and keep your fingers crossed—although the report is that most get to create an account within a week.
You’ll start off with a base template. The service provides three distros as options for a base OS—openSUSE 11.1, SUSE Linux Enterprise (SLE) 10 and SLE 11. Each of these distros have six templates to choose from:
- JeOS (Just-enough OS) – Well, as the name suggests, it’s just enough to be called an OS, suitable for minimalistic appliances.
- Server – A text-only base
- Minimal X – X Server + IceWM
- GNOME desktop – base system + GNOME
- KDE4 desktop – base system + KDE4
- KDE3 desktop – base system + KDE3
After this, you’ll have to make a decision between 32- and 64-bit architectures.
I’ll take the example of the KDE4 distro we’re bundling with LFY this month, to run you through the process. I selected openSUSE 11.1, KDE4 desktop and the 32-bit architecture. Now give a name to your appliance—mine’s KDE 4.3 Live CD.
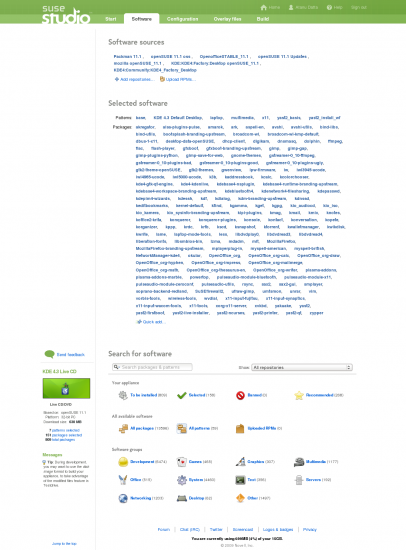
It’s time to put on your editor’s hat, because you now enter the wizard to start customising your distro/appliance. Click on the Software tab on the Web page. This is where you’ll do most of your work. This section is divided into three: Software sources, Selected software and Search for software. See Figure 1 for the complete picture.

Under Sources, only openSUSE 11.1 and Updates repos are available, to start off with. The selected software shows the software that’s included, by default, based on the template you’ve started off with, and the Search section is where you’re to locate what all is available in the repos. It is all interactive. One good thing is that when you enter a search term (by package name or pattern) it lists what’s available, ranked by popularity. It lists the name of the application, its version, repository in which it is available, installed (not the download) size, and an action button to add (or remove already selected) applications.
Your first job is to identify what exactly you want. My job was to create ‘The Perfect Desktop’. For that I needed the recently-released KDE 4.3, the latest version of OpenOffice.org and Firefox, besides support for multimedia codes and certain forms of drivers, out-of-the-box.
The default repositories offer older versions of all the essential applications, and the codes are plain missing in them.
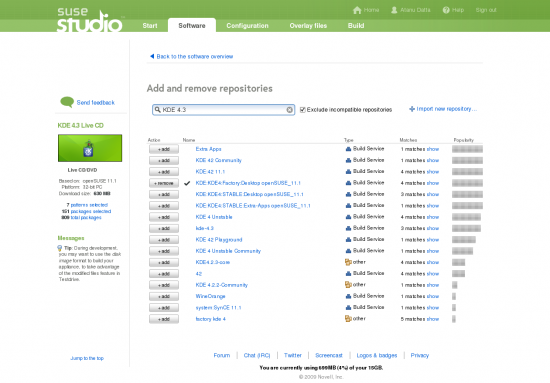
Go to the Software sources section and click on ‘Add repositories’ (Figure 2). Here, you can either search for a repository if you know its name or search for a package and see which repository makes more sense to add, based on the popularity ratings and number of packages available. For example, a search for KDE 4.3 pops out two results, out of which the Build Service-based ‘KDE:KDE4:Factory:Desktop openSUSE_11.1’ made more sense. Likewise, I added the OpenOffice.org and Firefox repos that had the latest versions of these apps; and of course, Packman, essentially for codecs.

After adding them, it’s time to go back to the software overview section again. If you want to add your own custom RPM (or something that’s third party), there’s an option to upload that as well—refer to the ‘Upload RPMs…’ link in Figure 1.
The good thing about openSUSE is the availability of software patterns (similar to meta packages offered by other distros) that can help you install a set of programs together instead of individual apps one by one—thus making the job a tad easier. For example, to include most of KDE 4.3 applications at one go, I first removed the kde4 pattern that came from my base template, and added the one called ‘KDE 4.3 Default Desktop’. Dependencies are all resolved and taken care of in the backend. When a package addition conflicts with another, it shows you the possible options to make amends.
The Selected software section is divided in two—patterns and packages. Note that the packages section will list all the packages that you’ve chosen (or automatically added when you included a pattern) but won’t list the dependencies. This helps in keeping an eye on all the major packages that you select—and if required you can remove a package with a single click. The Web interface is based on the Ruby on Rails and Ajax technologies and that makes the service pretty interactive (a la Facebook, Gmail, etc).
Another of my requirements was to build an ISO image and keep the size within 700 MB so that I could pack it in a CD. Upon selecting a package, the left-hand pane of the Web page live-updates the download size, number of packages and patterns, besides there being an Undo button (or Redo when you delete a package) to keep things under check. It also shows you a warning if the size of the overall image becomes more than 700 MB. This is important because the ‘Download size’ info box on the left-hand pane is that of the individual packages that have been selected. A live ISO will have certain other things that take up more space. What I figured was that I needed to stop adding packages the moment the download size reached 630 MB, because the process of ISO creation adds another 70 odd MB to the overall size.
Once you’re satisfied with the package selection, you can proceed for some finer-grained control over other settings, in order to personalise the appliance or distribution.


