Portlets are small applications that are rendered in the larger context of a portal. When you view any of the popular portals like Yahoo! or Rediff, you see the home page organised into small boxes displaying mail, news, photos, advertisements and other details. These boxes are called portlets. To develop portlets, there are various competing (and sometimes cooperating) technologies: Google Gadgets; Microsoft Sharepoint Portal; and in the world of Java, we have two specifications—JSR-286 and JSR-168—that govern Portlet development. JSR-286 supersedes JSR-168, and is mostly compatible with its predecessor. JSR-286 is sometimes called the Portlet 2.0 specification. The portlet specification is similar to the Java Servlet specification. Understanding the servlet API would shorten the process of learning Portlet technology.
Portlet containers
Portlet containers house the deployed portlets and render them in the context of the portal. There are various portlet containers in the market. WebLogic Portal and WebSphere Portal are popular proprietary portal servers. In the open source space, we have Liferay, JBoss Portal, OpenPortal, Pluto and others.
Liferay
After a small evaluation of different Portal servers, I shortlisted Liferay. Here is a list of the winning points:
- Support for the latest standards and specifications
- Various innovations in the UI layer
- An extensive set of pre-build ready-to-deploy portlets
- A good community
- Open development
Prerequisites
Software prerequisites:
- JDK 1.6
- Maven 2.1
- Liferay 5.2
Knowledge prerequisites—a working knowledge of the following technologies will be helpful:
- Servlets
- JSP
- JSTL and EL
Liferay installation
The only prerequisite to install Liferay is that you should have the Java Development Kit in your system. Liferay downloads are conveniently packaged with various application servers and servlet containers. Download the one that you are comfortable with, and extract it. The installation is then complete. The extracted directory will be called LIFERAY_DIR hereafter.
Writing the first JSR-286 portlet
Let us start with the ubiquitous example, writing the Hello World portlet. The code is available in liferaybook.googlecode.com.
Before we jump into coding, let’s set up the project environment. My preferred build and dependency management environment is Maven. Using this, we will create a new project (use mvn archetype:generate). Choose a normal WAR project (option 18 in the menu). For our example, I have given com.liferabook, hello-world and com.liferaybook as the groupId, artifactId and the package, respectively. To the generated pom.xml, add the following dependencies:
<dependency>
     <groupId>javax.portlet</groupId>
     <artifactId>portlet-api</artifactId>
     <version>2.0</version>
     <scope>provided</scope>
</dependency>
<dependency>
     <groupId>javax.servlet</groupId>
     <artifactId>jstl</artifactId>
     <version>1.2</version>
</dependency>
Now create your first portlet class:
package com.liferaybook;
import java.io.IOException;
import javax.portlet.GenericPortlet;
import javax.portlet.PortletException;
import javax.portlet.RenderRequest;
import javax.portlet.RenderResponse;"

public class HelloWorldPortlet extends GenericPortlet {

    @Override
    protected void doView(RenderRequest request, RenderResponse response)
        throws PortletException, IOException {
    request.setAttribute("message", "Hello World!");
    getPortletContext().getRequestDispatcher("/index.jsp").include(request, response);
    }

}
The code should be understandable to any servlet programmer. The similarities with the servlet API are listed in Table 1. Note that these similarities are based on API usage; they cannot correspond one-to-one in the functional or operational level.
| Table 1: Similarities of portlet APIs with servlet APIs | |
|---|---|
| Servlet API | Portlet API |
| javax.servlet.http.HttpServlet | javax.portlet.GenericPortlet |
| javax.servlet.http.HttpServlet.doGet() | javax.portlet.GenericPortlet.doView() |
| javax.servlet.ServletException | javax.portlet.PortletException |
| javax.servlet.http.HttpServletRequest | javax.portlet.RenderRequest |
| javax.servlet.http.HttpServletResponse | javax.portlet.RenderResponse |
| javax.servlet.RequestDispatcher | javax.portlet.PortletRequestDispatcher |
Coming back to our code, in the doView() method, we first set the request attribute message with the String “Hello World!”, then call RequestDispatcher to include the index.jsp.
Note, in the Maven structure, you have to place the above code as src/main/java/com/liferaybook/HelloWorldPortlet.java.
The index.jsp page:
<p>${requestScope.message}</p>
Using the Unified Expression Language (EL), we print the message request attribute set in the HelloWorldPortlet class. Note that in the JSPs you need not have the <html><head><body> elements defined. This is because your portlet is rendered as a box inside the portal’s theme.
The JSPs are placed in the project location: src/main/webapp/
A couple of more configurations need to be written before we can deploy our brand new portlet. These are portlet.xml and web.xml.
The following is what portlet.xml looks like:
<?xml version="1.0" encoding="UTF-8"?>
<portlet-app
    xmlns="http://java.sun.com/xml/ns/portlet/portlet-app_2_0.xsd"
    version="2.0"
    xmlns:xsi="http://www.w3.org/2001/XMLSchema-instance"
    xsi:schemaLocation="http://java.sun.com/xml/ns/portlet/portlet-app_2_0.xsd
                    http://java.sun.com/xml/ns/portlet/portlet-app_2_0.xsd">

    <portlet>
        <description>Hello World Portlet</description>
        <portlet-name>hello-world-portlet</portlet-name>
        <display-name>Hello World Portlet</display-name>
        <portlet-class>com.liferaybook.HelloWorldPortlet</portlet-class>
        <supports>
            <mime-type>text/html</mime-type>
            <portlet-mode>VIEW</portlet-mode>
        </supports>
        <portlet-info>
            <title>Hello World Portlet</title>
            <short-title>Hello World Portlet</short-title>
        </portlet-info>
    </portlet>
</portlet-app>
Shown below is what web.xml looks like:
<?xml version="1.0" encoding="UTF-8"?>
<web-app xmlns="http://java.sun.com/xml/ns/javaee"
    xmlns:xsi="http://www.w3.org/2001/XMLSchema-instance"
    xsi:schemaLocation="http://java.sun.com/xml/ns/javaee http://java.sun.com/xml/ns/javaee/web-app_2_5.xsd"
    version="2.5">
</web-app>
The portlet.xml code should be self-explanatory. The web.xml is an empty XML with no content. This is required, because we are using EL, and this web.xml specifies the Web app specification to version 2.5, where EL can be used inside JSP.
Place both portlet.xml and web.xml in the project path: src/main/webapp/WEB-INF/.
Build the portlet using the mvn package command. This will generate hello-world.war in your target directory. This is your ready-to-deploy portlet war.
Portlet deployment in Liferay
Start the Liferay server, then copy the hello-world.war to the LIFERAY_DIR/deploy/ directory. Monitor your application server log for successful deployment. Once it is deployed, visit the URL: http://localhost:8080/
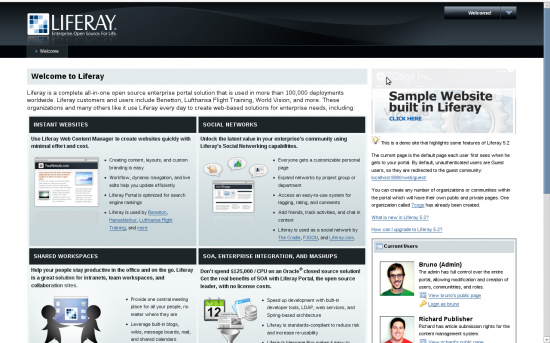
You will be able to view the default Liferay Portal page [Figure 1].

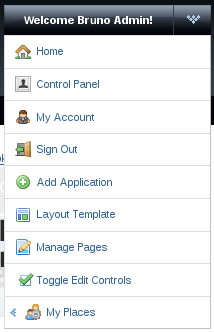
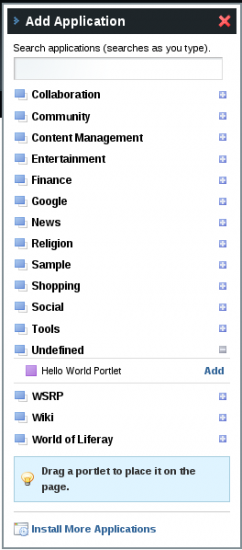
On to the right, you will see the link “Login as bruno”. Click this to log in as the portal administrator. Click on the menu Welcome Bruno Admin! (top-right of the screen) and select Add Application [Figure 2]. This will open the Add Application panel.

Under the Undefined category, you will find the deployed portlet [Figure 3].

Just drag and drop it in the screen to deploy your portlet [Figure 4].

So we have successfully developed a small “Hello World” application for deployment in the Liferay Portlet Container. In forthcoming articles in this series, we will discuss some more advanced concepts of the portlet specification.


thanx for the tutorial! clear and simple
ya, nice articles about Portlet Development With Liferay, one of the leading company also development with liferay is http://www.leosys.net/liferay-portal-development.aspx
Good article.
Thanking you for providing the reliable information. Portal Development
Thanking You Your blog is very informative. <a href=”http://ariestechsoft.net/portal-development.html”>portal development</a>
hi,
first thanks for your good and step by step example, but I have one problem, when I want to deploy my portlet, I place hello-world.war in LIFERAY_DIR/deploy/ but nothing happens! and my app never deployed! I do exactly what you do, and also I take a look at your project in googlecode and there was nothing wrong with my code! Also this folder is correct because I installed portlets that I’ve written with portlet sdk and Ant in this folder and those portlet working fine for me.