Initially, working with layers can be a bit intimidating and a newbie will try to avoid it. But once you get used to working with it, layers make editing images child’s play. Of course, you need to know a few editing tools and techniques.
What is a layer? In general, it is a combination of materials stacked over each other. But when we talk about image editing, a layer can be best described as a combination of images forming a single image. The combination of images can either be opaque, transparent or both, depending upon the type of effects you implement.
In layman’s terms, consider an opaque background with multiple transparent or opaque sheets, one over the other, combined to form an image.
Figure 1 illustrates how different layer stacks combine together to form an image. I have created only a three-layered image, making it easier for you to understand. The top layer is Johnny Bravo, followed by a wooden border in the second and the background in the last layer. Notice how it looks when they are combined together.
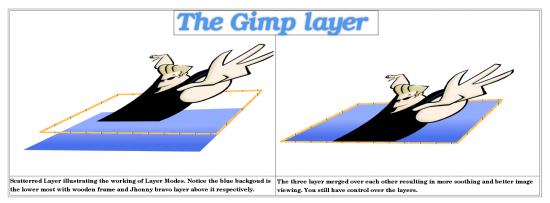
Now, you must be wondering about the need for all the fuss, especially when all of this can be achieved with a single layer itself. Well, yes, you can create similar effects with basic editors like KolourPaint, but when you create an image that way, you don’t have control over the different aspects of it. For instance, a similar image created using KolourPaint will not allow you to just move Johnny Bravo’s image to any place else. You simply cannot do it! Once you create an image just by pasting on non-layered parts, all the sections pasted will be merged in the background itself, leaving no way to edit it. So if you try to move the ‘Bravo’ part, the whole image will move along with the background and border. While when working with layers, you have the freedom to edit, share, delete and modify as you like. Pretty much like the FOSS idea, isn’t it?
We did learn a bit about the layer box in the previous tutorial. For those of you who missed it, the layer box is the third window to the left, right after the GIMP loads up. Previously, we just had an overview of the layer box. So in this tutorial we will get started with the details and learn the various aspects of the layer box.
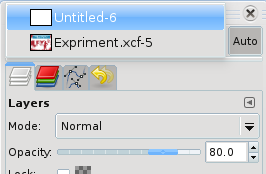
Starting from the top, the layer box has a layer switcher. As stated earlier, this helps in switching layers when working with multiple images. Though it is set on ‘auto’, it means that once you click the window of another image, the layer box will automatically list all the layers involved in the selected image window, but in case it doesn’t work, you can use this switcher to make it work for you.
This switcher also comes in very handy while copying a layer of an image onto another, making the transition smoother and brisk. Figure 2 shows the function of the layer switcher.
What follows is the most important section, in which we will apply all the effects and styles to the layer. Figure 3 illustrates almost all the functions of the layer section that we need to work on.
- Layer modes: Since we have understood a bit about layers, let’s move on to the different ways you can set a layer in. Layer mode does away with all the frustrating methods, with just a simple drop down. Just select a layer and set it to apply different effects. In the ‘Bravo’ example, the layers are set in Normal mode. You can change the mode from Normal to Overlay, and to Colour or any other pre-set, to provide the desired effect to your image. We will learn to work with them in upcoming tutorials.
- Opacity slider: This slide lets you set the opacity of the layer. You can either make the layer effects transparent, opaque or set it inbetween. Another handy tool that helps you achieve great effects and is just a drag away.
- Layer list: The middle section lists all the layers added in the image. Here, you can drag, delete, disable/enable and even lock a layer depending on the effect you are looking for.
- Layer tools: Listed below are the tools used to arrange layers:
- New layer: This lets you create a new layer. You can make it either opaque or transparent. It also allows you to fill a layer with colour. New layer has another important function, which we shall discuss later in this tutorial.
- Arrows: Arrows let you change the position of a layer. You can move a layer above or below with the help of these arrows. However, since the GIMP provides you with the easy dragging and dropping of layers, these arrows are actually a farce.
- Duplicate layer: As the name suggests, this tool lets you duplicate the current selected layer with a simple click. One very handy tool for making bold effects.
- Anchor layer: This tool only comes into action when you paste an image or a layer to the current active image window. This lets you merge the pasted layer with the background layer.
- Delete layer: This lets you delete an unwanted layer.
At the middle, you must have noticed some additional tools/sections (Figure 3). These form an integral part of the Layer List section, letting you perform various effects.
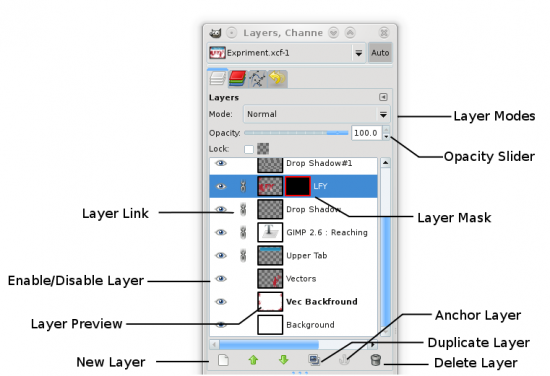
- Layer preview: On creating a layer, you will either notice a white/transparent or coloured section, depending on the type of layer you have created. Once you start creating an image, this small section provides a preview of the effects created in the main editing window. Though not of great use, it helps you distinguish between layers when working with images boasting of a huge number of layers.
- Layer eye—Enable/Disable layer: The eye that you see in Figure 3 lets you toggle the visibility of a layer.
- Layer link: This tool locks the layer. It combines the layer and lets you move multiple layers simultaneously, providing precise control while moving layers. The layer link comes in very handy at times and helps you restore the effect to its original state, even after moving the linked layers.
- Layer mask: To the right side of the layer preview, there is a Layer Mask option, as shown in Figure 3. The Layer Mask is an add-on that you can use as you wish. It controls the visibility of the layer. Initially the Mask is disabled, you can add it if you want. If a white mask (opaque) is selected, the layer in which the mask is applied will become visible, while a black mask (transparent) will make the layer transparent; even if there is image editing done on that main layer, it will not be visible, as the dark mask hides the drawn parts. Selecting the layer mask by clicking on it makes it active and after creating the mask, all the drawing done appends to the mask, and not to the layer.
Managing layers
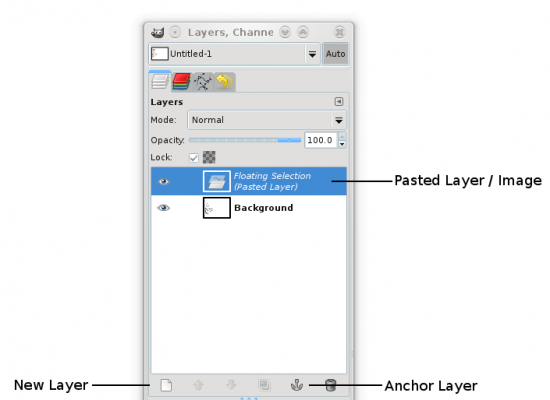
Pasting/dropping layers is an essential part of editing images. Whenever you paste an image in the GIMP, it goes into floating transition. What this means is that the image pasted is not permanent yet. You can make it permanent either by clicking on a new layer or by clicking on the anchor layer icons. When you click on the new layer while the pasted layer is selected, the pasted layer will be assigned a new layer and it will be made permanent. But if you click on the anchor layer, the pasted layer will be merged into the background of the image giving you little freedom for editing. Figure 4 demonstrates how pasted layers work.
Now we shall delve into moving a layer. To get started, create a background or open a wallpaper with the GIMP. Once done, grab the Text tool [A] from the toolbox and type something. Do note that whenever you try to edit/move/modify a layer, ensure the desired layer is selected; else the effect will be applied in the wrong section of the image.
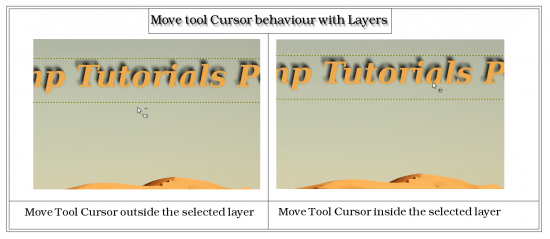
Select the text layer and grab the Move tool from the toolbox or press ‘m’. Notice the cursor change when you take it outside or inside the selected text layer. Figure 5 will give you a glimpse of the cursor change when taking it away or nearer the active layer region. Once you get the four-directional arrow key at the foot of the cursor, left click and while holding down the left button, move it wherever you want.
I’m sure you’ll understand that layer management is very essential if you are working with more layers. It’s actually a nice habit if you get used to it.
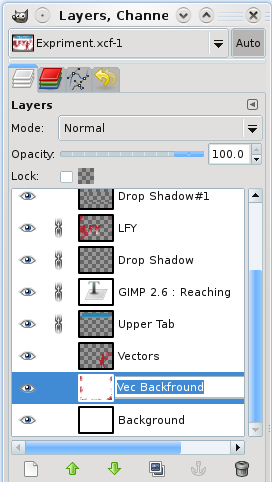
The GIMP automatically gives each layer a name so that it’s easy to distinguish when working with a high number of layers, especially while creating wallpapers. Just double click on a layer name and you can edit the layer’s default name. Figure 6 illustrates this feature.
Every layer has its own editing options, though some of them can be achieved easily. To gain access to a layer’s editing options, just right click on the layer and an extra window will pop up, giving you easy access to all the editing options, as listed in Figure 7.
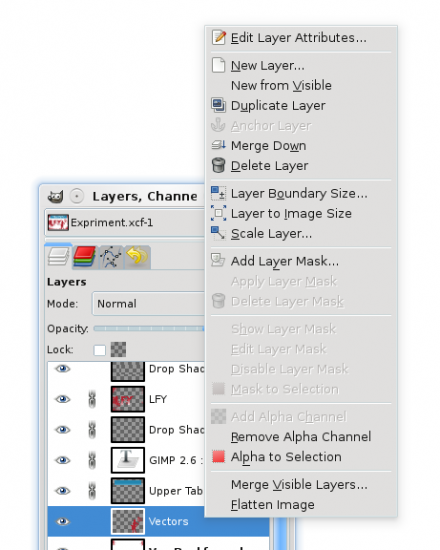
- Edit Layer Attributes: This option is basically the same as layer management. Selecting it will reveal a box where you can enter a new name to the layer. I always default to the double-click feature as stated above.
- New Layer: This option creates a new layer. This is similar to the icon present in the layer box.
- New Layer from visible: This option creates a new layer that contains all the elements of the currently visible layers, merged into one.
- Duplicate/Anchor/Delete Layer: These options have similar functions to their icon counterparts. Nothing fancy here.
- Merge Down: This option merges the currently selected layer with the next visible layer below. Transparency will be sustained, though the active layer modes will be retained.
- Layer Boundary Size: Every layer has its boundary, which is visible when you select a layer, making it easier for you to differentiate it from those not selected. The size can be increased or decreased at will. This option does just that—you can easily increase/decrease the size. Please note that the image/layer will remain intact; the only thing that will change is its boundary.
- Layer to Image Size: All this tool does is resize the layer boundary to the image size.
- Scale Layer: It is the same as resizing an image but will only be applied to the selected layer.
- Add Layer Mask: This adds a layer mask to the selected layer. This option lets you choose the type of mask you want to apply on the particular layer.
- Apply/Delete Layer Mask: The former appends the changes done in the mask to the host layer. Delete layer mask deletes the mask, so make sure you delete it before applying.
- Show Layer Mask: Lists the changes done in the mask applied.
- Edit Layer Mask: This option is selected by default if you have added a layer mask. It’s nothing but a selection to the mask preview. You can easily switch between the layer and its mask by either using this option or clicking on the preview.
- Mask to Selection: Makes an active selection to all the editing/painting done on the mask layer.
- Add Alpha Channel: This option makes a non-transparent layer capable of handling transparency, though it does not make it transparent. It is a very handy tool for creating quick animation with the GIMP.
- Alpha to Selection: This option makes an active selection on the drawing done on layers. It makes the drawing active—not the layer. So if you want to edit things later on, this tool comes as a saviour.
- Merge Visible Layer: Merges all the active visible parts of a layer, in the image.
- Flatten Image: It’s a unique case of the merge layer. It merges all the visible parts of the layer, deletes all the non-visible parts of the layers, removes the transparency and fills it with background colour, turning all the layers into one single image leaving no alpha channel behind. This is usually done when saving an image with a JPEG extension.
That’s it for now. I have tried to cover almost every aspect of layers —hope they’re now a bit easier to work with. You don’t need to grasp these things—just go through them once, fiddle around a bit and you are ready to get started. The dull days are about to end, as we will learn to work with tools in our next assignment. So stay tuned for the next tutorial and till then, happy GIMPin’!.

















[…] Blog using Gimp 32 GIMP tutorials to get Photoshop-like effects GIMP for Beginners: User Interface, Understanding Layers & Toolbox Demystified How to Create Steampunk Photography Using GIMP Plugins para GIMP Gimp […]
I don’t have a Layers box that allows me to switch layers. It’s just a tab. All of the tutorials I check show boxes that look like they’re seperate from the main box. Why?
Sorry. There is no layers channel. I pasted as a layer and now I can’t figure out how to select another layer to edit.