The toolbox
The toolbox that appears to the left side of the GIMP consists of useful tools. It’s a one-stop-shop for all the tools you need. The main aim of the toolbox is to improve the user experience and enable faster use. You can always add or remove tools from it according to your needs. To add additional tools navigate to Windows→Dockable Dialogs→Tools and add the desired tools.
The toolbox, as you can see in Figure 5, has a lot of tools. The main toolbox has been divided into four categories. The upper portion with an faint image of Wilber [the GIMP’s logo] is a drop area, into which you can directly drop your image and start editing or manipulating it.
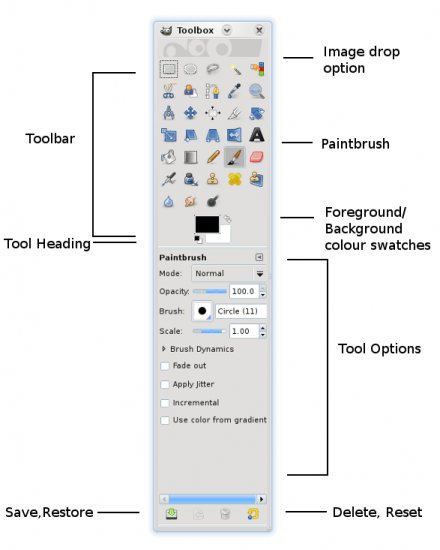
The second portion consists of tools and the colour selector. You will notice there are two swatches for colour selection—the one above is for the foreground and the lower one is for background colour selection. Just click it and select the colour. There’s no need to worry about what these two are meant for—we will learn about them later.
The third and extremely useful section has the tool options. As the name suggests, these offer features and settings for the tools you select from the second section, i.e., by clicking on the tools icon. The options are variable and depend on the tools you select.
The last section comprises save, restore, delete, and reset. These options are used to set a default value for any of the tools. For example, if you generally use big brushes for painting, then from this option, all you need to do is set the desired value and save it. From the next time onwards, whenever you choose the brush, you can use it with the saved settings.
Do note the bulging lines just below the colour selector and the save/restore options. These are docking stations for different tools that you may like to use and are handy in customising the interface of the GIMP. You can drop dialogue boxes as already mentioned earlier, in Figure 2.
The image window
The image window or the middle screen with the big Wilber logo is where you create wallpaper/edit pictures and do other such creative work. It’s like a drawing book with tools on the side.
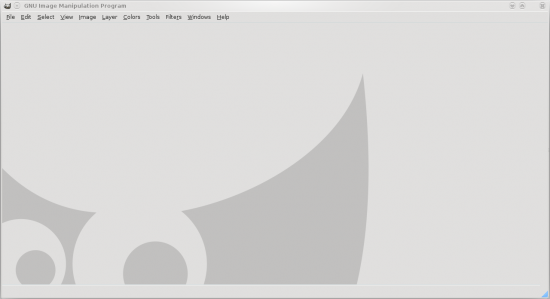
The image windows in version 2.6 have all the options unlike in the 2.4 series or older, where few options were scattered over the toolbox too. The menu has a plethora of options that are all listed, along with many others, in the tools/layer box menus, making it easier for you to access if you close any toolbox.
The image window menu options are as follows:
- File: This menu has tools to create new images, and save, load, export and print them at your will.
- Edit: Here you will find tools to undo/redo the mistakes you keep on doing while creating images. GIMP is the only image editor that allows quite a handful of undo steps (by default), and lets you easily go back and rectify or improve the image if you want. This section also lists a ‘Preferences’ icon, which lets you configure GIMP. The section also has a tool to provide easy outlines to selection.
- Select: This menu basically lists tools for different kinds of selections, making it easier for the user to perform complex tasks such as providing a border with ease. Actions like shrinking, expanding and distorting a selection would never have been so easy without these tools.
- View: This section gives you an access to complex mesh type views for more professional and precise drawing with a handful of other plug-ins.
- Image: Here you can resize and crop the image. You can also fill in picture metadata, assign colour profiles and perform various image-related functions.
- Layers: This section is almost the same as the image section, but is only applicable for layers. We will learn about layers in upcoming tutorials.
- Colours: All the mixing, blending, paths and postering tools are listed here. You can add some breathtaking effects with just a few tweaks. The much-hyped GEGL feature can be enabled from this section.
- Tools: This is a very handy section in case you close any other toolbar by mistake. It has all the tools (more than what are listed in tools and layerbox).
- Filters: This is the wicked witch store for all the fancy effects and magic that you need for an extraordinary and sparkling effect if you wish to mesmerise your friends with the power of FOSS. The section has lots of sub-sections, leading to various magical wands that you will need later to create unusual effects.
- Windows: This is a new option that made its debut with version 2.6. It is a recovery stop for those who’ve managed to mess up their GIMP interface. For example, you can re-enable the layer menu if closed by mistake. [If this option fails you could try deleting menu config in
~/.gimp-2.6.] - Help: This menu shows you information about the application version and provides links to the GIMP manual and other Help documents.
Once you add an image or a new template, you will notice some new options in the lower part of image window—for example, the zoom option—which is an extremely useful tool to make editing easier with accurate results.
On the lower right corner, you will see a four-directional arrow. This allows you to access/set any part of the image(s) while working. It is handy when you are working with high-resolution images or creating wallpapers.
















[…] Note that this tutorial will begin with a modified version of the Toolbox since we had learnt about customising the GIMP interface in the first article under this series. You can get to know more about that in LFY’s July 09 issue. […]