Virtualisation is going mainstream, with many predicting that it will expand rapidly in the next few years. Virtualisation is a term that can refer to many different techniques. Most often, it is just software that presents a virtual hardware on which other software can run. Virtualisation is also done at a hardware level, like in the IBM mainframes or in the latest CPUs that feature the VT or SVM technologies from Intel and AMD, respectively. Although a fully featured virtual machine can run unmodified operating systems, there are other techniques in use that can provide special virtual machines, which are nevertheless very useful.
Performance and virtualisation
The x86 architecture is notorious for its virtualisation unfriendly nature. Explaining why this is the case requires a separate article on the subject. The only way to virtualise x86 hardware was to emulate it at the instruction level or to use methods like ‘Binary Translation’ and ‘Binary Patching’ at runtime. Well known software in this arena are QEMU, Vmware and the previously well-known Bochs. These programs emulate a full PC and can run unmodified operating systems.
The recent VT and SVM technologies provided by Intel and AMD, respectively, do away with the need to interpret/patch guest OS instruction streams. Since these recent CPUs provide hardware-level virtualisation, the virtualisation solution can trap into the host OS for any privileged operation that the guest is trying to execute.
Although running unmodified operating systems definitely has its advantages, there are times when you just need to run multiple instances of Linux, for example. Then why emulate the whole PC? VT and SVM technologies virtualise the CPU very well, but the various buses and the devices sitting on them need to be emulated. This hits the performance of the virtual machines.
As an example, let us take the cases of QEMU, Xen, KVM and UML. This comparison is kind of funny, since the guys who wrote these software, never wanted to end up in a table like Table 1. This is like comparing apples to oranges, but all we want to understand from this table is whether the VMM can run an unmodified operating system, at what level it runs, and how the performance is compared to natively running it.
| Comparison of virtualisation software | |||
| Virtualisation software | Ability to run unmodified guests | Performance | Level |
| QEMU | Yes | Relatively slow | User level |
| Xen* | No | Native | Below OS and above hardware |
| KVM | Yes | Native, but devices are emulated | Hardware-supported virtualisation |
| UML | No | Near native | OS on OS |
| *Xen can make use of VT/SVM technology to run unmodified operating systems. In this case, it looks exactly like KVM. | |||
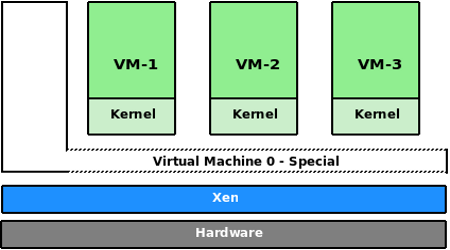
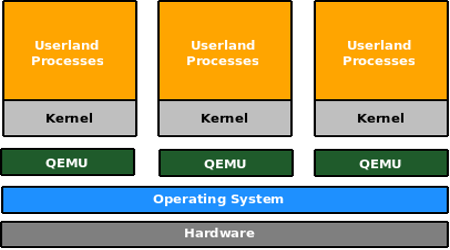
Figures 1 and 2 explain the Xen and QEMU architecture.


Introducing OpenVZ
Let us suppose you want to run only Linux, but want to make full use of a physical server. You can run multiple instances of Linux for hosting purposes, education and in testing environments, for example. But do you have to emulate a full PC to run these virtual, multiple instances? Not really. A solution like User Mode Linux (UML) lets you run Linux on the Linux kernel, where each Linux is a separate, isolated instance.
To get a simplified view of a Linux system, let us take three crucial components that make up a system. They are: the kernel, the root filesystem, and the processes that are created as the system boots up and runs. The kernel is, of course, the core of the operating system; the root filesystem is what holds the programs and the various configuration files; and the processes are running instances of the programs created from binaries on the root file system. They are created as the system boots up and runs.
In UML, there is a host system and then there are guests. The host system has a kernel, and the root file system and its set of processes. Each guest has a kernel, a root file system and its own set of processes.
Under OpenVZ, things are a bit different. There is a single kernel and there are multiple root file systems. The guest’s root file systems are directory trees under the host file system. A guest under OpenVZ is called a Virtual Environment (VE) or Virtual Private Server (VPS). Each VPS is identified using a name or a number, where VPS 0 is the host itself. Processes created by these VEs remain isolated from others. That is, if VPS 101 creates five processes and VPS 102 creates seven, they can’t ‘see’ each other. This may sound a lot like chroot jails, but you must note the differences as well.
A chroot jail provides only filesystem isolation. The processes in a chroot jail still share processes, networks and other namespaces with the host. For example, if you run ps -e from a chroot jail, you still see a list of system-wide processes. If you run a socket program from the chroot environment and listened on localhost, you can connect to it from outside the chroot jail. This simply means there is no isolation at the process or the network level. You can also verify this by running netstat -a from the chroot jail. You will be able to see the status of system wide networking connections.
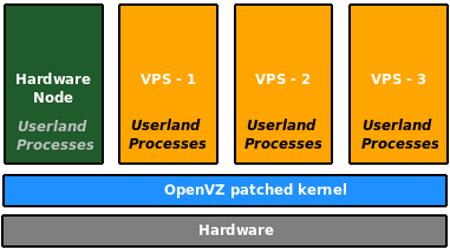
OpenVZ is rightly called a container technology. In case of OpenVZ, there is no real virtual machine. The OpenVZ kernel is a modification of the Linux kernel that isolates namespaces and contains or separates processes created by one VPS from another (see Figure 3). By doing so, the overhead of running multiple kernels is avoided and maximum performance is obtained. In fact, the worse case overhead compared to native performance in OpenVZ is said to be rarely more than 3 per cent. So, on a server with a few gigs of RAM, it is possible to run tens of VPSs and still have decent performance. Since there is only one kernel to deal with, memory consumption is also under check.

User bean counters
OpenVZ is not just about the isolation of processes. There are various resources on a computer system that processes compete for. These are resources like CPU, memory, disk space and at a finer level, file descriptors, sockets, locked memory pages and disk blocks, among others. At a VPS level, it is possible in OpenVZ to let the administrator set limits for each of these items so that resources can be guaranteed to VPSs and also to ensure that no VPS can misuse available resources. OpenVZ developers have chosen about 20 parameters that can be tuned for each of the VPSs.
The OpenVZ fair scheduler
Just as various resources are guaranteed to VPSs, CPU time for a VPS can also be guaranteed. It is possible to specify the minimum CPU units a VPS will receive. To make sure this happens, OpenVZ employs a two-level scheduler. The first level fair scheduler makes sure that no VPS is starved of its minimum CPU guarantee time. It basically selects which VPS has to run on the CPU next. At the scheduler level, a VPS is just a set of processes. Then, this set is passed on to the regular Linux kernel scheduler and one from the set is scheduled to run. In a VPS Web hosting environment, the hosting provider can thus guarantee the customer some minimum CPU power.
Installing OpenVZ
To install OpenVZ and have it work, you need to download or build an OpenVZ kernel, and also build or download pre-built OpenVZ tools. When you install the OpenVZ tools, it also installs the init scripts that take care of setting up OpenVZ. During system start-up and shut down, VEs are automatically started and shut down along with the Hardware Node (HN). Once the tools are installed, you can see that a directory named ‘vz’ is created in the root directory and it also contains other directories. On a production server, you may want ‘/vz’ on a separate partition.
Installing the kernel
There are a few options here. If you are running a CentOS or RHEL distribution of Linux, pre-built kernels are available. Although the current version of Linux is 2.6.29, OpenVZ stable kernels are still in the 2.6.18 series. These are considered stable and they are either based on RHEL/CentOS kernels or the vanilla kernel.org 2.5.18 kernel. If you are running CentOS or RHEL, you can expect these ‘stable’ kernels to play well with your system. For the sake of demonstration, I will be explaining a source-based installation.
Since we are installing from source code, first you’ll need to fetch the kernel from kernel.org. Later on, fetch the OpenVZ patch and the OpenVZ kernel config file required to configure the kernel. Get the ‘i686-SMP’ config file, if you are on a 32-bit machine.
$ wget http://www.kernel.org/pub/linux/kernel/v2.6/linux-2.6.16.18.tar.bz2
$ wget http://download.openvz.org/kernel/branches/2.6.18/028stab056.1/patches/patch-ovz028stab056.1-combined.gz
$ wget http://download.openvz.org/kernel/branches/2.6.18/028stab056.1/configs/kernel-2.6.18-i686-smp.config.ovz
Now, let’s untar the kernel and apply the patch:
$ tar xvjf linux-2.6.16.18.tar.bz2
$ gunzip patch-ovz028stab056.1-combined.gz
$ cd linux-2.6.18
$ patch -p1 < ../patch-ovz028stab056.1-combined
Let us configure the kernel based on the OpenVZ config file and compile it:
$ cp ../kernel-2.6.18-i686-smp.config.ovz .config
$ make bzImage && make modules
Time now for installation:
$ sudo make modules_install
$ cp arch/i386/bzImage /boot/vmlinuz-2.6.18.openvz
$ cp .config /boot/config-2.6.18.openvz
$ cp System.map /boot/System.map-2.6.18.openvz
Create the initrd:
$ cd /boot
$ sudo mkinitramfs -o initrd.img-2.6.18.openvz 2.6.18-028stab056
Add the new kernel to the GRUB menu in /boot/grub/menu.lst, and just append these lines:
title           OpenVZ
root           (hd0,0)
kernel        /boot/vmlinuz-2.6.18.ovz root=/dev/sda1 ro
initrd         /boot/initrd.img-2.6.18.ovz
savedefault
boot
Installing the OpenVZ tools
Now that the kernel installation is done, we can install the tools. The “vzctl” package contains the main utilities to manage OpenVZ virtual private servers, and the “vzquota” package contains utilities to manage disk quota. Installing these utilities is a simple affair, as explained in the following steps. If you are on an RPM-managed system, you can download and install the RPMs (see Resources section at the end of this article) rather than compile from source code.
$ wget http://download.openvz.org/utils/vzctl/3.0.23/src/vzctl-3.0.23.tar.bz2
$ tar xjf vzctl-3.0.23.tar.bz2
$ cd vzctl-3.0.23
$ ./configure && make && sudo make install

$ wget http://download.openvz.org/utils/vzquota/3.0.12/src/vzquota-3.0.12.tar.bz2
$ tar xjf vzquota-3.0.12.tar.bz2
$ cd vzquota-3.0.12
$ make && sudo make install
Now that both the kernel and the utilities are installed, it’s time to reboot into the new kernel. Once you reboot the system, select the “OpenVZ” option from the GRUB menu and we are booting into the system with the shiny new OpenVZ kernel. We are now ready to create Virtual Environments (VE). It is possible to create VEs based on popular distributions.
We will take the simplest approach to create VEs, which is to use a template cache. This is nothing but a file containing an archive of a Linux root filesystem. This root file system may be based on Debian, Gentoo, Ubuntu, Fedora or any distro that you prefer. There are many template caches available from the OpenVZ website. Please see the Resources section at the end of the article. These template caches need to be copied into the location /vz/template/cache directory. Once they are, we can go about creating VEs based on these caches. Some template caches are available from the OpenVZ website, so let us download a few:
$ wget http://download.openvz.org/template/precreated/contrib/centos-5-i386-minimal-5.3-20090330.tar.gz
$ wget http://download.openvz.org/template/precreated/contrib/debian-5.0-i386-minimal.tar.gz
$ wget http://download.openvz.org/template/precreated/contrib/fedora-10-i386-default-20090318.tar.gz
$ wget http://download.openvz.org/template/precreated/contrib/ubuntu-7.10-i386-minimal.tar.gz
Now, let us create a VE based on Ubuntu:
# vzctl create 101 --os-template ubuntu-1.10-i386-minimal --config vps.basic
The vzctl command can be used for many different things in OpenVZ. In the above command line we are using it to create a VE with an ID “101”. The --os-template option tells vzctl which template cache to use. It is basically the name of the template cache tar file without the trailing ‘.tar.gz’. The --config option tells vzctl to use a base config file called ‘vps.basic’. This file contains VE parameters that specify various limits and barriers among other things. There are several values in the vps.basic file that are applied to the VE after creating it. But these values can be overridden by specifying them explicitly for this VE. For example, we will look at how to set various values for the VE we just created, using the same vzctl command:
# vzctl set 101 --onboot --save
This command sets the “onboot” parameter of VE 101 to true. This means that the VE will be automatically started when the hardware node boots up. Each VPS has a private configuration file under /etc/vz/conf/<VE-ID>.conf. When you specify the –save option to vzctl, the setting is applied to the VE, if it is running and is also saved to the VE’s private configuration file.
# vzctl set 101 --hostname ubuntuve.k7computing.com --save
# vzctl set 101 --ipadd 192.168.1.101 --save
# vzctl set 101 --nameserver 192.168.1.1 --save
These commands set and save VPS networking parameters. It is now time to start the VPS:
# vzctl start 101
Let’s view the list of VEs by running the vzlist command:
# vzlist
VPSID     NPROC STATUS IP_ADDR       HOSTNAME
101         20 running 192.168.1.101 ubuntuve.k7computing.com
Setting the root password and logging in via SSH
Since the VPS has an IP address, you can use SSH to log into it. But the VE must be running the SSH daemon and you must know the root password. There are multiple ways to set the root password and we shall look at two of them:
- Setting the password using the
vzctlcommand# vzctl set 101 --userpasswd root:test123
- Entering into a VE
# vzctl enter 101
ubuntuve# passwd
Changing password for user root.
New UNIX password:
Retype new UNIX password:
passwd: all authentication tokens updated successfully.
The vzctl enter <ve-id> command is used to “enter” into a VPS. You can then run commands as if you have logged into the VE itself. Of course, this is only possible from the hardware node. You can even start the SSH daemon if it is not already running. Another way to start the SSH daemon or to run any other command is by using the vzctl exec command:
# vzctl exec 101 /etc/init.d/sshd start
This command can also be used to set the root password, by running passwd.
You can now SSH into this VPS from anywhere in the network. OpenVZ uses bridged networking for VEs and you can reach them over the network once they are up and running.
VPS life cycle management
Any VPS can be started, stopped or rebooted using the vzctl commands:
# vzctl start <ve-id>
# vzctl stop <ve-id>
# vzctl reboot <ve-id>
If you want to remove a VPS entirely from the hardware node, this can be done using the vzvtl destroy command:
# vzctl destroy <ve-id>
This command will remove all files related to the VE. It is not possible to undo this operation.
If you run a lot of Linux servers and want to take advantage of virtualisation and get the extra performance edge, OpenVZ is the right choice for you. You can have it up and running in a few hours and there is very little learning to do. Check the Resources section for links to free management software for OpenVZ.
Resources
- OpenVZ home
- Download OpenVZ kernel RPM and patches
- OpenVZ utilities, binaries and source code
- Pre-created template caches
- Browser-based OpenVZ management tool
- GTK+ based OpenVZ management tool


