John and Sam work in the same office. They handle a lot of documents every day and use OpenOffice.org for the purpose. Of late, John manages to finish his work early, whereas Sam has to stay in late to finish his. Moreover, John’s work is more accurate and organised than Sam’s. So Sam is eager to know the secret of John’s success. Can you guess?
Well, John has recently learnt how to program his OpenOffice.org suite. He has prepared macros for frequent tasks, and whenever there is a need for a lot of GUI operations, he makes it simple by automating them with macros. So just with a click or short-cut key, John has managed to avoid a lot of manual and mundane repetitive tasks.
Imagine a situation where you have to create a new spreadsheet daily, and copy certain data and processes from the previous day’s sheet. This will take a substantial amount of time every day. However, by preparing a macro, just a click or key combination will complete your work in a fraction of the time taken earlier.
Note: OpenOffice.org, here onwards called OOo, comes with many components like Writer for text documents, Calc for spreadsheets, Impress for presentations, Draw for diagrams, Math for formulae and Base for database purposes. OOo documents are based on the Open Document Format (ODF) from version 2.0 onwards. The present version of OOo is 3.0.1.
Overview of macros
A macro is like a script that can avoid a series of manual operations involved in GUI applications. In OOo, macros can be coded in many languages. In this article we consider one simple language—OOBasic (OpenOffice.org Basic) to develop our macros. It is a dialect of traditional BASIC.
OOo comes with built-in tools for the development of macros in OOBasic, i.e., no external SDK or development tools are required. OOo provides a macro organiser to create and maintain, and an IDE to code, run and debug macros.
Your first macro
Start any OOo component (e.g., Calc), and access Tools→Macros→Organize Macros →OpenOffice.org Basics. This opens a macro organiser window. In the pane on the left, expand the current document’s name, select the standard, and click on New to create a new module. Or, expand the standard, select an existing module and an available macro, and click on Edit to modify code.
This opens a basic IDE to write code (Figure 1).
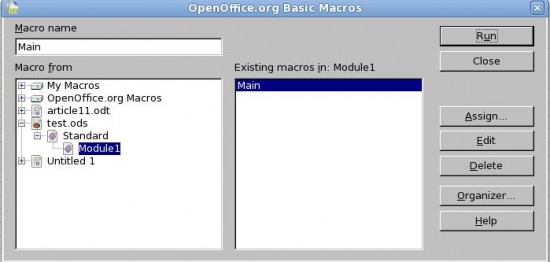
Macros are classified based on the location they are stored in.
- My Macros: User written macros common for all documents
- OpenOffice.org Macros: A library of macros provided by OOo
- Document Specific: These are also user written but on a ‘per document’ basis and are available to the current document only.
The following is the code for a simple macro to greet people.
1 Sub Main
2    MsgBox “Hello World”
3 End Sub
Figure 2 shows the editor, where you can enter the above code. When this code is run, a dialogue appears with the message, “Hello World”. This macro is available to the present document only. To make it available for all documents place it under ‘My Macros’.
This example works for all types of OOo documents. In the upcoming examples, we will concentrate more on Calc documents because there is greater business value for spreadsheet automation.
Running and debugging
We can use different items in the standard toolbar of the Basic IDE to run/debug macros. A simple one is Run Macro (shortcut: F5). Other options are compile, stop, step into, step over, step out, toggle breakpoint, watch, etc. Macros can be created and maintained from this IDE also (Figure 2).

The following is the second example of a macro to access sheets, cells, etc, in a Calc document:
1 Sub Main
2      Dim oBook as Object
3      Dim curSheet as Object
4      Dim oCell as Object
5      Set oBook = ThisComponent
6      MsgBox “No.of sheets = “ & oBook.Sheets.count
7      oBook.sheets(0).Name = “hello”
8      curSheet = book.Sheets.getByName(“hello”)
9      oCell = curSheet.getCellByPosition(0,0)
10    oCell.Value = 10
11 End Sub
In the above code:
- Lines 2-4 declare the objects oBook, curSheet, oCell
- Line 5 accesses the current document reference through ThisComponent and stores it to oBook.
- In Line 6 oBook.Sheets represents collection of all sheets in the present workbook and then displays the count.
- Line 7 renames first sheet to “Hello”.
- Line 8 accesses the same sheet and stores it in curSheet.
- Line 9 accesses the A1 cell in the first sheet and stores it in oCell
- Line 10 changes the value of the A1 oCell to 10.
Let’s consider some more code snippets to learn how spreadsheets can be controlled in different ways by macros.
To insert five rows before the third row in the first sheet, use the following code:
oSheet = ThisComponent.Sheets(0)
oSheet.rows.insertByIndex(2,5)
To fill range A1:A10 with a sequence, use the following line of code:
For i = 1 to 10
          oSheet.getCellByPosition(i-1,0)=i*i
Next
To remove 10th column:
oSheet.columns.removeByIndex(9)
To count the number of consecutive non-empty cells in the first column:
n=oSheet.Columns(0).computeFunction(com.sun.star.sheet.GeneralFunction.COUNT)
To search for a key pattern and highlight all cells in red:
Sub FindAndRed(iSheet as Object)
ThisComponent.getCurrentController.select(iSheet)
          xSearchDescr = iSheet.createSearchDescriptor()
          xSearchDescr.SearchString = “keypattern”
          xSearchDescr.SearchCaseSensitive = true
          xSearchDescr.SearchWords = true
          xFound = iSheet.findFirst(xSearchDescr)
          do while not IsNull(xFound)
                    r=xFound.getCellAddress.Row
                    c=xFound.getCellAddress.Column
                    iSheet.getCellByPosition(c,r).CellBackColor = RGB(255,0,0)
                    xFound=iSheet.findNext(xFound,xSearchDescr )
          loop
End Sub
To repeat this process for ‘N’ number of sheets:
For i = 0 to N-1
          FindAndRed(ThisComponent.Sheets(i))
Next
To insert a new sheet:
Set oBook=ThisComponent
sNew=oBook.createInstance(“com.sun.star.sheet.Spreadsheet”)
oBook.Sheets.insertByName(“Sheet4”,sNew)
To create a new document:
Dim args(3) as new com.sun.star.beans.PropertyValue
StarDesktop.loadComponentFromURL(“private:factory/scalc”,”_blank”,0,args())
To apply filters for all columns in all sheets:
Dim cRange As new com.sun.star.table.CellRangeAddress
Set oBook = ThisComponent
numSheets = oBook.Sheets.Count
For i = 0 to numSheets-1
          iSheet = oBook.Sheets(i)
          numRows = iSheet.Columns(0).computeFunction(com.sun.star.sheet.GeneralFunction.COUNT)
          numCols=iSheet.Rows(0).computeFunction(com.sun.star.sheet.GeneralFunction.COUNT)
          cRange.Sheet=i
          cRange.StartColumn=0
          cRange.StartRow=0
          cRange.EndColumn=numCols-1
          cRange.EndRow=numRows-1
          oBook.DatabaseRanges.addNewByName(“Range”+i, cRange)
          oBook.DatabaseRanges.getByName(“Range”+i).AutoFilter=true
Next i
Easy access to macros
Macros can be accessed in a more user-friendly way:
- A new menu item can be created to invoke a macro, which can be placed under the existing menu or an altogether new menu
- A tool bar item can be created
- A keyboard shortcut can be assigned
To achieve all this, follow the options under the different tabs of the Customize window—Tools→Customize.
Suppose a new menu item has to be created for the previous example of FindAndRed (for searching a key pattern and highlighting all cells in red), then the following steps are helpful to create a menu item.
Go to Tools→Customize→Menus. Under Menu List select an existing menu or create a new one by selecting the New option. In this example let’s create a new menu called ‘My Menu’ (Figure 3).
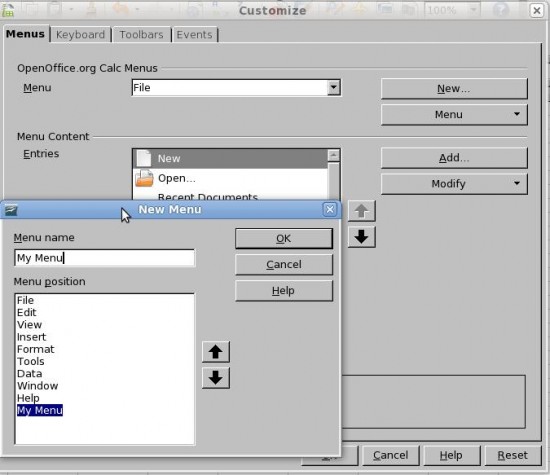
Under Menu Content→Entries, use the Add option. Scroll to the end and specify the macro from the available list. A new menu titled ‘My Menu’ will appear. Under this a menu item with the macro name of ‘Main’ will appear for invoking the macro. You can use the Rename option under the Modify button to change the default name from ‘Main’ to ‘FindNRed’, or anything else for that matter.
A similar process can be followed to create a toolbar item. Let’s see another example of assigning a key combination for the same macro.
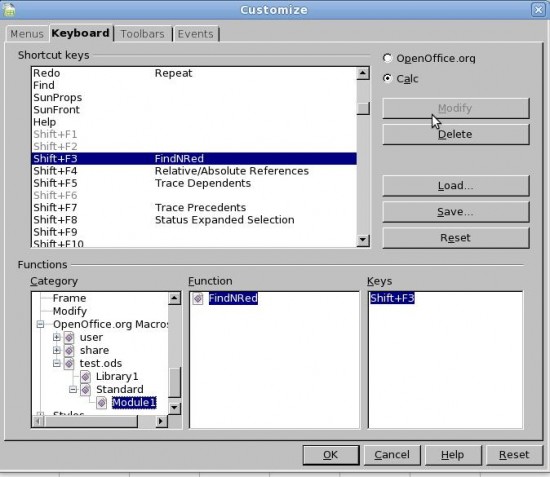
Go to Tools→Customize→Keyboard. Under the list of functions select the ‘OpenOffice.org Macros’ category and choose the macro. From the list of available keys select one which is free (better not to disturb standard shortcuts) and use the Modify option to assign it.
As you can see in Figure 4, we have assigned Shift+F3 to the FindAndRed macro.
Macros as event handlers
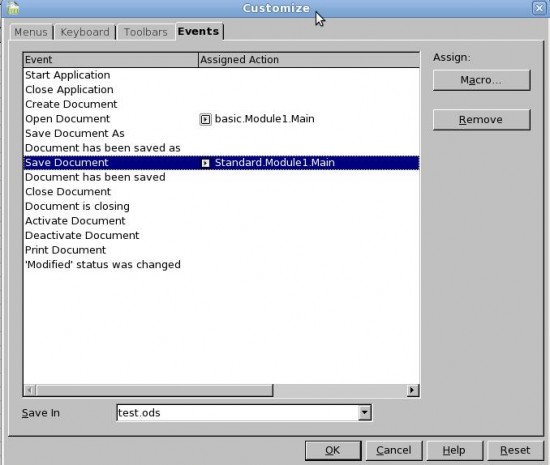
Want to perform some task on starting or closing an application, or opening or closing a document? It’s easy in OOo—put the desired code in a macro and it can be associated with some event by accessing Tools→Customize→Events (Figure 5).
Macro security
Although macros have their own advantages, they are dangerous too! Macros may contain vulnerable code that may harm the files and even your system. That said, there’s no need to worry too much about this. OOo provides different levels of security to handle macros in documents.
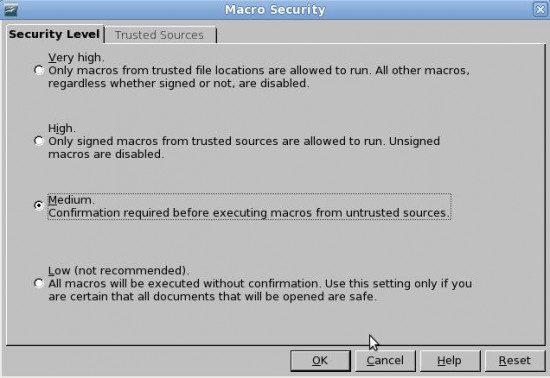
- Very High: Only from trusted sources, even signed macros from untrusted sources are disabled.
- High: Signed macros from trusted sources only.
- Medium: Confirms before enabling macros while opening a document if it’s from an untrusted source.
- Low: All macros will be executed without any confirmation.
To control the security level, configure Tools→Options→OpenOffice.org→Security→Macro Security. Refer to Figures 6 and 7.
Trusted locations and certificates can be managed from the second tab of the Security manager window (Figure 6).

There are a few limitations with OOBasic macros. OOBasic is a scripting language, so the code for macros is always available with the document. Even though it’s a good practice as per the open source philosophy, at the user level one may damage the code accidentally (or even intentionally), which may cause a huge loss of data or corrupt the system.
Extensions written in compiled languages are a better solution in this respect, as only the binary of the extension will be available to the end user. Only trusted persons with a knowledge of programming can be provided the source code.
References
- OpenOffice.org website
- VBA-enabled OOo
- OOo wiki—very helpful for developers:
- OOo API


The best Start for New Bee
Thanks a lot
Is there a comprehensive reference manual for this?
Or, better, a VBA to OOBasic transition manual?
Thanks.