Inter-process Communication (IPC) helps applications to talk to each other. You might have seen Firefox automatically tuned to offline mode when your Internet connection is down. Ever wondered how this happens? This is because the NetworkManager application talks to Firefox using a back-end utility called D-Bus to update it on the status of the Internet connection. D-Bus (Desktop Bus) is a simple IPC, developed as part of freedesktop.org project. It provides an abstraction layer over various applications to expose their functionalities and possibilities. If you want to utilise some feature of an application to make another program perform a specific task, you can easily implement it by making the process D-Bus aware. Once an application is made D-Bus compliant there’s no need to recompile or embed code in it to make it communicate with other applications. One thing really cool about D-Bus is that it helps developers write code for any D-Bus compliant application in a language of their choice. Currently, D-Bus bindings are available for C/C++, Glib, Java, Python, Perl, Ruby, etc.
Understanding D-Bus

D-Bus is a service daemon that runs in the background. We use bus daemons to interact with applications and their functionalities. The bus daemon forwards and receives messages to and from applications. There are two types of bus daemons: SessionBus and SystemBus.
The daemon that is attached to each user session is called SessionBus. When a user logs in, applications launched by him are attached to the SessionBus—a local bus limited to communicating between desktop applications that belong to a specific user currently logged in.

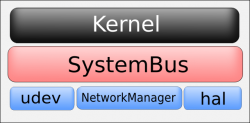
On the contrary, SystemBus is system-wide. It is initiated when the system boots, and is ‘global’ to the operating system. It is capable of interacting with the kernel and various system-wide events. Hardware Abstraction Layer (HAL), NetworkManager and udev are applications that use SystemBus. In this article, I will use Python bindings to explore the D-Bus daemon. To begin with, if we want to use a desktop-level conversation, a SessionBus object can be created as follows:
[slynux@slynux-laptop dbus-python-0.83.0]$ python
Python 2.5.2 (r252:60911, Sep 30 2008, 15:41:38)
[GCC 4.3.2 20080917 (Red Hat 4.3.2-4)] on linux2
Type “help”, “copyright”, “credits” or “license” for more information.
>>> import dbus
>>> bus = dbus.SessionBus()
>>>
While a SystemBus, on the other hand, can be created by simply replacing the dbus.SessionBus() element in the above code to dbus.SystemBus():
>>> bus = dbus.SystemBus()
Every application that intends to share its objects and methods are started as D-Bus services. A D-Bus enabled application exports its objects with their functionalities as methods that other applications can use. By connecting to the corresponding bus and the application object, the application’s functionalities can be accessed from other applications. We use an addressing method to identify each application and its functionalities—reversed domain name addressing. For example, NetworkManager is addressed as ‘org.freedesktop.NetworkManager’, Pidgin as ‘org.gnome.Pidgin’, etc. Each of the applications can export numerous objects and functions—that is, NetworkManager has got different parameters such as ‘if network is up or down’, ‘the current active wifi profile’, etc.
Proxy objects and interfaces
The term ‘proxy objects’ refers to objects that point to remote applications and are accessed through D-Bus session. Let’s explore how to create proxy objects. To obtain a proxy object, call the get_object method on the bus. For example, NetworkManager has the well-known name org.freedesktop.NetworkManager and exports an object whose object path is /org/freedesktop/NetworkManager, plus an object per network interface at object paths like /org/freedesktop/NetworkManager/Devices/wlan0.
>>> import dbus
>>> bus = dbus.SystemBus()
>>> proxy_object = bus.get_object(‘org.freedesktop.NetworkManager’,’/org/freedesktop/NetworkManager’)
The format of the parameters for get_object() is get_object(dbus_service_name,object_path). So, you can see from the above code snippet, org.freedesktop.NetworkManager is the service name and /org/freedesktop/NetworkManager is the object path. The object path is different for accessing different objects specified by the service. Here a proxy object referring to the NetworkManager is created. Now it is possible to access different properties of this object. For example, we can check whether the NetworkManager is in sleep or wake mode, or if it is connected to some network or not, as follows:
>>> print proxy_object .state()   # To know the NM state
4
The returned integer in the above example is called the NM_STATE. This corresponds to following states:
- ‘NM_STATE_UNKNOWN = 0’ means the NetworkManager daemon is in an unknown state.
- ‘NM_STATE_ASLEEP = 1’ means the NetworkManager daemon is asleep and all interfaces managed by it are inactive.
- ‘NM_STATE_CONNECTING = 2’ means the NetworkManager daemon is connecting to a device.
- ‘NM_STATE_CONNECTED = 3’ means the NetworkManager daemon is connected.
- ‘NM_STATE_DISCONNECTED = 4’ means the NetworkManager daemon is disconnected
Let’s take a look at the following code:
>>> proxy_object.sleep()  # Disable NetworkManager
>>> proxy_object.wake() # Enable NetworkManager
>>> proxy_object.GetDevices()
dbus.Array([dbus.ObjectPath(‘/org/freedesktop/Hal/devices/net_00_1c_23_fb_37_22’), dbus.ObjectPath(‘/org/freedesktop/Hal/devices/net_00_1c_bf_87_25_d2’)], signature=dbus.Signature(‘o’))
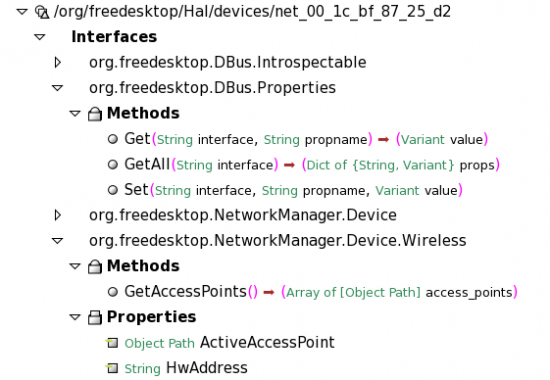
You can see that the code lists objects of two network interfaces with MAC ID 00:1c:bf:87:25:d2 and 00:1c:23:fb:37:22 along with their HAL object paths. The dbus.Array element is a D-Bus object specific data type. We’ll discuss more on D-Bus types in the later part of the article. An object path can support any number of different interfaces. Before calling any method, you need to specify which interface you want to use. Interfaces are sub-objects that can be used to refer to a group of other objects to provide a higher level of abstraction on proxy objects and their exported methods. It provides a name-spacing mechanism. You can have a better understanding of the concepts of Interfaces from Figure 3.

Take a look at the following code:
>>> bus=dbus.SystemBus()
>>> proxy_object=bus.get_object(‘org.freedesktop.NetworkManager’,‘/org/freedesktop/Hal/devices/net_00_1c_bf_87_25_d2’)
>>> proxy_object.GetAccessPoints(dbus_interface=’org.freedesktop.NetworkManager.Device.Wireless’)
dbus.Array([dbus.ObjectPath(‘/org/freedesktop/NetworkManager/AccessPoint/4’)], signature=dbus.Signature(‘o’))

# Above method returns with a dbus Array type containing object path of currently avaliable access points. dbus_interface=’org.freedesktop.NetworkManager.Device.Wireless’
>>> proxy_object.Get(‘/org/freedesktop/Hal/devices/net_00_1c_23_fb_37_22’,’HwAddress’,dbus_interface=’org.freedesktop.dbus.Properties’)
dbus.String(u’00:1C:23:FB:37:22’, variant_level=1)
# It returns Hardware Address of the Interface. dbus_interface=’org.freedesktop.dbus.Properties’)
Here we have used two different interfaces under the same object path. The D-Bus bindings provide an object type of Dbus.Interface, making it easier to interpret. We can rewrite the above code as follows:
>>> hw_address_interface = dbus.Interface(proxy_object,dbus_interface=’org.freedesktop.dbus.Properties’)
>>> hw_address_interface .Get(‘/org/freedesktop/Hal/devices/net_00_1c_23_fb_37_22’,’HwAddress’
Even though both are same, the latter eliminates the need for specifying the interfaces parameter dbus_interface every time we call a method. The D-Bus package comes with a set of utilities to manage the D-Bus daemon activities. The dbus-monitor is one such utility that is used to keep track of all active D-Bus sessions in a running system. It helps you be aware of the applications that make use of D-Bus and its events:
[slynux@slynux-laptop ~]$ dbus-monitor
signal sender=org.freedesktop.dbus -> dest=:1.134 path=/org/freedesktop/dbus; interface=org.freedesktop.dbus; member=NameAcquired
string “:1.134”
method call sender=:1.134 -> dest=org.freedesktop.dbus path=/org/freedesktop/dbus; interface=org.freedesktop.dbus; member=AddMatch
string “type=’method_call’”
method call sender=:1.134 -> dest=org.freedesktop.dbus path=/org/freedesktop/dbus; interface=org.freedesktop.dbus; memtber=AddMatch
string “type=’error’”
signal sender=:1.54 -> dest=(null destination) path=/im/pidgin/purple/PurpleObject; interface=im.pidgin.purple.PurpleInterface; member=BuddyIconChanged
int32 24422
signal sender=:1.54 -> dest=(null destination) path=/im/pidgin/purple/PurpleObject; interface=im.pidgin.purple.PurpleInterface; member=DrawingTooltip
The utility gives you an overview of the different D-Bus events and the applications using D-Bus. As you can see in the output, an event related to Pidgin ‘BuddyIconChanged’ along with some other D-Bus events has taken place. dbus-launch and dbus-sendto are two other utilities available for working with D-Bus. Check out their man pages to understand the purpose of these utilities. dbus-sendto can be used to interact with the buses and their return strings. It can be used if we want to write pure Bash-coded applications.
D-Bus activation
We can start a D-Bus service such as org.gnome.example_service from a server program or we can start a service by calling it by name. The technique of starting a service by name is called D-Bus activation. There are several instances where we need to start another application to make some feature of the currently running application work. For example, consider a video editor which extracts still images from the GNOME Web cam tool Cheese. Since the video editor needs Cheese to be running, it needs to be started. If Cheese is defined as a D-Bus service, we can easily start Cheese by D-Bus activation. Most of the applications which make use of D-Bus are defined as D-Bus services. You can have a look at the contents of the /usr/share/dbus-1/ directory for the some available services:
[slynux@slynux-laptop services]$ ls /usr/share/dbus-1/services/ | tail
org.gnome.keyring.service
org.gnome.PolicyKit.AuthorizationManager.service
org.gnome.PolicyKit.service
org.gnome.Rhythmbox.service
org.gnome.SettingsDaemon.service
org.gnome.Tomboy.service
org.gtk.Private.GPhoto2VolumeMonitor.service
org.gtk.Private.HalVolumeMonitor.service
org.xchat.service.service
sealert.service
Each of these services can be started by using the start_service_by_name() method. For example, the Tomboy note-taking application can be launched by running the following from a Python shell:
>>> import dbus
>>> bus=dbus.SessionBus()
>>> bus.start_service_by_name(‘org.gnome.Tomboy’)
(True, dbus.UInt32(1L))
You can see that Tomboy is started and the function returns True. In fact, it is very easy to create D-Bus services. Create a text file, called org.gnome.Newservice.service for example, with following contents:
[D-BUS Service]
Name=org.gnome.Newservice
Exec=/usr/bin/newservice
Now you can start Newservice by name.
Data types and type casting
Since D-Bus is an inter-process message passing mechanism, it deals with various data types, depending on the data to be received or sent. One of the primary benefits of D-Bus is that it is flexible with data type conversions. Since we are more concerned with D-Bus in Python’s context, let us take a look at how D-Bus types and Python types are tuned to each other with auto typecasting. D-Bus uses static types. Since Python types and D-Bus types are compatible to each other, we never have to worry about type conversion hurdles. The following table lists the types supported and their conversions. Types marked (*) may be a subclass of either int or long, depending on the platform.
| Python type | Converted to D-Bus type | Notes |
| D-Bus proxy object | ObjectPath (signature ‘o’) | (+) |
| dbus.Interface | ObjectPath (signature ‘o’) | (+) |
| dbus.service.Object | ObjectPath (signature ‘o’) | (+) |
| dbus.Boolean | Boolean (signature ‘b’) | a subclass of int |
| dbus.Byte | byte (signature ‘y’) | a subclass of int |
| dbus.Int16 | 16-bit signed integer (‘n’) | a subclass of int |
| dbus.Int32 | 32-bit signed integer (‘i’) | a subclass of int |
| dbus.Int64 | 64-bit signed integer (‘x’) | (*) |
| dbus.UInt16 | 16-bit unsigned integer (‘q’) | a subclass of int |
| dbus.UInt32 | 32-bit unsigned integer (‘u’) | (*)_ |
| dbus.UInt64 | 64-bit unsigned integer (‘t’) | (*)_ |
| dbus.Double | double-precision float (‘d’) | a subclass of float |
| dbus.ObjectPath | object path (‘o’) | a subclass of str |
| dbus.Signature | signature (‘g’) | a subclass of str |
| dbus.String | string (‘s’) | a subclass of unicode |
| dbus.UTF8String | string (‘s’) | a subclass of str |
| bool | Boolean (‘b’) | |
| int or subclass | 32-bit signed integer (‘i’) | |
| long or subclass | 64-bit signed integer (‘x’) | |
| float or subclass | double-precision float (‘d’) | |
| str or subclass | string (‘s’) | must be valid UTF-8 |
| unicode or subclass | string (‘s’) |
From the above table, you can infer that if we have some string to be passed or received through D-Bus daemon, it is received or sent as its equivalent D-Bus type. Likewise, string is send as dbus.String(“string”). We can call methods provided by the proxy object in two ways—synchronous call or asynchronous call. Synchronous calls block any other methods to be called until the current function call ends and returns something. Asynchronous (non-blocking) method calls allow multiple method calls to be in progress simultaneously, and allow your applications to do other work while it waits for results/answers. Asynchronous calls are invoked by setting up an event loop like Gmainloop or gtk.main().
Hands-on D-Bus client-server


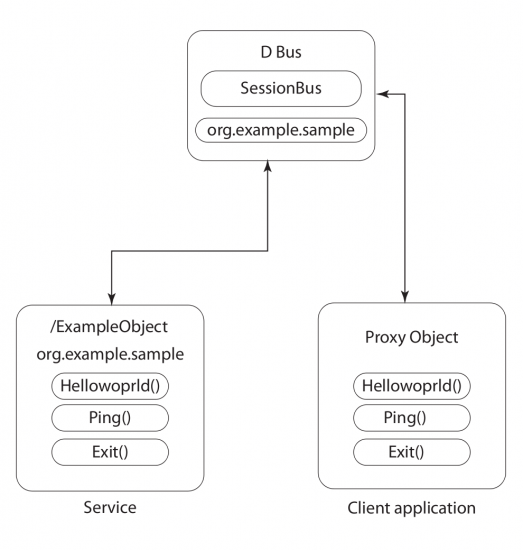
Let us code a simple ExampleObject to be exported under the org.example.Sample service and a client application, to understand programming with D-Bus better:
- D-Bus service:
org.example.Sample - File name:
dbus-example-service.py
#!/usr/bin/env python
import gobject
import dbus
import dbus.service
import dbus.mainloop.glib

class ExampleObject(dbus.service.Object):
@dbus.service.method(“org.example.Sample”,
in_signature=’s’, out_signature=’as’)
def HelloWorld(self, test_message):
print (str(test_message))

return [“Hello World “,” dbus-service”,str(test_message)]

@dbus.service.method(“org.example.Sample”,
in_signature=’’, out_signature=’s’)
def Ping(self):
print “Pinged”
return str(“Hi. I am Alive”)

@dbus.service.method(“org.example.Sample”,
in_signature=’’, out_signature=’’)
def Exit(self):
mainloop.quit()

if __name__ == ‘__main__’:
dbus.mainloop.glib.dbusGMainLoop(set_as_default=True)

session_bus = dbus.SessionBus()
name = dbus.service.BusName(“org.example.Sample”, session_bus)
object = ExampleObject(session_bus, ‘/ExampleObject’)

mainloop = gobject.MainLoop()
print “Running example dbus service: org.example.Sample.”
mainloop.run()
Here we have a class derived from dbus.service Object, which consists of the HelloWorld(), Ping() and exit functions that are to be exposed through the service. The decorator like @dbus.service.method(“org.example.Sample”, in_signature=’’, out_signature=’’) is used to expose these functions. It consists of parameters in_signature and out_signature, specifying the type of input (parameters to the function) and output (return type). You can refer to the table earlier for the types that are available. For example, ‘s’ specifies string, ‘sa’ specifies string array, ‘i’ specifies integer and so on. Let us now code a D-Bus client (client.py) to access methods exported by org.example.Sample:
#!/usr/bin/env python
import dbus
bus = dbus.SessionBus()
remote_object = bus.get_object(“org.example.Sample”,”/ExampleObject”)
interface = dbus.Interface(remote_object, ‘org.example.Sample’)
reply = interface.Ping()
print “Ping() returns : “ + reply
reply = interface.HelloWorld(“GNU/Linux”)

print “Helloworld() returns: “
for s in reply:
      print s,
If you go through the above code, you can understand that it simply creates a proxy object and an interface to the org.example.Sample service. Further, it calls the methods available. You can call it through any type of D-Bus client access method like dbus-send tool. Try this:
[slynux@slynux-laptop examples]$ dbus-send --session --dest=org.example.Sample --print-reply /ExampleObject org.example.Sample.Ping
method return sender=:1.326 -> dest=:1.364 reply_serial=2
string “Hi. I am Alive”
Now, you can open a terminal and execute the service script first and client after that. On terminal tab 1:
[slynux@slynux-laptop examples]$ python example-service.py
Running example dbus service: org.example.Sample.
Pinged
GNU/Linux
One terminal tab 2:
[slynux@slynux-laptop examples]$ python example-client.py
Ping() returns : Hi. I am Alive
Helloworld() returns:
Hello World   dbus-service GNU/Linux
Hacking other applications with D-Bus
Let us now focus more on the implementation and go through the coding part involving some applications, say, for example, Pidgin. Pidgin is a well-known IM client that a lot of us use to talk to people. We will now work on the D-Bus service interfacing with Pidgin in order to talk with Pidgin:
#!/usr/bin/env python
import dbus,subprocess,time

def set_status(message):
current = purple.PurpleSavedstatusGetType(purple.PurpleSavedstatusGetCurrent())
status = purple.PurpleSavedstatusNew(“”,current)
purple.PurpleSavedstatusSetMessage(status, message)
purple.PurpleSavedstatusActivate(status)

bus = dbus.SessionBus()
obj = bus.get_object(“im.pidgin.purple.PurpleService”,”/im/pidgin/purple/PurpleObject”)
purple = dbus.Interface(obj,”im.pidgin.purple.PurpleInterface”)
while True:
fortune=subprocess.Popen(‘fortune’, stdout=subprocess.PIPE).stdout.read()
set_status(fortune)
time.sleep(10)
The above script makes uses of the fortune command to generate random quotes. You may have noticed the gnome-panel applet Fish. Do you remember the “free the fish” Easter egg? Fish uses fortune as its back-end for generating quotes. The above script sets the status message for Pidgin every 10 seconds with a random quote generated by the fortune command. The next application in line is Tomboy, a note-taking application, which ships with GNOME. This is how you can talk to Tomboy and collect all the notes created with it to print them on a terminal:
#!/usr/bin/env python
import dbus
bus = dbus.SessionBus()
obj = bus.get_object(‘org.gnome.Tomboy’,’/org/gnome/Tomboy/RemoteControl’)
tomboy = dbus.Interface(obj, ‘org.gnome.Tomboy.RemoteControl’)
notes = tomboy.ListAllNotes();
for note in notes:
             print tomboy.GetNoteContents(note)
How about fiddling with Exaile music player, the GNOME-based Amarok clone? Our aim is to write few lines of Bash script to enquire the application on current music track, album name and artist. Add the following lines to the ~/.bashrc file:
artist=$(dbus-send --print-reply --dest=org.exaile.dbusInterface
/dbusInterfaceObject org.exaile.dbusInterface.get_artist  2> /dev/null | grep ‘”.*”’ -o | tr -d ‘”’);

album=$(dbus-send --print-reply --dest=org.exaile.dbusInterface
/dbusInterfaceObject org.exaile.dbusInterface.get_album 2> /dev/null | grep ‘”.*”’ -o | tr -d ‘”’);

if [[ -n $album ]]; then

echo -e “nCurrently Playing $album, $artistn”;
fi
Notice how every time you open a new terminal, it lists the information about the song currently playing in Exaile. Of course, if the player is not running, it wont print anything. Here, the dbus-send command is used to communicate with Exaile through the D-Bus interface. Finally, let’s hack GNOME’s PowerManager to hibernate our machine:
[slynux@slynux-laptop ~]$ python
Python 2.5.2 (r252:60911, Sep 30 2008, 15:41:38)
[GCC 4.3.2 20080917 (Red Hat 4.3.2-4)] on linux2
Type “help”, “copyright”, “credits” or “license” for more information.
>>>
>>> import dbus

>>> bus=dbus.SessionBus()
>>> power = bus.get_object(‘org.freedesktop.PowerManagement’,’/org/freedesktop/PowerManagement’)
>>> pm = dbus.Interface(power,’org.freedesktop.PowerManagement’)
>>> pm.Hibernate()
The above code makes the PowerManagement daemon execute the Hibernate() function and the machine goes into hibernation. You can also use the Shutdown(), Reboot(), Suspend() instead. So you see, by embedding any kind of D-Bus interfacing you are able to extract different sorts of things from an application. There are numerous applications that are hackable with D-Bus interfacing. Try it out for yourself—it’s fun! Note: Debugging D-Bus applications can be a hurdle sometimes. You can use the dbus-monitor to examine the events for a better understanding. Alternatively, you can also check out the D-Feet D-Bus debugger tool written by John Palmeri.
Bottom line
Now a days, most of the GNOME and KDE apps come with dbus interface support. This makes it easier for applications to communicate with each other and eliminates the higher-degree task of recompiling every application to make it compatible with another. Now, here is your task. You may find that some of your favourite applications do not have D-Bus support. If you do, maybe you can start writing the D-Bus interfacing for your favourite applications—contribute back to the community, it’s not that hard really! Happy Hacking!


If Article would have touched the c programming of DBUS it will be very good ……….
Greate Article! one point though:the NM_STATE no longer returns values mentioned in the article look : http://projects.gnome.org/NetworkManager//developers/migrating-to-09/spec.html#type-NM_STATE
Best tutorial on dbus I’ve come across!!
It took me a while to figure out what the dbus GUI browser ( https://wiki.gnome.org/Apps/DFeet ) was. This could have been mentioned earlier in the post.
Thanks much !!