Let’s first understand what virtual memory is. Today, computers are used for a wide variety of tasks, facilitated in part by modern OSs providing multitasking capabilities. A multitasking OS allows you to run more than one program at a time. If the number of programs you have started is greater than the number of CPUs (processors) available and in use, the OS repeatedly runs tiny parts of each program for very small amounts of time (not noticeable by the user) by turn; that is, it repeatedly allows each program to use the available CPU(s) for tiny fractions of a second. This creates the illusion of all programs running in parallel.
Multitasking, however, places large demands on the system memory (RAM). Running several graphical programs simultaneously can easily exhaust even today’s large memory banks in a short while. To alleviate this problem, modern OSs move some unused program data from RAM onto the hard disk to make room for required data.
This can be done because all of a program’s data in RAM is not needed at all times. If a program has finished working with some data and needs other data that had earlier been moved out to the hard disk, the OS can again move out the used data and move the old data back in. This entire process of moving unneeded data out and required data in is called swapping or paging, and the area on the hard disk where data is moved out from the RAM is called the swap space, page file, or virtual memory. Virtual memory is used even if you do not run more than one program at a time, simply because it allows the OS to keep frequently used parts of the running program in memory (as well as parts of the OS itself).
It is always better to assign a dedicated partition on a hard disk to the virtual memory. Since hard disks are much slower than RAM, it takes a significant amount of time to move data to and from virtual memory. Having a separate partition causes reading and writing of virtual memory to be independent of the reading and writing of other files. We will see how this scheme can be improved further.
Improving performance through cross swapping
If you have more than one hard disk, you can improve the performance of the virtual memory further. To do so, simply install the OS on one hard disk and the virtual memory on a dedicated partition on another hard disk. This scheme is much better than having both on the same hard disk because it gives independent control to the virtual memory. While files are being read from or written to one hard disk, the OS can operate the virtual memory simultaneously on the other—it won’t have to wait for either operation to complete before starting the other.
These days, it is becoming increasingly common to have more than one OS installed on a computer and use (boot) any one of them at a time. If you have more than one hard disk, you can use cross swapping to utilise all hard disks optimally.
It is best to install separate OSs on separate hard disks. This isolates their partition tables, provides physical encapsulation, and prevents space conflict and re-installation if you want to change partition sizes later. However, typically, only one OS is used at a time. All the others remain unused as long as that one is being used. If the other systems are on different hard disks, those hard disks will remain unused for that time. We can therefore utilise them for the virtual memory of the OS that is running. To do this, simply allot each OS’s virtual memory to a partition on a hard disk other than that on which the OS is installed. We will look at a scenario where Microsoft Windows and Linux are to be dual-booted.
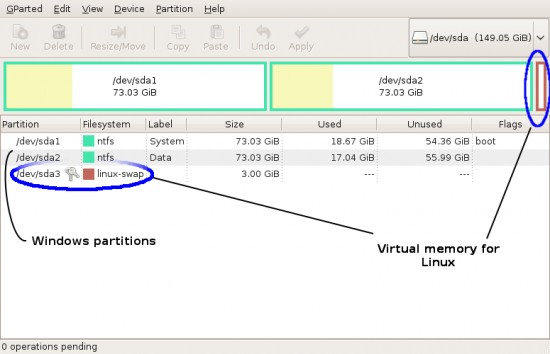
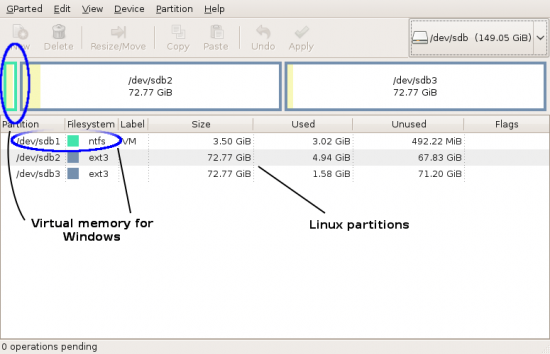
Let’s suppose we have two hard disks, A and B. We install Windows on hard disk A and a distribution of Linux on hard disk B. Now, to employ cross swapping, we place the virtual memory for Windows on a dedicated partition on hard disk B, while we place the virtual memory for Linux on a dedicated partition on hard disk A. However, to achieve this, it is best to create the partitions before or while installing the operating systems. They can be created later, but that requires either a RAID/LVM set-up or special software. If you wish to follow the process mentioned, set up your hard disk partitions as shown in Figures 1 and 2.

Figure 1 shows hard disk A with the first two partitions allotted for Windows files and the last partition used as dedicated virtual memory for Linux (the swap partition). Figure 2 shows a similar arrangement of hard disk B with a virtual memory partition for Windows and the last two partitions for Linux files. The exact positioning of the partitions is such because Windows always needs the first partition of the first hard disk, and the Windows swap partition is placed at the head of the second disk because Windows sometimes achieves better performance if its virtual memory partition is placed at the beginning of a hard disk. The two partitions each for Windows and Linux files are just my personal preferences to keep the system and personal files separate. You can use one or more partitions in their place for each OS.

To actually create such a layout during installation, start with two blank hard disks and follow the steps below (note: this assumes we’re using Windows XP and so the exact steps may differ for other versions—refer to Windows documentation for changing the amount of virtual memory in such cases).
- Create a primary partition on the first hard disk, make it bootable (active), and install Windows on it (you can create the partition from within the Windows installation program itself).
- If you want another Windows partition for your personal files, as shown in Figure 1, create a primary partition on the first hard disk (Disk 0) using the Windows disk management tool (right click on My Computer, click Manage→Disk Management).
- Leave the area for the Linux swap unpartitioned at the end of the first hard disk (Disk 0). Keep about 1.5 times the amount of your RAM reserved for this space. You can also keep 1 GB if you have 512 MB or more of RAM and want to conserve disk space.
- If the disk management tool is not already open, right click My Computer, click Manage→Disk Management.
- On the second hard disk (Disk 1), create a primary partition 1.5 times the size of your RAM (or 1 GB—see the above point); plus about 15 to 20 per cent of that space, assign a drive letter and format it (preferably with NTFS). Note that only Windows needs the extra 15-20 per cent of free disk space. Don’t reserve any extra amount for Linux on the first disk. Close the disk management tool when done.
- Right click My Computer, click Properties→Advanced. Under Performance click Settings→Advanced. Under Virtual memory click Change.
- Select the first partition (C:), click No paging file, then click Set.
- Select the new partition (drive letter) you created in Step 5, then click Custom size.
- If you allocated 1.5 times the amount of your RAM, type that amount in megabytes (1 GB = 1024 MB) in both the minimum and maximum boxes, then click Set. If you allocated 1 GB, type 1024 in both boxes, then click Set. This sets up your virtual memory for Windows. Make sure not to set the whole partition space (which includes the additional 15-20 per cent space) here. The extra free space is required by Windows to perform optimally.
- Click OK, then OK again to close the Performance Options box.
- Click the System Restore tab, then select the partition (drive letter) you set the virtual memory in.
- Click Settings… then select ‘Turn off System Restore on this drive’ and click OK. Confirm that you want to turn off System Restore on the drive.
- Click OK to close the ‘System Properties’ box.
- In your Linux installation program, select the option for custom (or expert) partitioning at the beginning of the partitioning phase (most Linux installers provide such an option, but if yours doesn’t, you can use the fdisk or cfdisk program; (c)fdisk coverage is out of the scope of this article so you can get help from their manual and info pages on a working/live Linux system).
- Select the first hard disk and create a primary partition in the space you had reserved for Linux swap at the end of the first disk. Make the partition use the full reserved (available) free space. Set it as the swap partition.
This creates the virtual memory for Linux. - Select the second hard disk and create primary or extended partitions as you want for your Linux files after the existing Windows partition. The existing Windows partition on the second disk contains the Windows virtual memory that was set up previously.
- Proceed with your Linux installation. Don’t set the option to automatically mount the Windows virtual memory partition on the second hard disk. If your installer turns it on by itself, make sure to turn it off.
Some notes
The exact performance gains you enjoy will vary depending on the amount of RAM you have (the less the RAM, the more the virtual memory used), the number of applications you use at a time and the load they place on the system memory, and other similar factors. However, even if not perceptible, there will be some difference, which will be better than using the default virtual memory set-up. You can check the amount of virtual memory being used, by using the Task Manager in Windows and the System Monitor in Linux.
A maximum of four primary partitions is allowed on a hard disk. More than four partitions can be created by using logical partitions within an extended partition. If you want to use logical partitions for your Windows files, fill the first hard disk to the end with the extended partition, create your logical partitions and make sure to keep the Linux swap space reserved within the extended partition. Then, in Step 15, create a logical partition for the swap space instead of a primary partition. Note, however, that this is not the optimal set-up for virtual memory.
If you have more than two hard disks and want to install more than two operating systems on them, you can jumble up the virtual memory partitions for them in a similar manner. However, note that cross swapping can be implemented best if you have as many operating systems as hard disks and install each OS on a different hard disk. Also ensure that you keep the first partition on the first hard disk for Windows.
If you use IDE hard disks, the primary master is the first disk, the primary slave the second, the secondary master the third, and the secondary slave the fourth. However, for best performance, you should make your hard disks masters on separate IDE channels (e.g., primary master and secondary master). For SATA hard disks, the disks are ordered according to the SATA ports on which they are connected.
Windows does not recognise/read Linux and UNIX partitions; so it is safe to place the swap partition for Linux/UNIX on the hard disk on which Windows is installed. However, do not try to manipulate any Linux/UNIX swap or other partitions using the Windows disk management tool.
You can allot partitions for the virtual memory of an OS on more than one hard disk with one partition on each hard disk. This will improve performance further. However, don’t allot a virtual memory partition for an OS on the hard disk on which the OS itself is installed, else you will defeat the purpose of cross swapping.
If you use more than one Linux distribution, you can reuse the same virtual memory partition(s) for all of them.


Yes it is all a fantasy