


A wiki could be defined as a simple, collaborative content management system which allows content editing. DokuWiki can be used for several purposes like a discussion forum for members of a team, providing tutorials and guides, providing knowledge about a topic, and so on.
DokuWiki is PHP powered, modest but versatile wiki software that handles all the data in plain text format, so no database is required. It has a clear and understandable structure for your data, which allows you to manage your wiki without hassles. DokuWiki is really flexible and offers various customisation options at different levels. Since DokuWiki is open source, it has a huge collection of plugins and templates which extend its functionalities. It is also well documented and supported by a vast community.
Although DokuWiki has numerous features, this article focuses only on the basics, in order to get readers started.
Pages
Pages can be easily created in DokuWiki by simply launching it on your browser. The first time, you will be shown a page like the one in Figure 1.Find the pencil icon on the right side; clicking on it will open up an editor and that’s it. You can start writing content on that page. The various sections of the page can be identified by the headings provided on it. The sections are listed out as a ‘Table of Contents’ on the top right side of the page.
Once you have finished typing the content on the page, you can preview it by clicking the ‘Preview’ button at the bottom of the editor. This will show you how your page will be displayed after it is published.
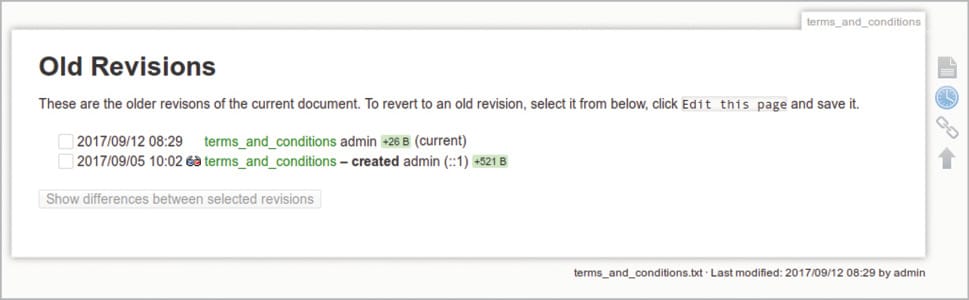
Pages can be removed by purging all their contents. Once a page is removed, all its interlinked pages too get removed. But we can restore a page by choosing its ‘Old revisions’ option. This option stores snapshots of the page over different time periods, so it is easy to restore a page with its contents from a particular time period.
Namespaces
Typically, a wiki may contain lots of pages. It is important to organise the pages so that the information the user seeks can be found easily. Namespaces serve this purpose by keeping all the relevant pages in one place. The following namespaces are bundled along with the standard DokuWiki installation:
- wiki
- playground
It is recommended that if you want to try anything before getting into a live production environment, use the ‘playground’ namespace.
To create a namespace, use the following syntax:
namespace_name: page_name
If the defined namespace doesn’t exist, DokuWiki automatically creates it without any break in linkage with the rest of the wiki.
To delete a namespace, simply erase all of its pages, which leads to empty namespaces; DokuWiki automatically deletes these.

Links
The linkage between the pages is vital for any wiki site. This ‘linkability’ keeps the information organised and easily accessible. By the effective use of links, the pages are organised in a concise manner. DokuWiki supports the following types of links in a page.
External links: These links deal with the external resources, i.e., websites. You can use a complete URL for a website such as www.duckduckgo.com or you can add an alternative text for that website like [[https://www.duckduckgo.com | search with DuckDuckGo]]. Also, we can link an email ID by enclosing it with the angled brackets, for example <admin@localhost.com>.
Internal links: Internal links point to the pages within the wiki. To create an internal link, just enclose the page name within the square brackets. The colour of the page links shows the availability of the page. If the link is in green, then the page is available. And if the link is red, then the page is unavailable.
Sectional links: Sectional links are used to link different sections of a page by using the ‘#’ character followed by the section name, enclosed by the double square brackets on both the sides. For example: [[#section|current section]]
Media
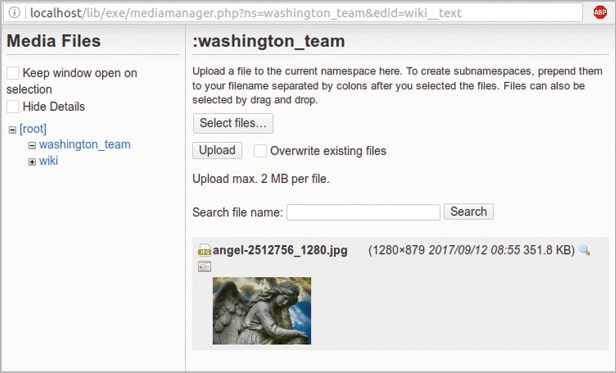
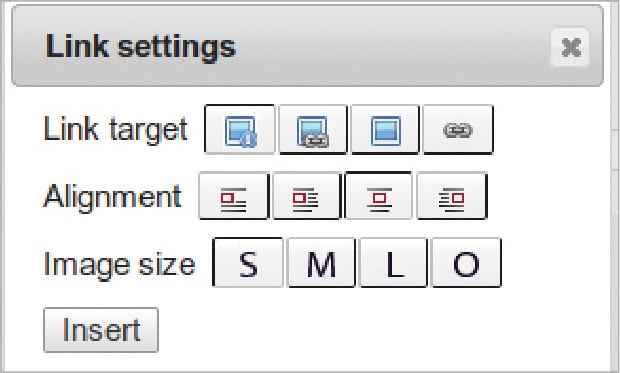
Media files can be added to your wiki by clicking the ‘picture frame’ icon (next to the smiley in the editor). On clicking the icon, a new dialogue box will pop up, and by clicking the ‘Select files’ button you can select the files for your wiki. When you’re finished, click the ‘Upload’ button and once it is uploaded, the image will show up in the dialogue box. You can further customise the image by clicking on it. This will display the ‘Link settings’ option. You can define how the image can be linked to your wiki, the alignment, and the size of your image. After customising the image, click on the ‘Insert’ button to insert the image in the page.
You can add metadata to your image by using the ‘Media manager’ option and choose the ‘Edit’ option for the particular image.
DokuWiki supports the following media formats:
Images: gif, jpg, png

Video: webm, ogv, mp4

Audio: ogg, mp3, wav

Flash: swf
Sometimes, the media file you added may not be recognised by your browser; so it is recommended that you add media files in the multiple formats prescribed above, so that any one of the formats can be recognised by your browser.
Access control lists
ACL or Access Control Lists are one of the core features of the DokuWiki. They define the access rights of the wiki for its users. There are seven types of permissions that can be assigned to the users, which are Read, Edit, Create, Upload, Delete, None and Admin. Of these, ‘Delete’ is the highest permission and ‘Read’ is the lowest, so if the ‘Delete’ permission is assigned to users, they can have ‘Read’, ‘Edit’, ‘Create’ and ‘Upload’ permissions as well.
Admin permissions are assigned to the members of the admin group, and surpass all the other permissions. Also, the members of the admin group are considered as ‘super users’, so regardless of the ACL restrictions, they can have unlimited access on the wiki.
Please note that ‘Create’, ‘Upload’ and ‘Delete’ permissions can be applied to namespaces only.
To change the access rules for a page or a namespace, follow the steps given below:
1. Log in to DokuWiki as the admin.
2. Now click on the gear wheel icon next to the admin label on the top of the page.
3. Choose the ‘Access control list management’ option in the administration page.
4. On the left side you will see the available namespaces and their pages. You just have to click on your choice and select the group or the user by supplying the respective name.
5. For each page or namespace, the current permissions for the selected group or user will be displayed. Below that, you can change the permissions and save them. These will get updated on the ACL rules table.

DokuWiki determines the access rights for each user by the following constraints:
1. DokuWiki will check all the permission rules against a person or the group to which s/he belongs, but the catch lies with the permission rule, which is closer to the namespace: page level will take precedence and this will determine the access for that person.
2. When more than one rule is matched on the same level, the rule with the highest permission will be chosen.
Please note that users in DokuWiki are compiled into groups. Before a user is manually added to any group by the administrator, all of its users will belong to the following groups:
- @user: All registered users will belong to this group.
- @ALL: Every user of DokuWiki falls into this group, including registered and non-registered users.
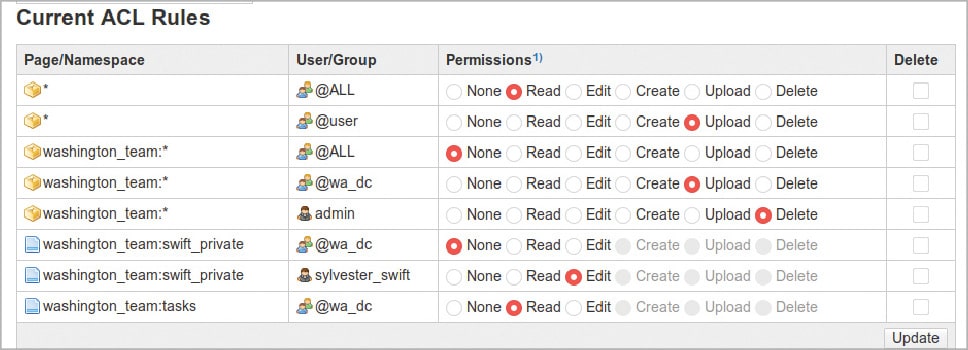
Let’s assume you want to create a namespace for your team in Washington and name it as washington_team. Now we want this namespace to be accessible only to your team members. To achieve that, you will add team members to a user group @wa_dc. Now let’s analyse the ACL rule table definition for the namespace washington_team.
The first line of the table tells us that any user, including the registered and non-registered users, can only read the contents on the root namespace.
The second line of the table shows us that the registered users of the wiki can have ‘Upload’ access, which enables them additional accesses such as ‘Read’, ‘Edit’ and ‘Create.’
The third line tells us that users in the group @ALL cannot access this namespace. This line specifically restricts access to all, including the intended users.
The fourth line shows that the user group @wa_dc can have ‘Upload’ access. This line is the continuation of the third line, since we have now successfully made the namespace washington_team exclusive for the user group @wa_dc.
In the fifth line, it shows us that ‘Admin’ has given ‘Delete’ access to the namespace washington_team; hence, the admin can have full and unrestricted access to the namespace.
Now let’s create two pages—tasks and swift_private — in washington_team to see how ACL rules are applied to different users (Figure 7).
User 1:
Name: Stella Ritchie, a non-registered user
User group: @ALL
For this user, in the rule table, the first rule and the third one matches, but the third rule matches on the namespace level since her access to the washington_team is None.
User 2:
Name: Priscilla Hilpert, a registered user
User group: @wa_dc
For Priscilla, the Rules 1, 2, 4, 6 and 8 are matching. Priscilla can have access to the namespace washington_team via Rule 4.
In Rule 8, it shows that Priscilla can have ‘Read only’ access to the page washington_team: tasks since this permission was set at the namespace level.
Rule 6 shows that Priscilla is prohibited from accessing the page washington_team: swift_private since the permission for accessing this page is set to None.
User 3:
Name: Sylvester Swift
User group: @wa_dc
For Sylvester, the Rules 1, 2, 4, 7 and 8 are matching.
Rule 4 enables Sylvester to access the washington_team. Rule 7 gives the Edit and Read access to the page washington_team: swift_private. Rule 8 shows that Sylvester has ‘Read only’ access to the page washington_team: tasks.
Customisation
The default look of DokuWiki can be changed by choosing a template from the template collection that is available for download. It is recommended that you download the template version that is equal to or more recent than your DokuWiki version.
DokuWiki offers a huge collection of plugins. As of now, it has more than 900 plugins that are available for download, each of which extend the functions of DokuWiki. Plugin installation can be automated by using the extension manager; or you could do it manually by downloading the package on your computer and manually upload it via the extension manager. Please note that the plugins are contributed by the user community and may not be properly reviewed by the DokuWiki team. Always look out for the warnings and update information in a plugin page to avoid problems.


