


If you’ve been faithfully following this series, then get ready to create a fun game. This is the popular sliding number puzzle which contains numbered tiles within a square frame, with one blank space for a tile. The idea is to move a tile to the blank space, and rearrange the tiles in sequence in the shortest possible time and with the least number of moves.
We started Android app development with App Inventor, picking up some pretty basic ideas to get used to the concepts, and we have moved towards more challenging and engaging application ideas.
I have been getting regular feedback, suggestions and debugging questions. By now, most readers have gained enough experience and hands-on practice with all the features of the tool. If you are a first-time reader of this series, you too can very well learn from this point onwards without having any prior programming experience or any specialised knowledge. Apps developed with App Inventor can be uploaded to the Google Play Store and I will be delighted to see the good work done by readers.
If we talk about App Inventor specifically, then we can proudly say that we have mastered the components that are available in the palette, and moving between designer and block editor is so much fun.
In this tutorial, I will give you the rather challenging task of building yet another interesting and powerful game with the resources available in App Inventor 2. I will be making a 15-number sliding puzzle which is also known by other names such as Gem Puzzle, Boss Puzzle, Game of Fifteen, Mystic Square, etc. It also comes in various sizes and variations. The objective is to arrange the numbers in sequence, leaving only the corner block empty to allow the number blocks to be moved around. If the size of the puzzle is 3×3 tiles, it is called the 8-puzzle or 9-puzzle, and if it is made up of 4×4 tiles, it is called the 15-puzzle or 16-puzzle—named, respectively, for the number of tiles or the number of spaces.
Theme of the application
The theme is pretty simple and you probably have already got the idea from descriptions in earlier articles in this series. We will make an Android application that will present a square board, which is covered with numbers on tiles (in a series starting from 1 but in jumbled order) with one empty space. The objective is to arrange the numbers in sequence. To make it more interesting, you can count the time and the number of moves it takes you to solve the puzzle so that you can challenge your friends as well.
GUI requirement
For every application, we have a graphical user interface or GUI, which helps the user to interact with the on-screen components. The block editor section defines how each component responds to user actions.
GUI requirements for Screen1
1. Label: This is a static text component that is used to display some headings or markings on to the screen.
2. Button: This will let you trigger the event and is a very essential component.
3. Horizontal arrangement: This comprises special components that keep all child components aligned within themselves.
4. Table arrangement: This comprises special components that keep all child components, within itself, well arranged in rows and columns as specified in the properties.
5. Clock: This is the timer component that provides the time control of the events happening. Using this, we can set certain events to happen after a particular interval.
6. Notifier: This is used to display some instructions or give controls over your existing components. You will see its functionality in more detail as we implement it in our game.
7. Canvas: This is the component for drawing and animation. You can place various animation objects on the canvas to control them via user actions. You will be able to see more details on this aspect as we work on the application.
8. Image: The image component is used when you need to show some pictures or special effects on screen.
9. TinyDB: This is the database component for your application. If we need to store some variables and values that we want to persist even after the application is closed, we use TinyDB.

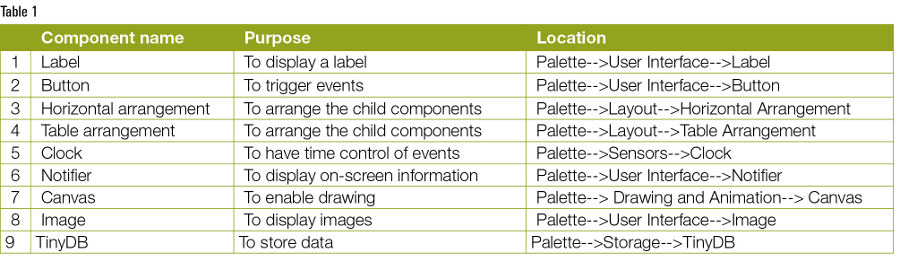
The components that we need for this application are given in Table 1. We will drag them on to the designer from the left hand side palette.
1. Drag and drop the components mentioned in Table 1 to the viewer.
2. Visible components will be seen by you while the non-visible components will be located beneath the viewer under the tag ‘Non-visible’.
3. For the application’s name, set the ‘Screen1’ title property to ‘SlidingPuzzle’.
4. All images need to be put within the vertical arrangement so as to keep them aligned in a square view.
5. If you have dragged and placed everything, the layout will look something like what’s shown in Figure 1.
6. Make the necessary property changes like we did in changing the text property for the label and button components.
7. Renaming the components helps to identify them in the block editor.
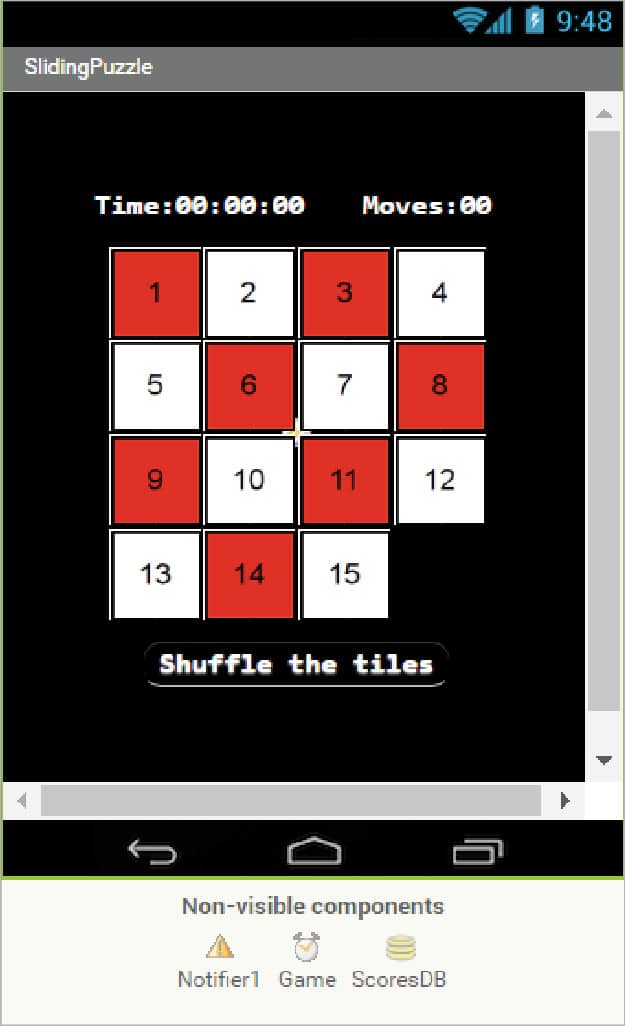
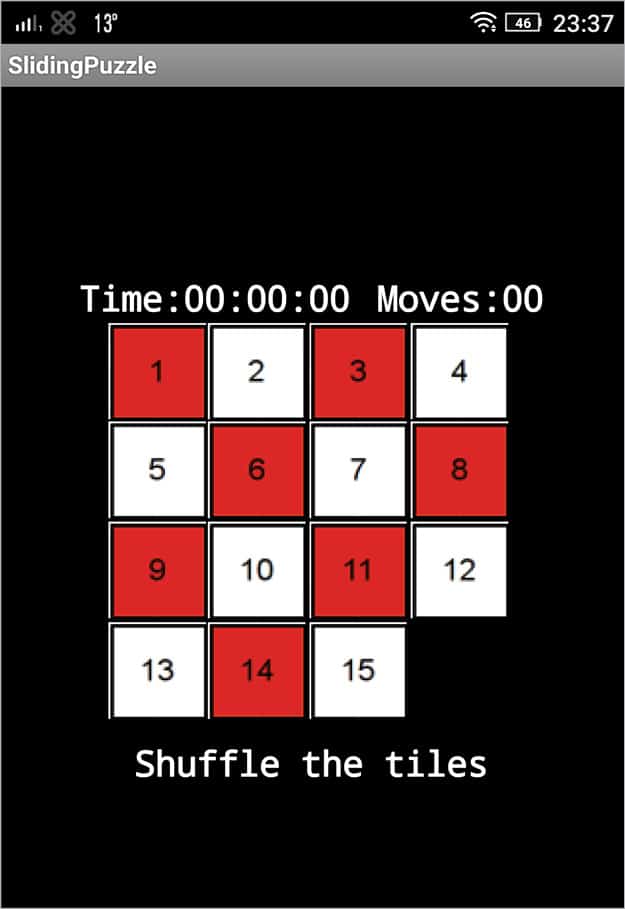
8. Your graphical user interface is ready. The application will look exactly like what’s shown in Figure 2, after installation in the device.
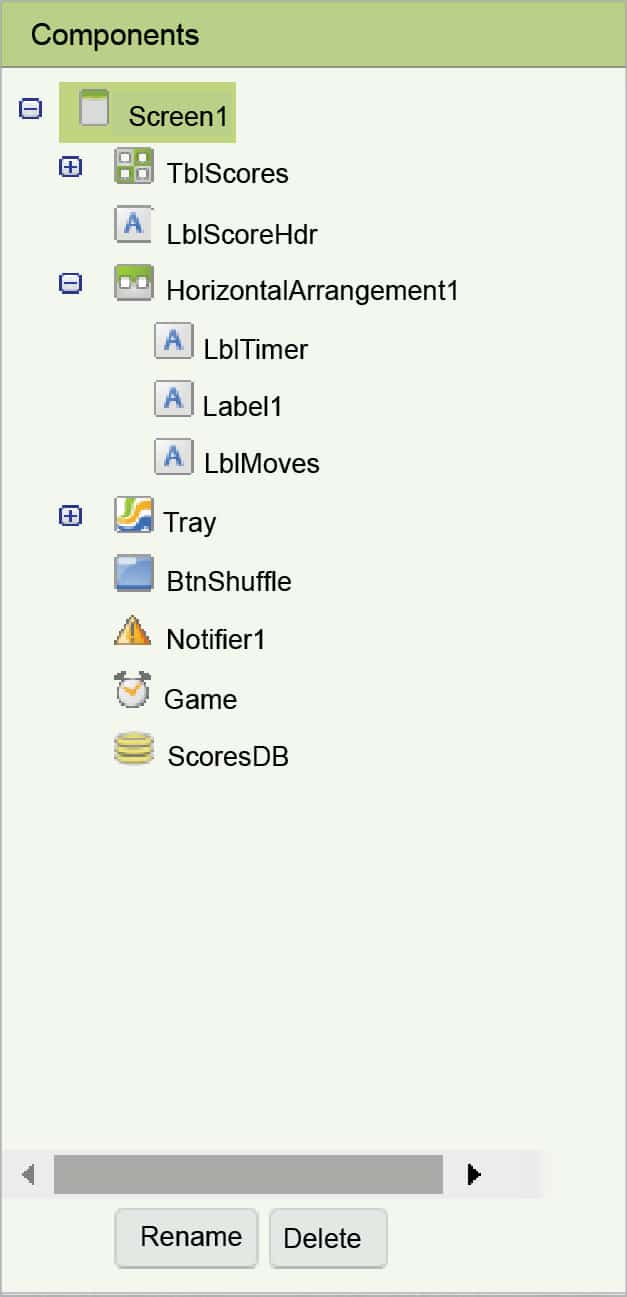
9. The hierarchy of the components dragged to the designer is shown in Figure 3.
If you are confused by the designer and the components viewer, let me discuss it a bit more. Here is the hierarchy that we have placed for our application.
1. At the top, we have the title for our application. It’s always a good practice to name your application and show it on the screen as well. We have set the title property of Screen1 as the name of the application, so the top grey bar will be the application title or you can make it within the screen by providing a label.
2. Below that, we have a score card which is hidden in the beginning and will be loaded as the leader board at the end of the game.
3. In the middle, we have labels of the time and the moves. We will display the time taken and the steps count to solve the puzzle.
4. Beneath that, we have our actual play area. We have placed 16 image components on the canvas. Assign a number to the 15 numbers and keep one block empty.
5. At the end, the ‘Shuffle the tiles’ button will begin a new session each time to randomly change the numbers displayed on the board.
 Now, let’s head towards the block editor to define the behaviour. Let’s discuss the actual functionality that we are expecting from our application.
1. The board will be loaded with the numbers 1 to 15, in sequence. On pressing the ‘Shuffle the tiles’ button, numbers will be randomly distributed on the square board.
2. If there is an empty block adjacent to any block that is touched, then this block should move to this empty position, and a blank should be created in the place from which it has moved. This is just a swapping of positions.
3. Each move will increase the move count.
4. Our clock timer will be running in the background and will count the seconds. Make sure to check the ‘Timer always fires’ checkbox in the clock properties.
5. Once the blocks are arranged in sequence, we need to display a message on the screen, and the move count and the time taken should be recorded to be presented on the leader board.
So let’s move on and add these behaviours using the block editor. I hope you remember how to switch from designer to block editor. There is a button right above the Properties pane to switch between them.
Block editor blocks
I have already prepared the blocks for you. All you need to do is drag the relevant blocks from the left side palette and drop them on the viewer. Arrange the blocks the same way as shown in the image. I will explain what each does and how it is called.
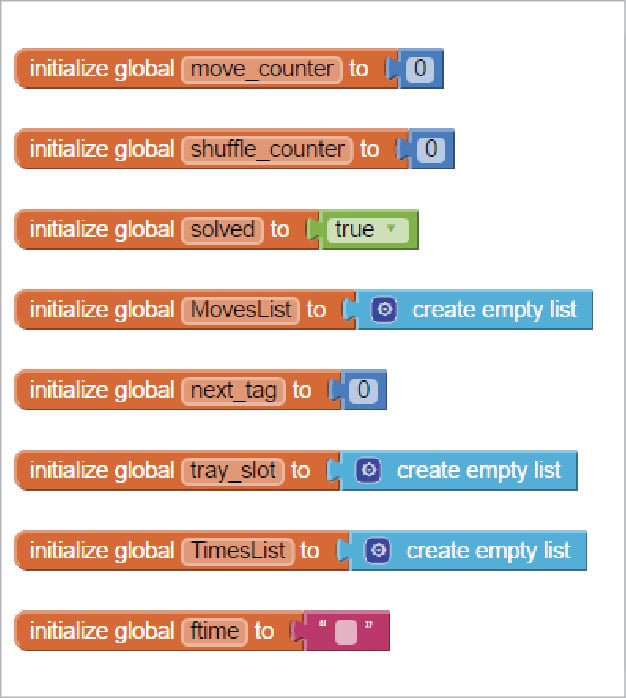
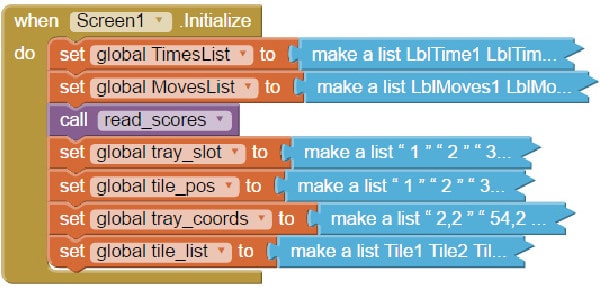
As soon as Screen1 is loaded, certain variables to control events later on will be declared. In Figure 4, all the necessary variables are declared with their initial state.
Before we present anything to the user, we need to reset everything by keeping all the blocks at their default position and setting the lists. How the Screen1.Initialize block takes care of that is displayed in Figure 5.
The Shuffle button will re-arrange the blocks and start the game. Figure 6 shows the blocks for events when you click on the Shuffle button.
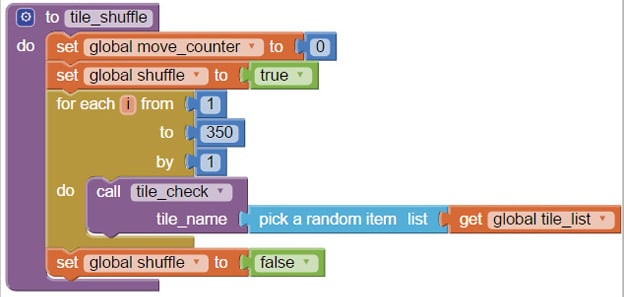
The ‘tile_shuffle’ procedure is a recursive call to shuffle the blocks; we have put that line of blocks within a procedure name so that we can call it any number of times.
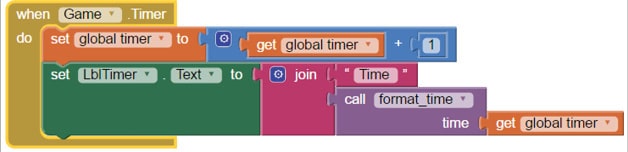
The counter will be triggered as soon as your play board is ready to use. It will increase by one second as we have set the interval property to ‘1000 milliseconds’ in the designer for the clock component.
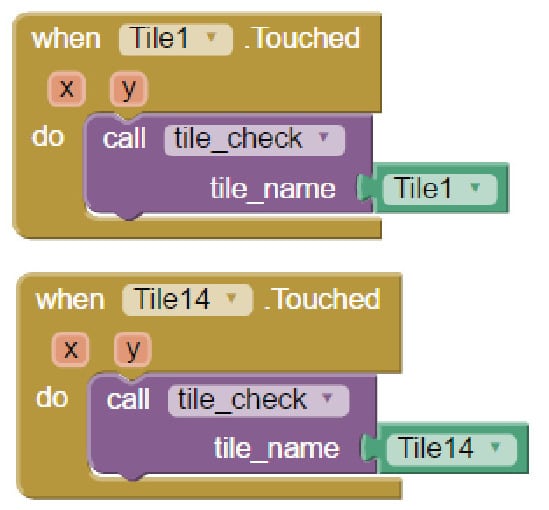
Now, when a tile is touched, how it should move is depicted in Figure 9. I have posted for two blocks. It will be the same for the others as well, keeping a separate event handler for all; so please create accordingly.
Application code
It was not possible to snap each and every block of the logic, so I am providing the complete code as a bar code. Scan the code (see QRCode 1) to obtain the .aia file, which you can upload to your projects in App Inventor 2 and view the complete code.


If you want to see how the application looks after installation, scan the code given in QRCode 2 to get the application apk.
Packaging and testing
To test the app, you need to get it on your phone. First, you have to download the application to your computer and then move it to your phone via Bluetooth or USB cable. I’ll tell you how to download it.
1. On the top row, click on the ‘Build’ button. It will show you the option to download the apk to your computer.
2. The progress of the download can be seen, and after it’s been successfully done, the application will be placed in the Download folder of your directory or the preferred location you have set for it.
3. Now you need to get this apk file to your mobile phone either via Bluetooth or USB cable. Once you have placed the apk file to your SD card, you need to install it. Follow the on-screen instructions to install it. You might get some notification or warning saying,‘Install from un-trusted source’. Allow this from the settings and after the successful installation, you will see the icon of your application in the menu of your mobile. Here, you will see the default icon, which can be changed and we will tell you how to do so as we move ahead in this course.
I hope your application is working exactly as per the requirements you have given. Now, depending upon your usage requirements and customisation, you can change various things like the image, sound and behaviour, too.
Debugging the application
We have just created the prototype of the application with very basic functionality, but what else might the user be interested in? Now come various use cases which require attention in order not to annoy the user. Your app should be able to address the following use cases:
1. Can we think of a way to share our moves and puzzle-solving time with our friends?
2. Can we display two boards simultaneously for two users and make it a dual player game?
3. What will other versions be like if we think of expanding the size of the square?
These are some of the scenarios that might occur and users will be pretty happy seeing these features implemented.
Think about all these scenarios and how you could integrate their solutions into the application. Do ask me if you fail to address any of the above cases.
You have successfully built another useful Android app for yourself. Happy inventing!


the QR code to see the rest of the code doesn’t work at all, and without it this tutorial is moderately useless.
how you got the numbers for the coordinate tray?