


Version control systems play an important role in tracking changes in software and enable users to fall back to a desired previous version. Git is a distributed version control system that can be run on Windows, the mechanics of which are demonstrated in this article.
Version control software is that which helps software teams to manage changes in source code over time. It stores these changes in a special database. A group of changes is stored in a special type of database called a commit. If new changes made by developers are not acceptable for whatever reason, they can switch back to the original version, using version control methods.
Currently, the most widely used version control system is Git, which is an actively maintained open source project by Linus Torvalds, the creator of the Linux OS. Git is an example of a distributed version control system. Rather than have a single location to maintain the history of development, each developer has a code base which is her own repository, from which she can choose what to send to the server and what remains with her. Git provides a great amount of performance, security and flexibility in version maintenance.
Installing Git on Windows
To install Git on Windows, download the Git installer for Windows from https://git-for-windows.github.io. Run the executable to complete the installation. The default options are pretty good for many users. Open Git Bash from the Start menu. To work with Git, you need to set up your local Git username and email ID. To set the username, use the following command:
git config --global user.name “my_username”
To set the email ID, use the following command:
git config --global user.email “my_email”
After this step, Git is completely ready to be used and you can now locally start managing your source code.
The Git repository
Git repositories are folders of your source code, in which the history of the changes made in the code is stored. For example, let’s look at a small project that has the following directory structure:
myproj
--> a.c
--> b.c
myproj is the directory, where I have my source code and a.c and b.c are my source files, which need to be tracked. First, through Git bash, go to the folder. We need to make Git aware of this directory—that is, we need to make this folder a repository; so type the following command to make this happen:
git init
This will create a .git folder, which will contain all the information that Git needs to make this folder a repository. Git commands can only be run inside a Git repository, so git init is the first step.
Note: You can also run git init on an empty folder to make it a Git repository, and can start adding files to it.
Running git init will not modify any files in the source code directory. Git init is run only once when the project is starting; once initialisation of the Git repository is complete, this project can be hosted on the Git server. Other developers can clone this repository.
Cloning in Git means copying an already existing Git repository from some server. The repository that gets copied is a fully functional Git repository—it has its own history, its own files and is totally isolated from the original repository from which it was cloned. The following is the command to clone a Git repository:
git clone <repo_path>
Here, repo_path is the URL of the Git repository on the server.
Let’s take a look at an example. The Linux kernel source code is hosted on the git.kernel.org server. To get a copy of this, we need to clone that repository, and what’s shown below is the example of this.
git clone https://git.kernel.org/cgit/linux/kernel/git/torvalds/linux.git
This will create a folder Linux in the current directory, which will contain the Linux kernel source code.
Each time you clone, you get a local copy of the repository that is present on the server. Any changes you make will happen to the local copy and not in the server. A copy of the Git repository, which is obtained by cloning, is called the local repository.
Whenever you clone a repository or you initialise a Git repository, all files in the repo are called unmodified files. Whenever any change is made to any file, that file is maintained by the Git repo as a modified file. If a new file is added to the Git repository, then that file is called an untracked file.
Any changes that are made to the local copy are maintained in the Git repository. Such changes can be viewed by checking the status of the repo. The following is the command to check the status of the Git repository:
git status
If any file is modified or a new file is added, everything is listed in Git status.
Suppose, for instance, in our example, we modify a.c and then execute Git status, we will get the following output:
Changes not staged for commit:
(use “git add <file>...” to update what will be committed)
(use “git checkout -- <file>...” to discard changes in working directory)

modified: a.c

no changes added to commit (use “git add” and/or “git commit -a”)
You can see that modified files are listed in the status.
Now, suppose we add a new file called g.c in our Git repository and execute Git status; you will see the following output:
Untracked files:
(use “git add <file>...” to include in what will be committed)

g.c
…where g.c is listed in the untracked files section.
These are the changes that will not be present in the Git server from which this repo was cloned. To put these changes in the Git server, we need to take the following steps:
1. Add the modified files or newly added files to the list of Git files which will get committed.
2. Commit these changes.
3. Push these new commits to the Git server.
So to make Git understand that you want to put these changes in the Git server, it first needs to move the changes from the untracked to the tracked section. To add these changes to the tracked section, the following command is used:
git add <file>
For our example, we will need to add our modified file a.c and newly added file g.c; so use the following command:
git add a.c g.c
After this, if we check the Git status, we will see the following output:
Changes to be committed:
(use “git reset HEAD <file>...” to unstage)

new file: g.c
modified: a.c
You can see that under the Changes to be committed section, a.c and g.c are listed. These are the changes that will be committed. To commit these changes, use the command given a little later in this article.
Each set of changes that we make in the repository can be grouped into what is called a Git commit. Each commit in Git has a numeric value, using which it can be reverted to. Whenever you make a set of changes that you think is perfect, you group those changes, and make them a commit before starting off on new changes. Then, while making new changes, if you feel something is broken, you can revert back to the point of your last commit. Also, you can push this commit to the Git server, so that you can access this change from anywhere in the world.
The following command is used to commit to Git:
git commit
Once git commit is executed, a text editor will open up. You will have to write some message, which will provide the details of changes in this commit. Once the file is saved and closed, a commit is created and the Git repository is updated with that commit.
You can see all the commits in the Git repository by executing the following command:
git log
This command will show all the commits made to the Git repository.
After making the commit, if we make any changes to the repository, and we want to revert back to the last commit, then we can do so by using the following command:
git reset –hard
If some changes have taken place on the Git server from where the current working Git repo was cloned, and we need the changes in our local Git repo, use the following command:
git pull origin master
This will pull in all the changes that have taken place in the Git hosting server. Similarly, any changes that need to be pushed to the remote server can be made using the following command:
git push orign master
This will push all the commits to the Git server.
Tortoise Git
Tortoise Git is a Windows graphical interface to Git and is based on the Tortoise SVN. It is open source software based on the GPL. Interactions with Tortoise Git are done using the Windows context menu.
Tortoise Git can be downloaded from https://tortoisegit.org.
After installing Tortoise Git, you can see the following three new options on your Windows Right click Context menu.
Git Clone...
Git Create repository here...
TortoiseGit
These are the menu items that will be useful to work with Git on Windows, graphically. The following are the tasks that we have carried out earlier, using Git on the command line and now, we will perform these using Tortoise Git.
To create a new Git repository, follow the steps shown below:
1. Go to an empty directory where you want to create a Git repository.
2. Right click and select Git Create repository.
This will create a .git folder, which will make this directory an empty Git repository. For our example, we will add two files, a.c and b.c, to this repository. The following steps will add these files.
1. First add these files to the current directory.
2. Right click on this folder and you will see the option ‘Git Commit -> master’.
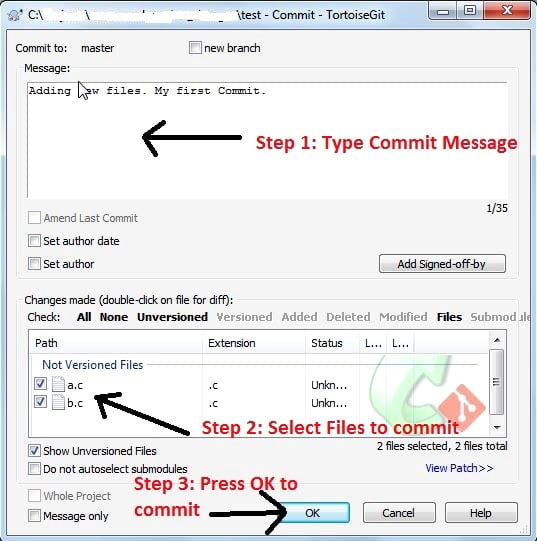
3. Click on this option and you will see the menu shown in Figure 1.
4. Type the message in the message box. This is the message about what you are about to do. In the example, I have given the message ‘Adding new files. My first Commit’.
5. Then select the files you want to add to the repository from the file list, as specified in step 2 of Figure 1.
6. Next, press OK to push these changes to the Git repository.
Take the following steps to see whether the changes are added to the Git repository and to see the current status of the Git repository.
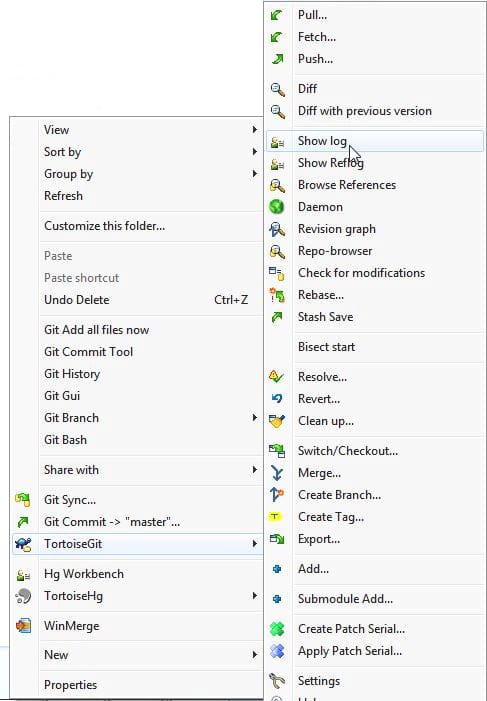
1. Right click and go to TortoiseGit -> Show log as shown in Figure 3.
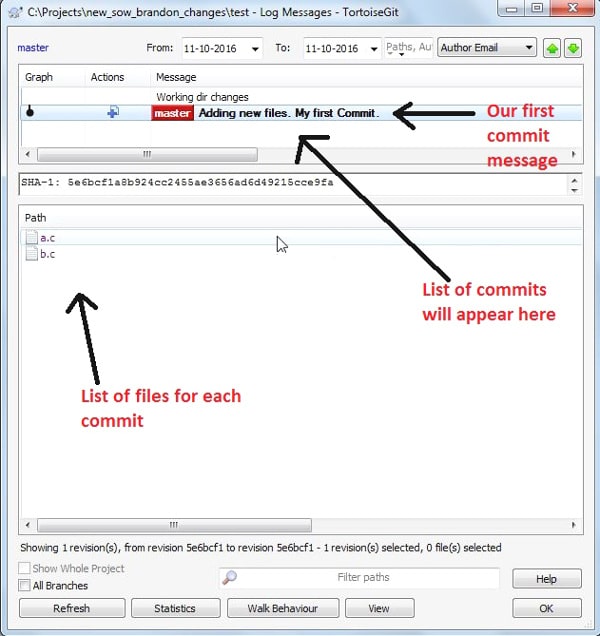
2. In the Git log dialogue box, there are three non-editable text boxes. In the top box, you will see the list of commits. The top-most commit is the last one. It will display the commit message, to which the title master will be appended. The commit message will be what you typed in the previous commit. Click on it.
3. In the third text box, you will see all the files that have been modified or newly added. In our example, these will be a.c and b.c.
Now, we have created a new repository and added files to it.
If you make some changes to a.c and again see the log, click on Working dir changes in the commit box. You will see a.c in the file list. So now there are two points—one where you added new files and the second point is Working directory where you made new changes. If you want to add these changes as a new commit, right click and select ‘Git commit -> master’. Type in the commit message, select the modified files and press OK to commit. Now, if you see the log, you will see two commits—our first one in which we added two new files, and the second one in which we added the modifications in a.c. Note that there will be no changes in the ‘Working dir changes’ section.
Now, if you again make some changes in a.c or b.c and check the log, you will see these changes in the ‘Working dir changes’ section. In case you feel that you want to reverse these changes and revert back to the second commit you made, follow the steps listed below.
1. Right click and go to TortoiseGit->Show log.
2. Right click on the commit ID that you want to revert back to. In our case, it will be the latest commit, which is our second one.
3. Select the ‘Reset master to this’ option.
4. Select the reset type as Hard. Press OK to reset. If you now check the files, there will be no changes present.
You can check what changes you made in the Working directory by going to ‘TortoiseGit->Diff’. This will show the list of files that got modified. Double clicking on these files will show the difference in the patch format.
Git cloning in Tortoise Git
If there is any Git repository on the Git server and you need it, then you will have to clone that server. This can be done as follows.
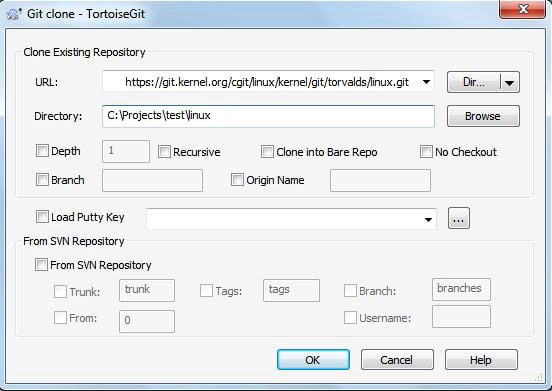
1. Right click and select Git clone. A clone dialogue box will appear as shown in Figure 4.
2. In the URL box, type the web URL of the Git server. In Figure 4, I have used the Web URL of the Linux kernel Git repository.
3. In the Directory box, type the path where the clone will be located.
4. Press OK to start cloning.
After the cloning is successful, the Git repository from the Git server will be copied to your local folder, where you can make changes and commits. Once all the changes are finished, you can go to ‘TortoiseGit->Push…’ to push changes to the Git server.


