

Some time ago, an article titled The free software at work” was published in Byte magazine (see Reference 1). In this four-page article, the author discusses GNU Linux and some applications, making some interesting comments mainly about their use in a research environment (at that time, the author was systems administrator in a universitys physics department). The first figure, in the article, shows GV (the PDF and PS viewer), LyX and the text editor Jed, all under KDE. The second figure shows a table and a graph made with StarOffice. Finally, the last figure shows Netscape and a terminal window opened under the FVWM desktop environment (I’m not too sure about this though, since the article appeared many years ago). So I decided to give Linux a chance, because the author was very optimistic, on the off chance that what hed written was indeed true.
The next step involved choosing a distro the first was Red Hat 5.0, and then SuSE from the version 5.3 (with Applixware Office 5.0) to the version 10.0. For the last few years, my preferred distro has been Mint, because I like to have a distro that’s easy to install and to configure, and has almost all the software I need installed by default, in order to have a completely functioning system in a short span of time. In the past, I have mainly used GNOME and, sometimes, KDE. I’m not a big fan of GNOMEs transition to version 3 and KDEs move to the Akonadi technology, because I like to have a desktop environment which is reasonably light, fast and easy to back up; so my choice is Xfce. This article is based on GNU Linux Mint 17.3 Xfce 32 bit Rosa.
The article presents some basic customisations of the desktop environment, and information about the installation and configuration of a few daily-used applications, with the help of the terminal window. Please note that the following are only examples because a lot of other ways are possible.
Settings and systems managers
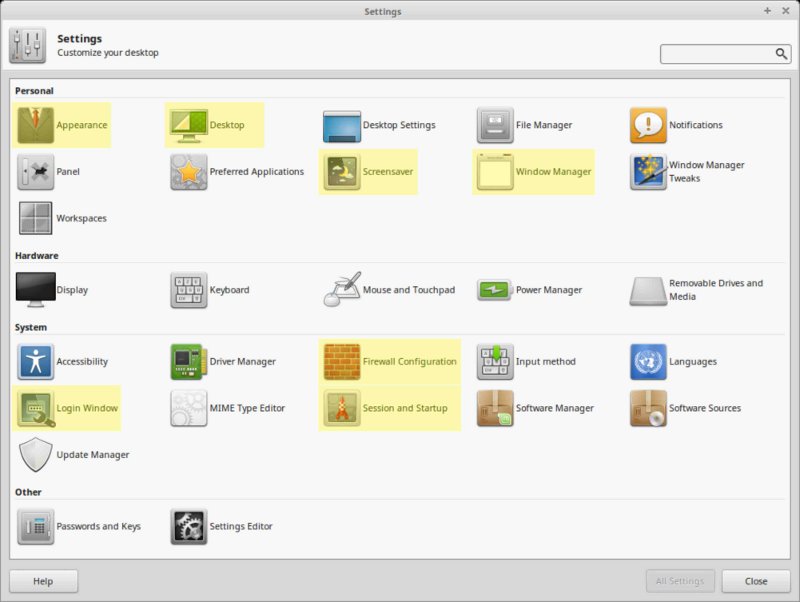
Figure 1 shows the Settings manager with a yellow background, for the following options:
- The Appearance option, as suggested by the name, is to configure how the desktop looks. The Style tab controls the visual appearance of the controls such as the buttons and menus. The second tab, called Icons, is about how the icons are shown, for example, in the panel, on the desktop, in the file manager and in the menus. Because I think the default font size is too big, I need to use the third tab, called Fonts, to select a smaller size. A more detailed explanation about this aspect can be found at http://docs.xfce.org/xfce/xfce4-settings/appearance
- I use the Background option only to change the default background, and the Icons tab to select a smaller font size and to select the default icons for the visualisation on the desktop.
- The Screensaver, as its name suggests, is about selecting a screen saver. The option Blank after’ is to set the time, in minutes, after which the screen saver activates.
- The only thing that I did with the Window manager option was to select a smaller font size for the windows title. More information about this can be found at http://docs.xfce.org/xfce/xfwm4/preferences
- The Firewall configuration starts Gufw, if previously installed. This is a GUI for the Linux default firewall. Simply, change the Status to On.
- In the Login window, you can choose the theme for it. My preference was Elegance, though you can also change its default background, which is located in /usr/share/mdm/themes/Elegance/background.jpg with another picture having the same name.
- Usually, its not necessary to use the Session and Startup options. Sometimes, these can be used to uncheck some applications that will be started automatically when you log in to the desktop for example, Blueman, MintUpdate, mintUpload, mintWelcome, etc.
- The installation of a printer is easy. On System > Printers simply click on Add and follow the instructions on the screen. The most important thing is that the recommended driver may not be the best. So some further tests may be needed.
Software manager
In this section, I would like to explain the applications I added after the default installation:
- Accessories group: mc (Midnight Commander), vim-gtk.
- Graphics group: eog also known as the Eye of GNOME (because its not possible to print a picture from the default Ristretto application), Imagemagick (a nice application especially for batch operations) and Inkscape.
- Internet group: Skype.
- Multimedia group: Audacious (but the default Banshee is also a nice player), k3b (probably the best CD burner available on Linux), system settings (KDE system settings – by selecting Application appearance > Icons > Mint-X-Aqua you can have k3b with Xfce icons), mtp-tools, mtpfs, gmtp (gMTP is a player that can communicate with devices such as MP3 players or mobile phones via a USB cable see Reference 2).
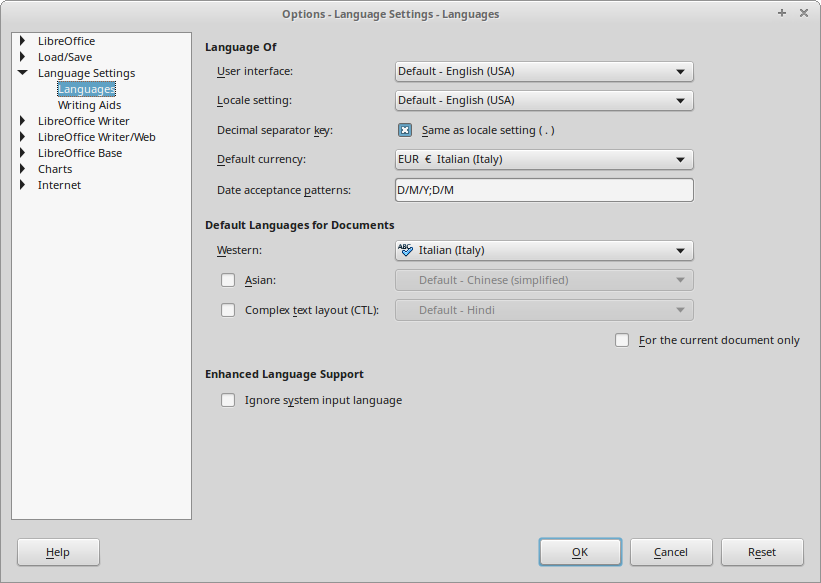
- Office group: qpdfview (a fast PDF reader), libreoffice-style-tango (Im not a big fan of the default human icons), hyphen-[your-language], mythes-[your-language], myspell-[your-language] (the default language is selected during the installation process and if English is chosen, it may be necessary to add one or more languages to LibreOffice; an example is shown in Figure 2).
- Settings group: gufw (see the previous section).
Other packages: efax, fonts-inconsolata, fonts-sil-gentium-basic, p7zip-full, ttf-mscorefonts, texlive-full. Some information about 7-Zip and efax will be presented in the next two sections.
7-Zip
This software is very useful to zip (with encryption) one or more files. In the following example, an encrypted file called archive.zip containing two text files is created. The syntax for the terminal is as follows:
7za a -mem=AES256 -pPASSWORD -tzip archive.zip file1.txt file2.txt
To unzip, use 7za e archive.zip (the e option stands for extract), and to clear the terminal history, simply use history cw.
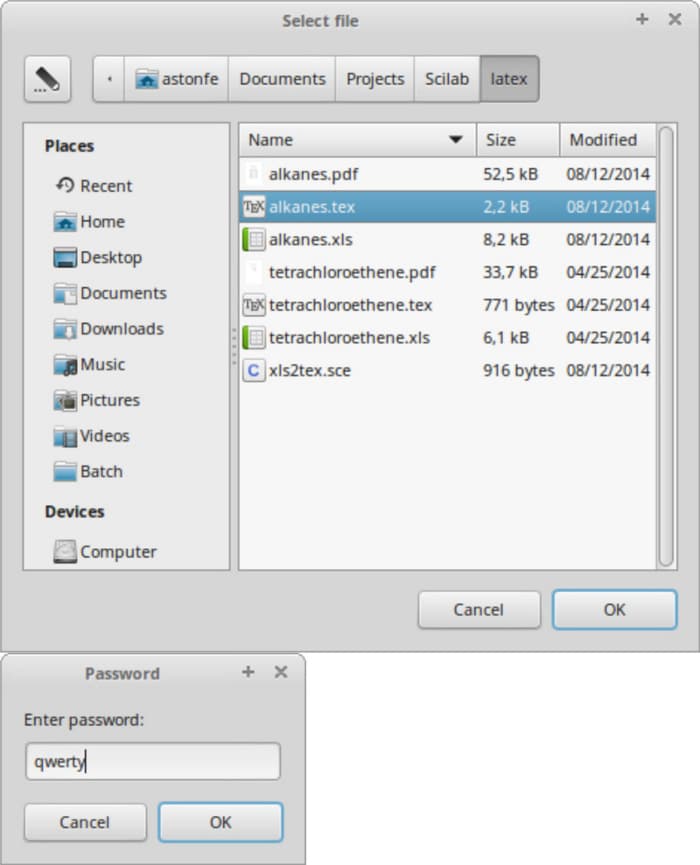
Zenity is free software and a cross-platform program that allows the execution of GTK+ dialogue boxes in the command line and shell scripts (see References 3 and 4), and in Mint, its installed by default. The following bash script can be used to zip (with encryption) one file or one directory:
#!/bin/bash # File archive with AES encryption # F=$(zenity --file-selection --directory --title=Select directory) F=$(zenity --file-selection --title=Select file) P=$(zenity --entry --title=Password --text=Enter password:) 7za a -mem=AES256 -p$P -tzip $F.zip $F
An example is shown in Figure 3 one dialogue box is about the file selection and the other for entering the encryption password. The following script is to unzip an archive:
#!/bin/bash # File extract F=$(zenity --file-selection --title=Select file) P=$(zenity --entry --title=Password --text=Enter password:) 7za e -p$P $F
Im used to using only 7-Zip to zip, because the simplest way to unzip an archive is to use the default archive manager and also because, in the case of an encrypted archive, a prompt for the password is shown.
Efax
The first thing to know is which port your modem is available on. In this example, an external USB modem is considered. From the terminal window, type lsusb and look if the modem is recognised. Its probably recognised on the ttyACM0 port. Sometimes it may not be so easy and further tests may be needed. According to Reference 5, some privilege changes are required:
sudo chmod +s /usr/bin/fax
sudo chmod +s /usr/bin/efax
sudo chmod +s /usr/bin/efix
Then edit the configuration file with sudo gedit (or gvim) /etc/efax.rc and change some options as follows:
DEV=ttyACM0 FROM=[your-faxnumber] NAME=[your-name] PAGE=a4
In the following example for the terminal window, a file called filename.ps is sent to the number 0123456789:
fax send -v 0123456789 filename.ps
With Zenity, the previous operation can be done with the following bash script:
#!/bin/bash # Fax send F=$(zenity --file-selection --title=Select file) N=$(zenity --entry --title=Fax number --text=Enter the fax number:) fax send -v $N $F
I use Efax only to send a fax, so I havent tested it to receive one. More sophisticated faxing solutions are achieved with the Hylafax fax server and with the YajHFC client (Yet another Java HylaFAX client) as reported on http://www.yajhfc.de, but some testing is required mainly for the configuration of Hylafax.
Another example of Zenitys usage is password generation. In Mint, the APG (automated password generator) utility is installed by default, and can be used directly in a terminal window or via a bash script as reported in the following code, which generates N passwords of M length:
#!/bin/bash
# Password generator
M=$(zenity --entry --title='Password' --text='Minimum password length:')
N=$(zenity --entry --title='Password' --text='Generate n passwords:')
apg -a 1 -m $M -n $N
Freeplane, NetBeans and Scilab
Because the software repositories are a bit outdated, it can be interesting to download the latest version directly from the developers website for some applications. Presented here are three examples.
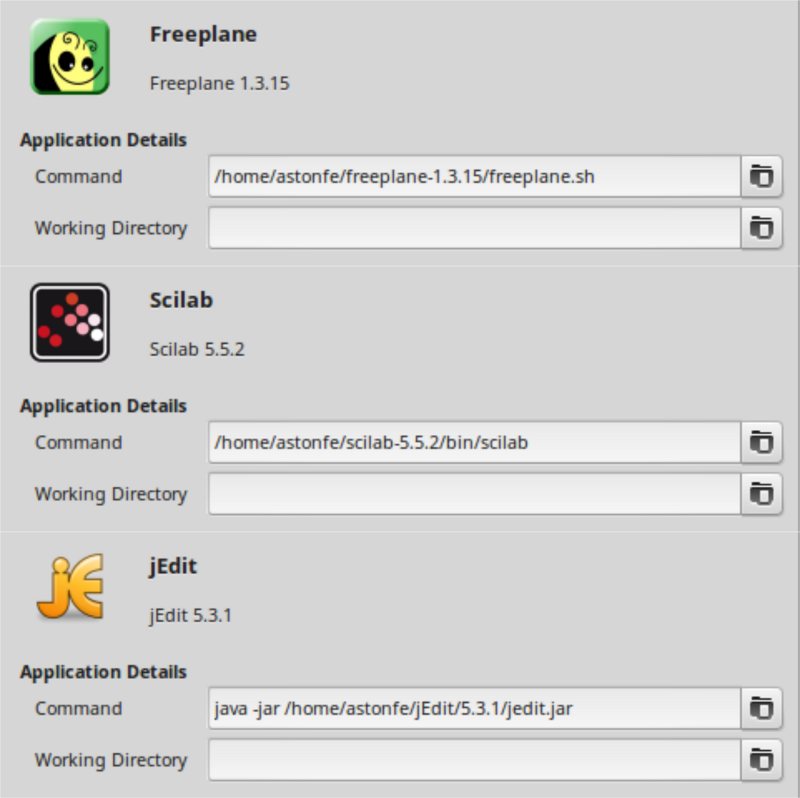
Freeplane is an interesting Java based mind mapping software. Download the latest version freeplane_bin-1.3.15.zip from https://sourceforge.net/projects/freeplane, unpack it in your home directory and then run it using /home/[your-username]/freeplane-1.3.15/freeplane.sh. See the top part of Figure 4 (Settings > Menu editor > Add launcher). The application icon is /home/[your-username]/freeplane-1.3.15/freeplane.svg.
A Java Development Kit must be installed before NetBeans. An easy way is to install openjdk-7-jdk from the Software manager. The last version for Linux netbeans-8.1-linux.sh can be downloaded from https://netbeans.org/downloads. The installation involves the following two steps from the terminal:
chmod +x netbeans-8.1-linux.sh
./netbeans-8.1-linux.sh
During the installation process, be careful to install the NetBeans IDE in /home/[your-username]/netbeans-8.1 and the JDK location thats /usr/lib/jvm/java-7-openjdk-i386
The latest version of Scilab scilab-5.5.2.bin.linux-i686.tar.gz can be downloaded from http://www.scilab.org, which you can then unpack to your home directory. Last of all, run Scilab using /omhe/[your-username]/scilab-5.5.2/bin/scilab (see Figure 4, middle). The application icon is /home/[your-username]/scilab-5.5.2/share/icons/hicolor/256×256/apps/scilab.png
jEdit, Emacs and Vim
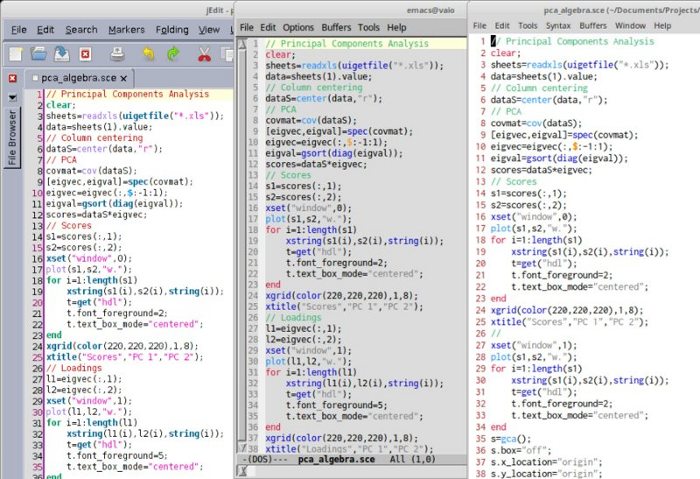
Its not possible to install the last stable version jEdit 5.3.0 due to issues with the preinstalled Java. But its possible to install jEdit 5.3.1 (a development trunk). Download jedit5.3.1install.jar from http://www.tellurianring.com/projects/jedit-daily and then install it from the terminal with java -jar jedit5.3.1install.jar. To run it, simply use java -jar /home/[your-username]/jEdit/5.3.1/jedit.jar (see Figure 4, bottom). The icon is /home/[your-username]/jEdit/5.3.1/doc/jedit.png. If you have your own syntax-highlighting file, you can add it in the modes directory /home/[your-username]/.jedit/modes. In this case, you must also add a row to the catalogue file, for example:
<MODE NAME=scilab FILE=scilab.xml FILE_NAME_GLOB=*.sce />
You can download the last stable release of GNU Emacs emacs-24.5.tar.gz from http://ftp.gnu.org/gnu/emacs and then unpack it to your home directory. Before installing Emacs, its necessary to install the following software:
sudo apt-get install gtklp cups-pdf build-essential libx11-dev xaw3dg-dev libjpeg-dev libpng12-dev libgif-dev libtiff4-dev libncurses5-dev libxft-dev librsvg2-dev libmagickcore-dev libmagick++-dev libxml2-dev libgpm-dev libghc-gconf-dev libotf-dev libm17n-dev libgnutls-dev
The Emacs installation process involves the following steps from the terminal window:
cd /home/[your-username]/emacs-24.5
./configure
make
sudo make install
The two programs, gtklp and cups-pdf, are very useful to simplify the printing from Emacs by adding the following two lines in your dotemacs file /home/[your-username]/.emacs:
(setq lpr-command gtklp ps-lpr-command gtklp)
This way, the printing process is managed by a GTK GUI in which you can print to a PDF file or to a printer. One more thing about the colour themes as an alternative to the adoption of a specific colour theme, I prefer to change only some colours by adding the following code to the dotemacs file:
(custom-set-faces (font-lock-keyword-face ((t (:foreground #0000CD)))) ;; Medium blue (font-lock-type-face ((t (:foreground #DC143C)))) ;; Crimson (font-lock-constant-face ((t (:foreground #FF8C00)))) ;; Dark orange (font-lock-builtin-face ((t (:foreground #1E90FF)))) ;; Dodger blue (font-lock-function-name-face ((t (:foreground #800080)))) ;; Purple (font-lock-string-face ((t (:foreground #808080)))) ;; Gray (font-lock-comment-face ((t (:foreground #3CB371))))) ;; Medium sea green
About Vim, the directory for the colour themes is /usr/share/vim/vim74/colors and for the syntax-highlighting files is /usr/share/vim/vim74/syntax. So, if you have some of them, you must copy your files to these directories. If you want to recognise the lstlisting environment as in Vim 7.3, you can use the following code in /usr/share/vim/vim74/syntax/tex/lstlisting.vim:
let b:loaded_lstlisting=v1b
syn region texZone start=\\begin{lstlisting} end=\\end{lstlisting}\|%stopzone\>
syn region texZone start=\\lstinputlisting end={\s*[a-zA-Z/.0-9_^]\+\s*}
Because the default configuration file is almost empty, edit gvimrc with sudo gedit (or gvim) /etc/vim/gvimrc and paste it as a basic configuration, for example, as in the following lines:
set cryptmethod=blowfish set encoding=utf-8 The encoding displayed set fileencoding=utf-8 The encoding written to file set foldmethod=marker set guifont=Inconsolata\ Medium\ 11 set guioptions-=T set number set textwidth=0 set wrapmargin=0 source $VIMRUNTIME/mswin.vim behave mswin
The last two lines are useful to make the cut, copy and paste commands work as in Windows with Ctrl+X, Ctrl+C and Ctrl+V (see Reference 7).
Installation and configuration of Linux is not as difficult as is sometimes reported. It is possible for GNU Linux to be the only system installed on your computer along with a wide range of great programs. Almost 20 years have passed since the article cited in the introduction was published, and during this time, developers have taken great steps forward. For the future, I hope that LibreOffice will continue to have its present GUI. I also hope that Xfce will have more customisation options.
References
[1] Gonzato, Il free software al lavoro (The free software at work), Byte (Italian edition), 1998, 8, 96-99.
[2] http://en.wikipedia.org/wiki/Media_Transfer_Protocol, last visited on 26/02/2016.
[3] http://en.wikipedia.org/wiki/Zenity, last visited on 26/02/2016.
[4] http://help.gnome.org/users/zenity/stable, last visited on 26/02/2016.
[5] http://www.aldovarotto.org/computer/linux/fax.htm, last visited on 26/02/2016.
[6] Arnote, Just the fax Maam… and it works in Linux!, PCLinuxOS Magazine, 2013, 72, 38-47.
[7] http://superuser.com/questions/10588, last visited on 26/02/2016.


