


If you were born in the 90s, then you must have played the pong game a lot. It is a simple two-dimensional arcade mode game, which replicates real life table tennis. The objective of the game is to strike the ball towards the opponent in such a way that the latter misses it, enabling you to score a point. Since its inception, it has been a very popular arcade game, with an element of artificial intelligence so that you could play it against the computer.
The concept of animation in App Inventor was introduced in our last article and we have demonstrated how a ball can be moved on the screen using the controls. Taking that concept forward, lets now build a complete game from scratch. So without further delay, let’s get into the nitty gritty of building a complete 2D animation game.

The theme of the application
As already described, we will build a pong game for an Android mobile phone using App Inventor 2. The players objective is to hit the ball using the paddle. Here, we will make a slight modification from the conventional game. We will control the paddle at both ends, so that our objective will be to keep the ball between the paddles. Any failure in keeping the ball within the limit will cause us to lose points. As long as we keep the ball in play, our score will keep increasing.
In the last application, you got to know about the various options and features available on the designer or block editor in the App Inventor browser application. We will use that knowledge here along with a few more components.

GUI requirements
For every application, a graphical user interface or GUI helps the user to interact with the on-screen components. How each component responds to user actions is defined in the block editor section.
As per our requirements, we will need the following components:
1. Canvas: The canvas component works as the base for the animation, and it gives a platform over which the object will move according to instructions.
2. Labels: These are the static text components used to display some headings or markings on the screen.
3. Buttons: These let you trigger the event and are very essential components.
4. Ball: This is the in-built component in your App Inventor palette, which will display a ball on the screen. Using its properties, you can set the colour, diameter and various other features of the ball.
5. Image sprite: This is a graphical component, which is the same as the ball component, with the addition that you can assign to it any image to make better graphics and animation. Using the properties of the image sprite component, you can set the colour, diameter and various other features of the image sprite.
6. Clock: This component is responsible for all the timely events. The clock component will repeat a particular action after a fixed duration of time, cyclically.
7. Horizontal arrangement: This keeps all the child components horizontally aligned.
8. Notifier: This is used to display some instructions or give controls over existing components. You will see its functionality in more detail as we will be implementing it in our game.
The table on the right shows the components that we will require for this application. We will drag them on to the designer from the left hand side palette.
1. Drag and drop the components mentioned in the table on the right to the viewer.
2. Visible components can be seen, while the non-visible components will be located beneath the viewer under the tag Non-visible.
3. We have used labels to identify applications.
4. All buttons need to be put within the Horizontal arrangement to keep them aligned horizontally.
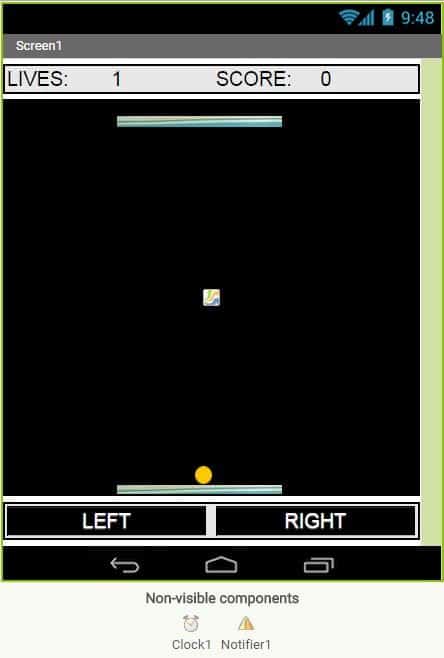
5. If you have dragged and placed everything, the layout will look something like whats shown in Figure 1.
6. Make the necessary property changes like we did while changing the text property for the Label and Button components.
7. Renaming the components helps to identify them in the block editor.
8. Your graphical user interface is now ready. Figure 1 shows how the application will look after the installation.
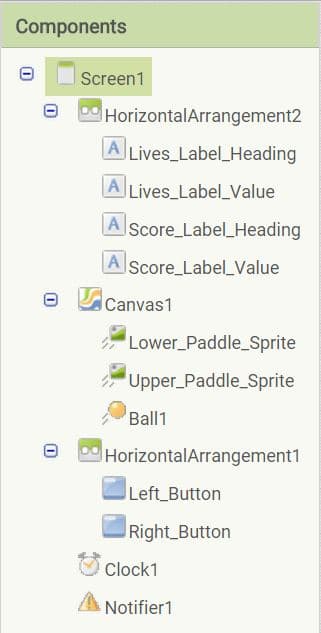
9. Figure 2 shows the hierarchy of the components that we have dragged to the designer.
If you are confused after seeing the designer and the components viewer, let me explain it a bit more. Here is the hierarchy that we have placed for our application.
1. At the top, we have a horizontal arrangement, which has four label components as its child components. Of these, two will be displayed as headings while the other two will be dynamic in nature, which means that their value will change according to the behaviour. For each of the label components, the font is set at 20 points and width is set to fill the parent.
2. Next, we have the canvas component with the width and height to fill the parent. Within this, we have a ball component and two image sprites, namely Upper_paddle_sprite and Lower_paddle_sprite.
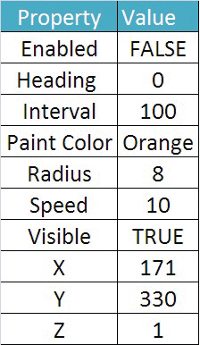
3. For the ball, we have set the properties given in Figure 3 in the designer itself.
4. Both the image sprites will be moving together; hence, they will also have the same set of properties.
5. Next is another horizontal arrangement, which has two buttons with the width set to fill the parent and the height as automatic. Set the text for these buttons accordingly.
6. Then comes the clock component. For the clock, uncheck the enabled property and set the interval as 1 millisecond (1/1000th of a second).
7. For the notifier, keep the default settings as available in the designer.
Now, we move on to the blocks editor to define the behaviour so lets discuss the actual functionality that we expect from the application.
1. We need to code it so that on pressing the Left button the paddles should move towards the left, and vice versa.
2. The ball should move independently over the canvas and on touching the walls or paddles, it should bounce back.
3. Based on the games progress, our score should be increased.
4. We need to keep monitoring the position of the ball, so that if it goes beyond the paddles, we should decrease one point.
5. We should define the basis on which the game ends.
6. As the game finishes, we should display a pop-up enabling the user to choose either to Restart or Quit.
So lets move on and add these behavioural aspects using the block editor. I hope you remember how to switch from the designer to the block editor. There is a button available right above the Properties pane to switch between the designer and block editor.
Block editor blocks
I have already prepared the blocks for you. All you need to do is drag the relevant blocks from the left side palette and drop them onto the viewer. Arrange the blocks in the same way as shown in the images ahead. I will explain what each does and what they are called.
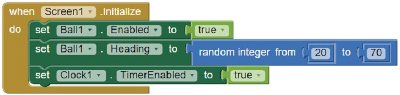
1. The blocks given in Figures 5 to 9 are easy to understand. The very first one (Figure 5) tells us that when the screen is initialised, i.e., the application has started, it should enable the ball, which will head anywhere between 20 to 70 and enable the clock as well.
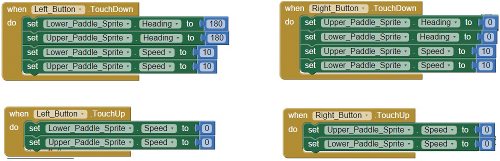
2. Now, by touching the buttons, the paddles move left or right. Here, a touchdown refers to how long the button is kept pressed. Heading 0 means movement towards the left and 180 indicates movement towards the right. If speed is 10, it means it will move 10 pixels per cycle or interval.
3. Once the buttons are released, the movement of paddles is stopped; hence, speed is once again set at 0 for the touchup blocks.
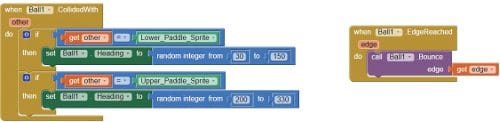
4. Now if the ball collides with the side walls, it has to be sent back. For this we have used the blocks visible in image 3 (Figure 7) for the block editor. As soon as it collides with the wall, it will bounce back. If the collision is with the upper or lower paddles, then it should move back in the opposite direction; hence, we are using a random block to give it a random heading.
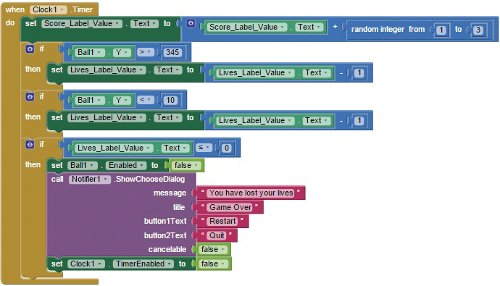
5. The most complex is the fourth block which is for the clock. It says, When clock.timer, which means that when the clock is enabled, it will increase the score and will also check for the position of the ball.
6. Once it detects that the ball has moved outside the boundaries, it will decrease the value of the points label we have set in the designer.
7. When the value of the points is less than or equal to zero, it will display the notifier, along with two options, namely Restart and Quit.
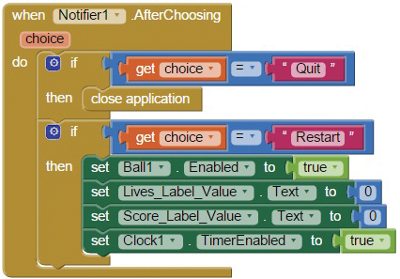
8. The last block is to decide what the user wants to do after the notification. If he or she chooses to restart the game, then the score and points will be reset to their default values, and the clock and ball will be enabled once again. If the Quit button is chosen, then it should close the application.
Now, you are done with the block editor too. Next, we will move to downloading and installing the app on your phone to check how it is working.
Packaging and testing
To test the app, you need to get it on your phone. First, you have to download the application to your computer and then move it to your phone via Bluetooth or USB cable. Ill tell you how to download it.
1. On the top row, click on the Build button. It will show you the option to download the apk to your computer.
2. The progress of the download will be shown and after successful completion, the application will be placed in the download folder of your directory or the location you have set for it.
3. Now you need to get this apk file to your mobile phone either via Bluetooth or via USB cable. Once you have placed the apk file to your SD card, you need to install it. Follow the on-screen instructions to install it. You might get a warning stating that the installation is from an untrusted source. Allow this from the settings and, after successful installation, you will see the icon of your application in the menu of your mobile. Here, you will see the default icon that can be changed, which we will tell you how to do as we move ahead in this course.
I hope your application is working exactly as per your requirements. Now, depending upon your usability and customisation, you can change various things like the image, sound and behaviour, too.
Debugging the application
We have just created the prototype of the application with very basic functionality. What else might the user be interested in? Lets look at various possible cases that require serious care so as not to annoy the user. Consider the following.
1. Wouldnt it be nice to add some background music for the game as well?
2. Rather than starting the game automatically, can we have a control button that needs to be pressed for the game to begin?
3. Can we move the two paddles independently, i.e., with some sort of procedure or method to give it artificial intelligence?
These are some of the scenarios that might occur and users will be pretty happy seeing those implemented.
Think through all these scenarios and how you can integrate these into the application. Do ask me if you fail to accomplish any of the above cases.
You have successfully built another useful Android app for yourself. Happy inventing


i cant make an AI for the game
[…] https://www.opensourceforu.com/2016/04/building-the-pong-game-in-app-inventor-2/ […]