


So far, over the course of the previous articles in this series, we have explored the procedure to set up Chef server, the knife tool, the Chef server-agent and how to validate the installations in a typical sandbox environment. We have also introduced Ruby as a reference language thats used to prepare cookbook scripts for the Chef set-up. In this article, we will continue to provide the necessary details on Ruby scripts and will see how easy it is to prepare cookbook patterns using Ruby to configure, deploy and manage Chef agent nodes in a Chef server. A case study of how a Chef environment was set up on a DevOps Journey by the Standard Bank of South Africa is discussed in brief at the end.
The basics of Ruby
Ruby is a complete programming language that can be used for any programming logic like math, string manipulations, writing business logic, IO operations and more. We have numerous tools such as RubyMine or the NetBeans IDE for writing, testing and validating Ruby scripts inside and outside the Chef container, which is a typical Chef set-up with server configuration that controls all agents and shares cookbook scripts from its store.
In fact, Ruby can be used as a programming language outside Chef Boundary for programming business logic like a Python script, and can be used to test across various platforms like Linux and Windows.
Ruby is bound by a syntax and programming structure and, hence, we need to learn the programming constructs, which is as easy as a Python or Pascal programming construct. We can use the command below to validate the syntax of a given Ruby script:
$ ruby -c test.rb
Syntax OK
As you can see, a Ruby script has the file extension rb. If there is a syntax mistake, the ruby – c command will highlight the syntax error, line by line. Complete Ruby programming tutorial videos by Wild Academy are published online in 37 modules in YouTube at https://www.youtube.com/playlist?list=PLMK2xMz5H5Zv8eC8b4K6tMaE1-Z9FgSOp
Chef Solo
Chef Solo is a standalone tool, which can be used to test Chef scripts without a Chef container. For example, without installing a Chef server-agent, we can write Chef recipes in a standalone environment and run them using Chef Solo. For this, Chef-apply, which is a wrapper tool built on top of Chef Solo, helps in running Chef recipes without a Chef server set-up. Sample code test1.rb is explained below as an example:
[root@magdesklinux ~]# cat test1.rb file file.txt do content This is a test program end
This program creates a file file.txt in the users directory and writes the content command as a text in the file. Chef-apply shows the output, which is a detailed execution of the script.
[root@magdesklinux ~]# chef-apply test1.rb
Recipe: (chef-apply cookbook)::(chef-apply recipe)
* file[file.txt] action create
- create new file file.txt
- update content in file file.txt from none to 31b31c
--- file.txt 2015-11-07 02:28:10.000000000 +0530
+++ /root/magesh/chef/hello.txt20140711-2344-mf17rh
@@ -1 +1,2 @@
+This is a test program
Creating a cookbook
After testing and validating the Ruby script, lets get into the Chef cookbook using Ruby scripts. In a typical Chef set-up, we need to create a cookbook which is a pre-defined structure of Ruby scripts; this can be created using the knife tool as shown below:
[root@magdesklinux ~]# knife cookbook create cookbook1
** Creating cookbook cookbook1
** Creating README for cookbook: cookbook1
** Creating CHANGELOG for cookbook: cookbook1
** Creating metadata for cookbook: cookbook1
The execution of the knife cookbook create cookbook1 command creates the cookbook template, which in turn creates a directory tree structure as shown below:
|
|--CHANGELOG.md
|--metadata.rb
|--README.md
|--attributes
|--definitions
|--files
|--libraries
|--providers
|--recipes
|--resources
|--templates
In the directory tree structure, the recipes directory file is used to keep recipes (also known as installation scripts), which help in installing and configuration application package deployment. The resources directory is used to store the files required for the installation explained above, such as readme files, etc.
There is a pre-defined construct for the Chef script, which is explained in detail here. First, we need to create a package that will be invoked during the installation process. It can be the installation of the code package and/or the configuration package for the required set-up, or an application or service that is required to run as background services.
package def-package do action :install end service service1 do action [ :enable, :start ] end
After preparing the package and service, we can write scripts to install/copy the application package or libraries in the recipes folder and then upload the cookbook into the Chef server using the knife command, as given below:
# knife cookbook upload cookbook1 or # knife cookbook upload a
The given -a option is used to upload all cookbooks as a bulk upload to the Chef server. Once this is done, we need to synchronise the cookbook from the server to all node-agents connected to the Chef server by simply running the commands below in all connected nodes.
[root@magdesklinux ~]# sudo chef-client Starting Chef Client, version 11.8.2 resolving cookbooks for run list: [cookbook1] Synchronizing Cookbooks: - apt - cookbook1 Compiling Cookbooks... Converging 4 resources Recipe: apt::default * execute[apt-get update] action run - execute apt-get update Recipe: cookbook1::default * package[def-package] action install (up to date) * service[service1] action enable - enable service service[service1] * service[service1] action start (up to date) * cookbook_file[/root/magesh/cookbook1/www/index.html] action create (up to date) Chef Client finished, 2 resources updated
Please note that this synchronisation has to be done for each Chef agent, where we need to invoke the installation process.
Life cycle of the Chef server
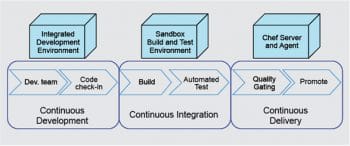
Let us discuss the life cycle of the Chef server in the context of banking software being delivered in real-time. We will have two major processes in operation here, called continuous integration and continuous delivery.
Continuous integration (CI) is the process of taking the latest changes in the code check-in and doing an automated build with peripheral activities like a unit test, code coverage and static code analysis. This can be done with a suite of tools like Teamcity, Hudson or Jenkins. CI has multi-fold build options like incremental, nightly and weekly schedules. In the course of an incremental build, as soon as there is a code change, it is checked into the code repository. For a nightly build, a complete build is done, as against an incremental build, which only builds on recent changes. A weekly build does a complete build along with additional peripheral activities as listed above.
Once the CI is successful, the control of the process in the life cycle will be handed over to the continuous delivery (CD) process. CD is another process which runs through frameworks like Jenkins and is integrated with the Chef server environment. CD takes the build, which is successfully built by CI, and invokes the deployment process to the respective nodes (clients) invoked through Chef agents using the cookbooks, where the instructions for the deployment activity are fed. We can set the invoking script of CD in such a way that it happens only when CI execution is successful, including or excluding peripheral activities. This means, we can invoke CD with build and test execution successful but some testcases failure or build and all testcases successful. Please note that CD will be invoked only when CI execution is successful, and then we can set the success factor to all unit test results being successful or only build being successful.
When we have a code repository linked to the CI server, which is in turn connected to the Chef server for CD, then whenever there is a code change, these automated processes of CI and CD will get triggered, and the nodes will have code packages installed and brought up automatically, using the recipe uploaded to the agent. This can be stopped till the unit integration test stage or the system integration test stage. Also, we can include recipe scripts to trigger automated test beds which run on their own in a typical black box environment. Once the test result is successful, the recipe can take the code build one stage further into the production test environment (a.k.a. user acceptance test).
A real-time DevOps Journey case study
A leading banking house in South Africa was running its IT development for more than a couple of decades on a legacy platform in a heterogeneous environment. This meant that it developed the front-end in AngularJS or Java, the back-end in a mainframe database, and service integration with mainframe systems which had undergone multiple releases over the past 20 years. There were also various supplier and feeder systems running on AIX, UNIX, Linux, etc. There was no control on development costs or on capacity expansion, which in turn cost the bank a lot.
This was studied by the CIO of the bank, and a team comprising business and technical consultants was set up to analyse and propose solutions on improving the IT platform to reduce residual costs incurred during capacity expansion. The CIO also wanted to improve the delivery time lines.
To focus on improving delivery time lines and to improve automated processes at each stage of the development, right up to the delivery stage, the consultant team suggested the formation of a task force which was referred to as the Chop Chop team. Chop Chop means quickly or without delay. The key task of this team was to build a robust DevOps environment for the banking IT infrastructure to fit into the heterogeneous cluster of nodes (servers).
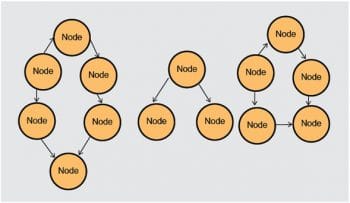
The key idea behind this cluster of nodes or server instances was to prepare the environment in such a way that
- Clients were served by clustered server instances.
- Clustered instances could be automatically increased when load went up, with Chef recipes. A Chef monitoring tool would regularly monitor the load of the system and, depending on the increase, it could achieve resilience by doing a horizontal scaling of cluster nodes automatically using the Chef cookbook for capacity expansion.
- A dedicated cluster could be allocated to each region, if necessary, with standby Chef nodes with agents installed in them, which could be brought up when the need arose.
This approach ensures that whenever continuous integration and continuous delivery is completely integrated, it reduces a lot of the time needed for manual software configuration and management activities like build, versioning and deployment, and also reduces time and effort in quality checks (which are automated in continuous delivery). Moreover, the turnaround is quicker when deploying and preparing the test environment along with the latest code releases. A complete discussion on this case study is available online from the Chef official website Standard Bank: Our DevOps Journey at https://www.chef.io/blog/2015/04/14/standard-bank-our-devops-journey-blog-posts/
Summary
In our first article (OSFY, October 2015), we had started with the basic idea of sandbox environment preparation for the Chef environment. In the second article (OSFY, December 2015), we covered the installation and configuration of the Chef server and agents, and synchronised recipes between them. In this article, we have covered cookbook creation, knife tool usage for recipe templates, and a case study on the implementation of Chef in a heterogeneous environment.
The key idea of this series is to introduce readers to ways in which we can use Chef as a CD tool, automate our build/deployment process in an efficient way to improve the standards in delivery management, and reduce the effort/time in build/deployment and quality check process.
Puppet is an alternate to Chef in the world of CD. Though there are a variety of tools available as competitors to Chef, Puppet is one of the most popular and is equally competent as Chef in terms of handling the customer deployment process with a high rate of flexibility.


