


Smartphones have completely changed the way we perform many everyday tasks. Now we dont cross dates on our paper calendars to remember upcoming events because our phone is smart enough to give us a reminder of the date and time. Similarly, we rarely use paper and pen to note down the small details we want to remember, especially when we are away from home or office. Things can be written on the phone to be checked later. Google Play Store is flooded with so many note-taking apps and each one of them is more advanced than the other.
In this article, we will develop our own digital diary app in App Inventor 2. Using the app, we will be able to note down things instantly to be viewed later, any time and anywhere.
As in all previous issues, lets first discuss the specifications required for the application, the actual requirements and then go on to put things in place. So we will first consider the GUI requirements and the appearance of the app. Once we are clear about the look and feel we want, we will add behaviour to the components.
GUI requirements
We are hoping to give users a chance to create new notes and to view any previously saved notes. For that, we will need to have two independent buttons.
We will require the components given in the table below for this project.
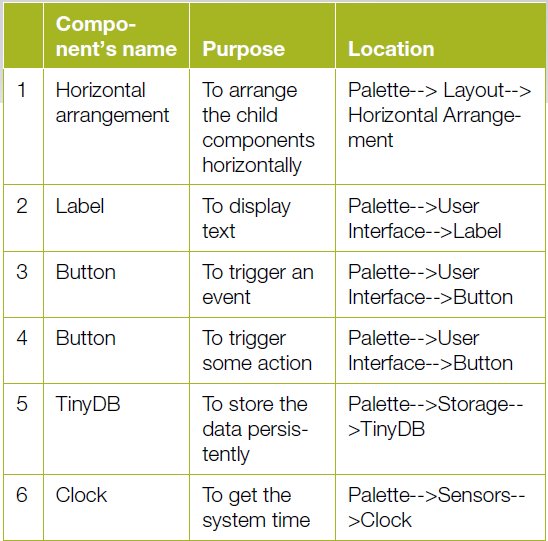
1. Drag and drop the components mentioned in the table above to the viewer.
2. Visible components can be seen by you while the non-visible components will be located beneath the viewer under the tag Non-visible.
3. We have placed a label so as to display the name of the application.
4. All buttons need to be placed within the horizontal arrangement in order to keep them aligned horizontally.
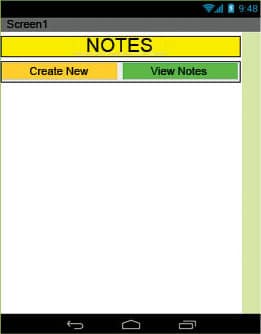
5. If you have dragged and placed everything, the layout will look something like whats shown in Figure 1.
6. Make the necessary property changes as described in earlier articles, to change the text property for label and button components.
7. Renaming the components helps to identify them
in the block editor.
8. So in this way, your graphical user interface is ready. Figure 1 shows what the application will look like after installation. (Figure 1)
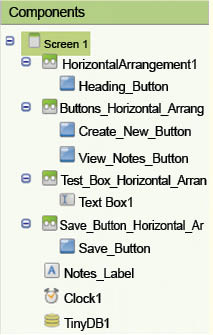
9. Figure 2 shows the hierarchy of the components that we have dragged to the designer.
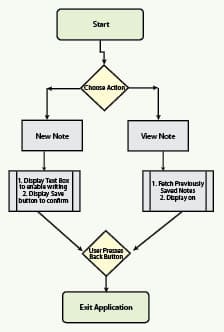
Lets look at the block diagram shown in Figure 3, so that we know what to expect and how various actions will be performed.
Now lets head towards the blocks editor to define the behaviour. Lets discuss the actual functionality that we expect from our application.
1. We need to code it so that on pressing the New Note button, the user is presented with a text box to write the note.
2. When the text box is enabled, we should have the Save button enabled at the same time so that the user can click on it and save the note.
3. On the press of the Save button, the data in the text box should be reflected as a note and it should also be stored in the phone database with the current time stamp.
4. On pressing the View notes button, it should fetch the data from the database and make it visible on the screen.
5. When the user presses the Back button, it should quit the application.
So lets move on and add these behaviours to the app, using the block editor. I hope you remember how to switch from the designer to the block editor. There is a button available right above the Properties pane to switch between the designer and block editor.
Block editor blocks
I have already prepared the blocks for you. All you need to do is to drag the relevant blocks from the left side palette and drop them on the viewer. Arrange the blocks the same way as in the image. I will explain what one does and how it is called.
1. The blocks below are easy to understand. The first one tells us that when the screen is initialised for the first time, there should be only two buttons visible at that time and all the rest should be hidden.
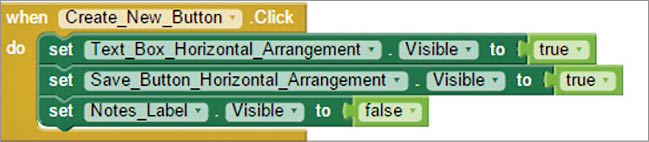
2. When the New Note button is clicked, the text box should be made available so that the user can type the text and the Save button should also be available to click.
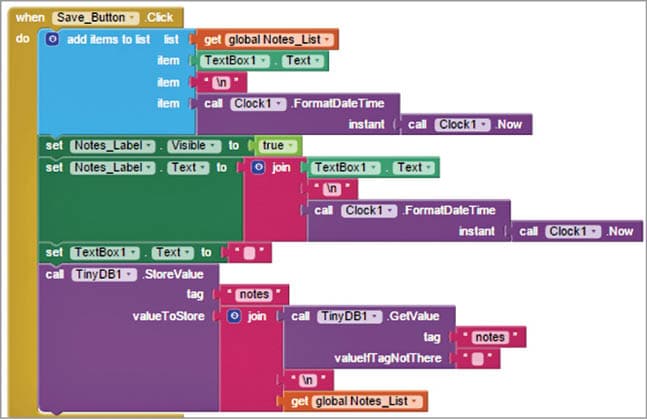
3. When the Save button is clicked, the text written in the text box should be converted into the current note and the note list should be appended with the existing record.
4. The time stamp should be noted to keep track of the note created. The clock component is able to extract this information from the system clock.
5. We are using the phone database so that when the user exits the app, the data should not be lost and for this purpose, we are using the TinyDB component.
6. In the database, we store the data with a tag name so that when we need to fetch it back, it can be accurately received.
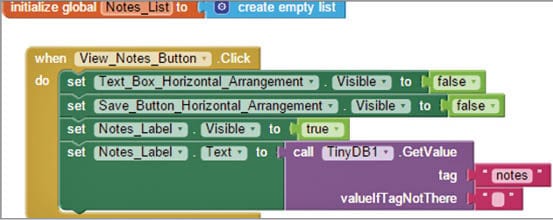
7. When the View notes button is clicked, it should call the database component to get the data from the phone database and display it on the screen.
Now you are done with the block editor too. Next, lets move to download and install the app on the phone to check how it works.

Packaging and testing
To test the app you need to get it on your phone. First, you have to download the application to your computer and then move it to your phone via Bluetooth or USB cable. Ill tell you how to download it.
1. On the top row, click on the Build button. It will give you an option to download the app to your computer.
2. As the downloading begins, you can watch its progress and after it has been successfully done, the application will be placed in the download folder of your directory or the preferred location you have set for it.
3. Now you need to get this apk file to your mobile phone either via Bluetooth or USB cable. Once you have placed the apk file on your SD card you need to install it. Follow the on-screen instructions to install it. You might get some notification or warning about installing from an untrusted source. Allow this from the settings, and after successful installation you will see the icon of your application in the menu of your mobile. Here you will see the default icon which can be changed, as you will learn as we move ahead in this course.
I hope your application is working exactly as per your requirements. Now, depending upon your usability and customisation, you can change various things like images, sound and even behaviour.
Debugging the application
We have just created the prototype of the application with very basic functionality and lets look at what else might interest users. Now come various cases which require serious care so that users are not annoyed by your app. Consider the following cases:
1. Is there any way to edit the previously saved notes?
2. Can we delete any previously saved notes?
3. Rather than directly quitting the application, can we have a confirmation notification before the user completely gets out of the application?
These are some of the scenarios that might occur and the user will be pretty happy seeing those implemented.
Think about all these scenarios and how you can integrate them into the application. Do ask me if you fail to accomplish any of the above cases.
We have successfully built another useful Android app for ourselves. Happy inventing!


Sorry, but have you explained already how to edit the previous entries? I have no idea of how to do it..